11. User Guide to the RUBIK Pi 3 Bluetooth Tool – rubikpi_btapp
11.1 Enable Bluetooth and pair devices
-
Run rubikpi_btapp.
rubikpi_btappThe main menu is output as follows. The main menu shows the rubikpi-btapp functional modules. Type a number to go to the menu of the corresponding function (0: Exit the program, 99: Print help information, 1: Return to the previous level).
BSA_trace 1@ 01/01 00h:31m:18s:746ms: BSA_MgtOpenInitBSA_trace 2@ 01/01 00h:31m:18s:746ms: BSA_MgtOpen (/usr/src/rubikpi-btapp/)Created thread with thread_id= 8119f120BSA_trace 3@ 01/01 00h:31m:18s:746ms: bsa_cl_mgt_initBSA_trace 4@ 01/01 00h:31m:18s:746ms: UIPC_InitBSA_trace 5@ 01/01 00h:31m:18s:746ms: UIPC_Open ChId:3*****************Main Menu menu*******************1 ==>main2 ==>manager3 ==>opp4 ==>a2dp5 ==>pan6 ==>pbap7 ==>sap8 ==>hfp ag9 ==>hfp client10 ==>hfp sw11 ==>av12 ==>data gw13 ==>fm14 ==>ftp15 ==>hid dev16 ==>hid host17 ==>headless18 ==>health19 ==>map20 ==>nsa21 ==>ctn22 ==>3d23 ==>test24 ==>vsc25 ==>ble26 ==>ble_ancs27 ==>ble_cscc28 ==>ble_blp29 ==>ble_eddystone30 ==>ble_hrc31 ==>ble_htp32 ==>ble_pm33 ==>ble_rscc34 ==>ble_tvselect35 ==>ble_wifi99 ==>help0 ==>quit****************************************************Select action => -
Type "2" to go to the manager menu, which contains basic Bluetooth pairing and connection functions. The manager menu is as follows:
Select action => 2*****************manager menu*******************1 ==>main_menu99 ==>help_menu0 ==>quit****************************************************Bluetooth Application Manager menu:2 => Init3 => Abort Discovery4 => Discovery5 => Discovery test6 => Bonding7 => Cancel Bonding8 => Remove device from security database9 => Services Discovery (all services)10 => Device Id Discovery11 => Set local Device Id12 => Get local Device Id13 => Stop Bluetooth14 => Restart Bluetooth15 => Accept Simple Pairing16 => Refuse Simple Pairing17 => Enter BLE Passkey18 => Act As HID Keyboard (SP passkey entry)19 => Read Device configuration20 => Read Local Out Of Band data21 => Enter remote Out Of Band data22 => Set device visibility23 => Set device BLE visibility24 => Set AFH Configuration25 => Set Tx Power Class2 (specific FW needed)26 => Set Tx Power Class1.5 (specific FW needed)27 => Change Dual Stack Mode (currently:DUAL_STACK_MODE_BSA)28 => Set Link Policy29 => Enter Passkey30 => Get Remote Device Name31 => RSSI Measurement32 => Tx Power Measurement33 => Set class of device96 => Kill BSA server97 => Connect to BSA server98 => Disconnect from BSA server0 => ExitSelect action => -
Initialize the manager.
noteOther menus' communication is based on the socket established in the manager. Therefore, initialize the manager before performing operations in other menus.
Type "2" to initialize the manager:
Select action => 2DEBUG: app_mgr_read_config: Enable:1DEBUG: app_mgr_read_config: Discoverable:1DEBUG: app_mgr_read_config: Connectable:1DEBUG: app_mgr_read_config: Name:BSA_HOGPDEBUG: app_mgr_read_config: Bdaddr be:ef:be:ef:25:6aDEBUG: app_mgr_read_config: ClassOfDevice:00:04:24 => Audio/VideoDEBUG: app_mgr_read_config: RootPath:/usr/src/rubikpi-btapp/picturesDEBUG: app_mgr_read_config: Default PIN (4):0000ERROR: app_xml_read_db: open(/usr/src/rubikpi-btapp/bt_devices.xml) failedERROR: app_mgr_read_remote_devices: app_xml_read_db failed:-1ERROR: app_mgr_config: No remote device database foundBSA_trace 6@ 01/01 00h:33m:52s:562ms: BSA_DmGetConfigInitBSA_trace 7@ 01/01 00h:33m:52s:562ms: BSA_DmGetConfigDEBUG: app_mgr_get_bt_config: Enable:1DEBUG: app_mgr_get_bt_config: Discoverable:1DEBUG: app_mgr_get_bt_config: Connectable:1DEBUG: app_mgr_get_bt_config: Name:BSA_HOGPDEBUG: app_mgr_get_bt_config: Bdaddr be:ef:be:ef:25:6aDEBUG: app_mgr_get_bt_config: ClassOfDevice:00:04:24DEBUG: app_mgr_get_bt_config: First host disabled channel:79DEBUG: app_mgr_get_bt_config: Last host disabled channel:79DEBUG: app_mgr_sec_set_security:BSA_trace 8@ 01/01 00h:33m:52s:564ms: BSA_SecSetSecurityInitBSA_trace 9@ 01/01 00h:33m:52s:564ms: BSA_SecSetSecurityAdd all devices found in databaseERROR: app_xml_read_si_db: open(/usr/src/rubikpi-btapp/si_devices.xml) failedERROR: app_read_xml_si_devices: app_xml_read_si_db failed: -1BSA_trace 10@ 01/01 00h:33m:52s:564ms: BSA_DmSetConfigInitDEBUG: app_mgr_set_bt_config: Enable:1DEBUG: app_mgr_set_bt_config: Discoverable:1DEBUG: app_mgr_set_bt_config: Connectable:1DEBUG: app_mgr_set_bt_config: Name:BSA_HOGPDEBUG: app_mgr_set_bt_config: Bdaddr be:ef:be:ef:25:6aDEBUG: app_mgr_set_bt_config: ClassOfDevice:00:04:24DEBUG: app_mgr_set_bt_config: First host disabled channel:79DEBUG: app_mgr_set_bt_config: Last host disabled channel:79BSA_trace 11@ 01/01 00h:33m:52s:565ms: BSA_DmSetConfigBSA_trace 12@ 01/01 00h:33m:52s:676ms: BSA_TmReadVersionInitBSA_trace 13@ 01/01 00h:33m:52s:676ms: BSA_TmReadVersionServer status:0FW Version:3.6.6.1154BSA Server Version:BSA0107_00.26.00_qcom_qcs6490BSA Server Version Information:Use_local_timestamp_for_logs_20240814DEBUG: app_dm_get_dual_stack_mode: Get DualStackModeBSA_trace 14@ 01/01 00h:33m:52s:678ms: BSA_DmGetConfigInitBSA_trace 15@ 01/01 00h:33m:52s:678ms: BSA_DmGetConfigCurrent DualStack mode:DUAL_STACK_MODE_BSASelect action => -
Search for devices.
Type "4" to search for devices available for pairing. (Since communication between the app and service is asynchronous, you will need to wait a moment before the available devices are displayed.)
Select action => 4Start Regular DiscoveryBSA_trace 16@ 01/01 01h:45m:29s:988ms: BSA_DiscStartInitBSA_trace 17@ 01/01 01h:45m:29s:988ms: BSA_DiscStartSelect action => New Discovered device:0Bdaddr:69:00:83:7f:b1:15Name:ClassOfDevice:00:00:00 => Misc deviceServices:0x00000000 ()Rssi:-47DeviceType:BLE InquiryType:BLE AddressType:RandomExtended Information:Flags:0x1a [LE_General Controller_LE/BR/EDR Host_LE/BR/EDR]TxPower:12 dBManufacturer Specific CompanyId:0x004C [Apple, Inc.]:Data: 10 05 65 1C 6D B4 B4............Discovery complete -
Pair devices
Type "6" to go to the bonding menu. The devices previously searched for pairing will be displayed. Type the corresponding device number to pair with the desired device. Then, follow the prompts to type "15" or "16" to confirm whether to accept the pairing (15-Accept, 16-Refuse). Once accepted, the pairing process will be completed.
Dev:0Bdaddr:5a:20:4e:6e:f7:57Name:ClassOfDevice:00:00:00 => Misc deviceRssi:-55......If needed, type "7" to unpair the Bluetooth device.
11.2 Transfer files via Bluetooth
In the main menu, type "3" and press Enter to go to the opp menu for file transfer testing:
Select action => 3

*****************opp menu*******************
         1 ==>main_menu
         99 ==>help_menu
         0 ==>quit
 ****************************************************
Bluetooth Application OPP Menu:
    2 => opp server enable
    3 => opp server disable
    4 => ops enable auto accept
    5 => ops disconnect device
    6 => opp client enable
    7 => opp client disable
    8 => push vcard
    9 => exchange vcard
    10 => pull vcard
    11 => push /usr/src/rubikpi-btapp/test_file.txt
    12 => opc disconnect device
    13 => discovery
    0 => Exit
Select action =>
- Test file receiving
-
The terminal where rubikpi-btapp is run in the previous section is called terminal 1. In another terminal – terminal 2, go to the rubikpi-btapp directory /usr/src/rubikpi-btapp/ and create a new directory push using the following command:
mkdir push -
Go back to terminal 1. In the opp menu, type "2" to enable the opp server.
Select action => 2app_start_opsBSA_trace 6@ 01/01 00h:40m:39s:334ms: BSA_OpsEnableInitBSA_trace 7@ 01/01 00h:40m:39s:334ms: BSA_OpsEnableapp_start_ops Status: 0Select action => -
Type "4" to enable automatic file reception. Then, use the device paired with RUBIK Pi 3 to send a test file. RUBIK Pi 3 will save the received file in the push directory. Once the transfer is complete, you can find the transmitted file in the push directory through terminal 2.
Select action => 4BSA_trace 8@ 01/01 00h:41m:54s:528ms: BSA_OpsAccessInitapp_ops_auto_acceptDEBUG: app_ops_auto_accept: app_ops Auto - oper:1 access:4 Name:/usr/src/rubikpi-btapp/push/BSA_trace 9@ 01/01 00h:41m:54s:528ms: BSA_OpsAccessapp_ops Auto - oper:2 access:4 Name:/usr/src/rubikpi-btapp/pull/Abdul Iqbal.vcfBSA_trace 10@ 01/01 00h:41m:54s:530ms: BSA_OpsAccessSelect action => -
Type "3" to disable the server.
Select action => 3app_stop_opsBSA_trace 11@ 01/01 00h:42m:52s:588ms: BSA_OpsDisableInitBSA_trace 12@ 01/01 00h:42m:52s:588ms: BSA_OpsDisableSelect action =>
- Test file sending
-
In terminal 2, go to the rubikpi-btapp path usr/src/rubikpi-btapp/, create a file test_file.txt for the sending test, and run the following command to write the content to the file:
touch ./test_file.txtecho RUBIKPI_TEST > test_file.txt -
Go back to terminal 1. In the opp menu, type "6" to enable the opp client.
Select action => 6app_opc_startBSA_trace 13@ 01/01 00h:44m:27s:670ms: BSA_OpcEnableInitBSA_trace 14@ 01/01 00h:44m:27s:670ms: BSA_OpcEnableapp_opc_start Status: 0Select action => -
Type "11" to get ready to send the test file. Select the number of the device to which you want to send the file and press Enter. The device will be ready to receive the file. After the file is received, type "7" to disable the client.
11.3 Test Bluetooth audio
-
Audio playback test
-
In the main menu, type "11" to go to av mode:
Select action => 11*****************av menu*******************1 ==>main_menu99 ==>help_menu0 ==>quit****************************************************Bluetooth Application AV menuAV Point To Point menu:2 => Abort Discovery3 => Start Discovery4 => Display local source points5 => AV Register (Create local source point)6 => AV DeRegister (Remove local source point)7 => AV Open (Connect)8 => AV Close (Disconnect)9 => AV Play AVK Stream10 => AV Play Tone11 => AV Toggle Tone12 => AV Play File13 => AV Start Playlist14 => AV Play Microphone15 => Accept Request16 => Refuse Request17 => AV Stop18 => AV Pause19 => AV Resume20 => AV Send RC Command (Inc Volume)21 => AV Send RC Command (Dec Volume)22 => AV Close RC23 => AV Send Absolute Vol RC Command24 => AV Configure UIPC25 => AV Change Content Protection (Currently:NONE)26 => AV Test SEC codec27 => AV Set Tone sampling frequency28 => AV Send Meta Response to Get Element Attributes Command29 => AV Send Meta Response to Get Play Status Command30 => AV Send Metadata Change Notifications31 => Change AV file for PTS test32 => Reset folder location for PTS test0 => ExitDEBUG: app_uipc_tx_thread: Starting UIPC Tx threadDEBUG: app_uipc_tx_thread: Waiting for play startDEBUG: app_playlist_create: New file Audio file found:2c.wavDEBUG: app_playlist_create: New file Audio file found:Remix_48K_2ch_16bit.wavWAV format of: /usr/src/rubikpi-btapp/test_files/av/2c.wavcodec(PCM) ch(2) bits(16) rate(44100)WAV format of: /usr/src/rubikpi-btapp/test_files/av/Remix_48K_2ch_16bit.wavcodec(PCM) ch(2) bits(16) rate(48000)app_av_cb.soundfile_list_size:2BSA_trace 6@ 01/01 00h:46m:41s:124ms: BSA_AvEnableInitBSA_trace 7@ 01/01 00h:46m:41s:124ms: BSA_AvEnableBSA_trace 8@ 01/01 00h:46m:41s:127ms: BSA_AvRegisterInitBSA_trace 9@ 01/01 00h:46m:41s:127ms: BSA_AvRegisterBSA_trace 10@ 01/01 00h:46m:41s:134ms: UIPC_Open ChId:5BSA_trace 11@ 01/01 00h:46m:41s:134ms: uipc_rb_open name:rb_av id:5 size:20001 flags:x2BSA_trace 12@ 01/01 00h:46m:41s:134ms: uipc_rb_open: Size = 20001BSA_trace 13@ 01/01 00h:46m:41s:134ms: uipc_rb_open: Buffer = 0x7f97074010BSA_trace 14@ 01/01 00h:46m:41s:134ms: uipc_rb_open: semid = 0BSA_trace 15@ 01/01 00h:46m:41s:134ms: uipc_rb_open: wr_lockid = 1BSA_trace 16@ 01/01 00h:46m:41s:134ms: uipc_rb_open: wr_lockid.val = 20000BSA_trace 17@ 01/01 00h:46m:41s:134ms: uipc_cl_av_open AV channel openedBSA_trace 18@ 01/01 00h:46m:41s:134ms: UIPC_Ioctl ChId:5 Request:UIPC_WRITE_BLOCK (3)BSA_trace 19@ 01/01 00h:46m:41s:134ms: BSA_AvRegisterInitBSA_trace 20@ 01/01 00h:46m:41s:134ms: BSA_AvRegisterSelect action => -
Type "3" to start discovering Bluetooth audio devices and wait for the discovery to complete.
-
Type "7" to go to connect mode.
Select action => 7Bluetooth AV Open menu:0 Device from XML database (already paired)1 Device found in last discoverySelect source => -
Type "1", find the device you want to connect from the discovered ones, type the corresponding device number, and start paring. The following example uses dev 0 as a reference.
Select source => 1Dev:0Bdaddr:60:6b:4d:3e:93:26Name:ClassOfDevice:00:00:00 => Misc deviceRssi:-65Dev:1......Select device => -
Type "15" or "16" to confirm whether to accept the connection request.
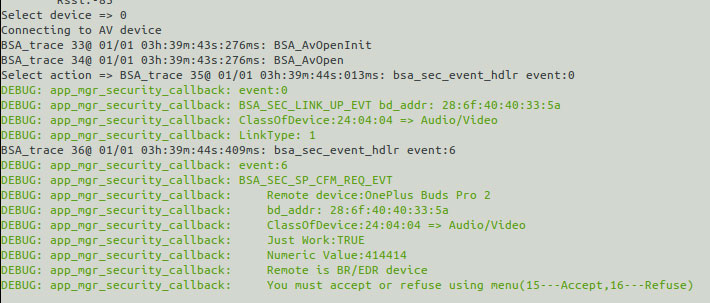
After accepting the connection request, the pairing process begins until the Bluetooth device is successfully connected.
-
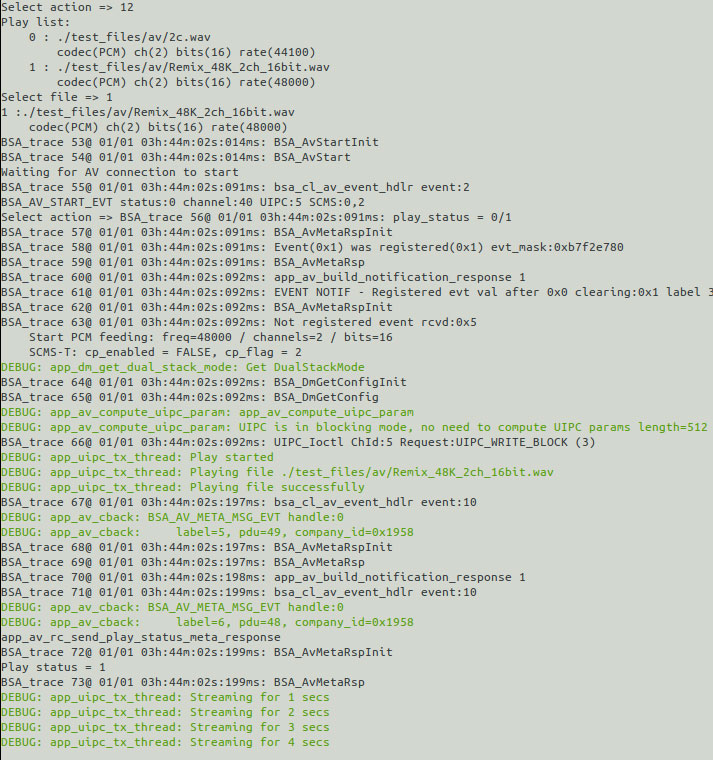
Type "12" to go to the playback menu, select the desired test audio, and start playback. The Bluetooth audio device will output sound.
-
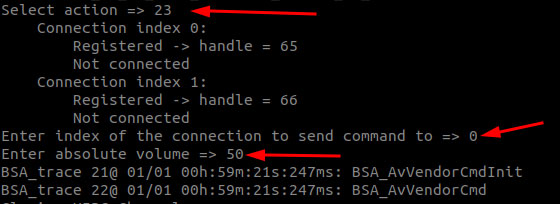
While playing Bluetooth audio, you can adjust the volume by sequentially entering "23 > 0 > volume value." The volume range is from 0 to 100.
-
-
Bluetooth recording test
-
In the main menu, type "8" to go to ag mode. The ag menu is as follows:
Select action => 8*****************hfp ag menu*******************1 ==>main_menu99 ==>help_menu0 ==>quit****************************************************Bluetooth Application HFP AG menu:2 => Initialize3 => Deinitialize4 => Discover Headset5 => Enable6 => Disable7 => Register8 => Deregister9 => Connect10 => Disconnect11 => Open audio12 => Close audio13 => Record audio file15 => Accept Request16 => Refuse Request14 => Stop record audio file17 => Play audio file18 => Stop Playing audio file19 => Display SCO route config20 => Indicate incoming call21 => PickUp call22 => HangUp call0 => QuitSelect action => -
Type "2" to initialize ag mode.
-
Type "4" to discover the Bluetooth headset and wait for the discovery to complete.
-
Type "9" to go to the connect menu.
Select action => 9DEBUG: app_ag_open: EnteringBluetooth AG menu:0 Device from XML database (already paired)1 Device found in last discoverySelect source => -
Type "1" to select the device you want to connect from the discovered ones.
-
Type the device number to start connection.
-
Type "15" or "16" to confirm whether to accept the connection.
You must accept or refuse using menu(15---Accept,16---Refuse) -
Type "11" to open the SCO link.
In another terminal – terminal 3, run the following commands:
systemctl stop pulseaudio#Start recording audio from the Bluetooth headset microphone.agmcap /home/root/my.wav -D 100 -d 101 -r 16000 -b 16 -c 1 -i MI2S-LPAIF_VA-TX-PRIMARY -dkv 0xA3000003 -p 120 -n 2#Press Ctrl+C to stop recording.systemctl start pulseaudioThe recorded audio is saved at /home/root/my.wav.
mkdir /data/misc/display -pexport PATH=/usr/bin:$PATHexport EXTRALAYERS="meta-qcom-qim-product-sdk"export MACHINE=qcm6490-idpexport DISTRO=qcom-waylandsource setup-environmentexport CUST_ID="213195"export FWZIP_PATH="/home/scm/prj/6490PI/src/vendor/thundercomm/prebuilt/BP-BINs"export BB_ENV_PASSTHROUGH_ADDITIONS="$BB_ENV_PASSTHROUGH_ADDITIONS FWZIP_PATH CUST_ID"export PATH=/usr/bin:$PATHexport EXTRALAYERS="meta-qcom-qim-product-sdk"export MACHINE=qcm6490-idpexport DISTRO=rubikpi-debiansource setup-environmentexport CUST_ID="213195"export FWZIP_PATH="/home/scm/prj/6490PI/src/vendor/thundercomm/prebuilt/BP-BINs"export BB_ENV_PASSTHROUGH_ADDITIONS="$BB_ENV_PASSTHROUGH_ADDITIONS FWZIP_PATH CUST_ID" -
11.4 Check the software version
Run rubikpi_btapp with the parameter -v to view the version information:
rubikpi_btapp -v