运行示例应用程序
魔方派 Ubuntu24.04 包括各种示例应用程序。相关详细信息,请参见 人工智能、摄像头软件、机器人开发章节。
您可以运行这些应用程序:
- 运行应用程序可能会带来高负载运算,为了您更好的体验,请加装风扇。
- 要运行多媒体和 AI 应用程序,请设置 Wi-Fi 并建立 SSH 连接。
- 要查看显示输出,请将 HDMI 显示屏连接到魔方派 3 HDMI 端口(参见 连接 HDMI 显示器)。
- 要启用音频,请参见魔方派 音频 章节。
示例程序运行前提条件
在运行示例程序前,需要使能 Weston 显示,用来启用完整的摄像头和 AI 功能,使能步骤如下:
-
更新并安装依赖项。
sudo apt update && sudo apt upgrade -
安装 Weston 并测试基本显示功能。
- 安装 Weston 和相关软件包。
sudo apt install weston-autostart gstreamer1.0-qcom-sample-apps gstreamer1.0-tools qcom-fastcv-binaries-dev qcom-video-firmware weston-autostart libgbm-msm1 qcom-adreno1
sudo reboot- 以root用户身份设置显示环境。
sudo -i
export XDG_RUNTIME_DIR=/run/user/$(id -u ubuntu) -
插上HDMI屏幕,稍等片刻,Weston 桌面就会显示在屏幕上。
备注如果 Weston 桌��面未正常显示,请尝试在魔方派终端中输入
sudo dpkg-reconfigure weston-autostart命令。 -
要测试图形,请运行示例应用。以下示例运行 Weston-simple-egl 示例。
weston-simple-egl
运行多媒体示例应用程序
多媒体示例应用程序展示了魔方派设备上的摄像头、显示器和视频流的用例。
- 多摄像头流传输或编码(行车记录仪)
- 多通道视频解码与合成(视频墙)
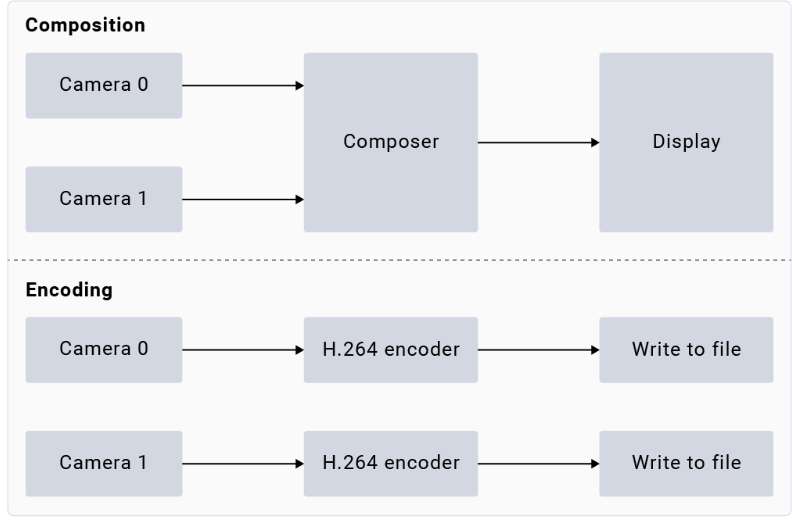
gst-multi-camera-example 命令行应用程序展示了从魔方派 3 设备上的两个摄像头传感器同时进行流传输。该应用程序将摄像头传输的流进行并排合成并显示在显示器上,或将视频流进行编码并存储到文件中。
使用示例
运行前请 使能 Weston 显示,要启动应用程序,请从 SSH 终端运行以下用例:
-
安装摄像头相关软件
-
将魔方派 PPA 添加到 Ubuntu 源,并更新软件包列表
sudo sed -i '$a deb http://apt.thundercomm.com/rubik-pi-3/noble ppa main' /etc/apt/sources.list
sudo apt update -
安装摄像头软件
sudo apt install -y qcom-ib2c qcom-camera-server qcom-camx
sudo apt install -y rubikpi3-cameras
sudo chmod -R 755 /opt
sudo mkdir -p /var/cache/camera/
sudo touch /var/cache/camera/camxoverridesettings.txt
sudo sh -c 'echo enableNCSService=FALSE >> /var/cache/camera/camxoverridesettings.txt'
-
-
要在 HDMI 显示器上查看示例应用程序,请运行以下 export 命令:
export XDG_RUNTIME_DIR=/run/user/$(id -u ubuntu)/ && export WAYLAND_DISPLAY=wayland-1备注如果 Weston 未自动启用,请启动两个安全 shell 实例:一个用于启用 Weston,另一个用于运行应用程序。
-
要启用 Weston,请在第一个 shell 中运行以下命令:
export GBM_BACKEND=msm && export XDG_RUNTIME_DIR=/run/user/$(id -u ubuntu)/ && mkdir -p $XDG_RUNTIME_DIR && weston --continue-without-input --idle-time=0 -
要设置 Wayland Display 环境,请在第二个 shell 中运行以下命令:
export XDG_RUNTIME_DIR=/run/user/$(id -u ubuntu)/ && export WAYLAND_DISPLAY=wayland-1
-
-
要查看
waylandsink输出,请运行以下命令:gst-multi-camera-example -o 0 -
要存储编码器输出,请执行以下操作:
-
运行以下命令:
gst-multi-camera-example -o 1设备将编码后的文件分别存储在
/opt/cam1_vid.mp4和/opt/cam2_vid.mp4中,分别用于摄像头 1 和摄像头 2。 -
要从主机提取文件,请运行以下命令:
scp ubuntu@<IP address of target device>:/opt/cam1_vid.mp4 <destination directory> -
要播放编码器输出,可以使用任何支持 MP4 文件的媒体播放器。
-
-
要停止用例,请按 CTRL + C。
-
要显示可用的帮助选项,可运行以下命令:
gst-multi-camera-example --help -
GST_DEBUG环境变量控制 GStreamer 调试输出。设置所需级别以允许日志记录。例如,要记录所有警告,可运行以下命令:export GST_DEBUG=2
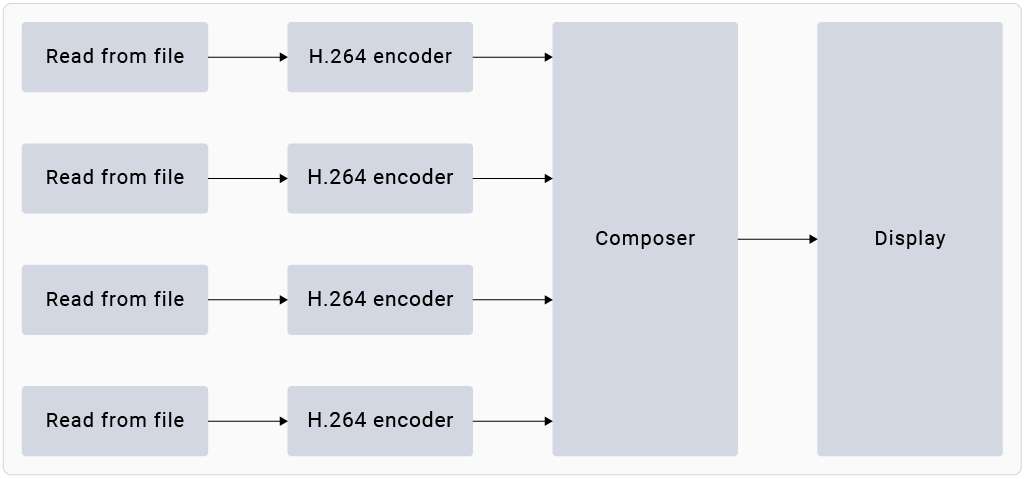
gst-concurrent-videoplay-composition 命令行应用程序允许对 AVC 编码的视频进行并发视频解码和播放,并将它们组合在显示器上用于视频墙应用。该应用程序至少需要一个输入视频文件,该文件��应为 AVC codec 编码的 MP4 文件。
运行前请 使能 Weston 显示,要启动应用程序,请从 SSH 终端运行以下用例:
-
安装摄像头相关软件
-
将魔方派 PPA 添加到 Ubuntu 源,并更新软件包列表。
sudo sed -i '$a deb http://apt.thundercomm.com/rubik-pi-3/noble ppa main' /etc/apt/sources.list
sudo apt update -
安装摄像头软件。
sudo apt install -y qcom-ib2c qcom-camera-server qcom-camx
sudo apt install -y rubikpi3-cameras
sudo chmod -R 755 /opt
sudo mkdir -p /var/cache/camera/
sudo touch /var/cache/camera/camxoverridesettings.txt
sudo sh -c 'echo enableNCSService=FALSE >> /var/cache/camera/camxoverridesettings.txt'
-
-
要将 AVC 编码的 MP4 (H.264) 格式的预先录制或测试视频(文件名为
<file_name>)传输到您的设备,可在主机上运行以下命令:scp <file_name> ubuntu@[DEVICE IP-ADDR]:/opt/ -
要在 HDMI 显示器上查看示例应用程序,请从 SSH 终端运行以下 export 命令:
export XDG_RUNTIME_DIR=/run/user/$(id -u ubuntu)/ && export WAYLAND_DISPLAY=wayland-1
如果 Weston 未自动启用,请启动两个安全 shell 实例:一个用于启用 Weston,另一个用于运行应用程序。
-
要启用 Weston,请在第一个 shell 中运行以下命令:
export GBM_BACKEND=msm && export XDG_RUNTIME_DIR=/run/user/$(id -u ubuntu)/ && mkdir -p $XDG_RUNTIME_DIR && weston --continue-without-input --idle-time=0 -
要设置 Wayland Display 环境,请在第二个 shell 中运行以下命令:
export XDG_RUNTIME_DIR=/run/user/$(id -u ubuntu)/ && export WAYLAND_DISPLAY=wayland-1
- 要启动四通道并发播放,请运行以下命令:
gst-concurrent-videoplay-composition -c 4 -i /opt/<file_name1>.mp4 -i /opt/<file_name2>.mp4 -i /opt/<file_name3>.mp4 -i /opt/<file_name4>.mp4
-
-c:指定要解码并合成的流的数量,可以是 2、4 或 8。 -
-i:指定输入视频文件的绝对路径。
- 要停止用例,请按 s Ctrl + C。
- 要显示可用的帮助选项,请运行以下命令:
gst-concurrent-videoplay-composition --help
GST_DEBUG环境变量控制 GStreamer 调试输出。设置所需级别以允许记录日志。例如,要记录所有警告,可运行以下命令:
export GST_DEBUG=2
运行 AI 示例应用程序
AI 示例应用程序展示了在魔方派 3 设备上对来自摄像头、视频文件或实时流传输协议 (RTSP) 流的输入流进行对象检测和并行推理的用例。要运行这些示例应用程序,您必须从 Qualcomm® AI Hub 获取 AI 模型并从 GitHub 获取标签。该过程包括下载模型和标签、将它们传输到魔方派 3 设备以及运行示例应用程序。

前提条件
设备上需要有模型和标签文件才能运行 AI 示例应用程序。
步骤
运行前请 使能 Weston 显示,要启动应用程序,请从 SSH 终端运行以下用例:
-
安装摄像头相关软件
-
将魔方派 PPA 添加到 Ubuntu 源,并更新软件包列表。
sudo sed -i '$a deb http://apt.thundercomm.com/rubik-pi-3/noble ppa main' /etc/apt/sources.list
sudo apt update -
安装摄像头软件。
sudo apt install -y qcom-ib2c qcom-camera-server qcom-camx
sudo apt install -y rubikpi3-cameras
sudo chmod -R 755 /opt
sudo mkdir -p /var/cache/camera/
sudo touch /var/cache/camera/camxoverridesettings.txt
sudo sh -c 'echo enableNCSService=FALSE >> /var/cache/camera/camxoverridesettings.txt'
-
-
您需要以下用于 AI 示例应用程序的模型:
Sample Application Required Model Required label file AI object detection yolov8_det_quantized.tflite yolonas.labels Parallel AI inference yolov8_det_quantized.tflite yolov8.labels Parallel AI inference inception_v3_quantized.tflite classification.labels Parallel AI inference hrnet_pose_quantized.tflite hrnet_pose.labels Parallel AI inference deeplabv3_plus_mobilenet_quantized.tflite deeplabv3_resnet50.labels -
下载并运行自动化脚本以获取设备上的模型和标签文件:
curl -L -O https://raw.githubusercontent.com/quic/sample-apps-for-qualcomm-linux/refs/heads/main/download_artifacts.shchmod +x download_artifacts.sh./download_artifacts.sh -v GA1.4-rel -c QCS6490
YOLOv8 模型不是脚本的一部分。您需要使用 Qualcomm AI Hub API 导出这些模型。
-
从 Qualcomm AI Hub 导出 YOLOv8。
按照这些说明,将模型导出到您的主机上。您还可以通过 Windows Subsystem for Linux (WSL) 在 Windows 上运行这些指令,或在 macOS 上设置 Ubuntu 22.04 虚拟机。有关更多详细信息,请参阅虚拟机搭建指南。
-
获取用于导出模型的 shell 脚本:
wget https://raw.githubusercontent.com/quic/sample-apps-for-qualcomm-linux/refs/heads/main/scripts/export_model.sh -
更新脚本权限以使其可执行:
chmod +x export_model.sh -
使用您的 Qualcomm AI Hub API 令牌作为 --api-token 参数的值运行 export 脚本:
./export_model.sh --api-token=<Your AI Hub API Token>
备注您可以在 account settings 中找到您的 Qualcomm AI Hub API 令牌。
-
该脚本会将模型下载到 build 目录。使用以下命令将这些模型复制到设备的 /etc/models/ 目录:
scp <working directory>/build/yolonas_quantized/yolonas_quantized.tflite ubuntu@<IP address of target device>:/etc/models/scp <working directory>/build/yolov8_det_quantized/yolov8_det_quantized.tflite ubuntu@<IP address of target device>:/etc/models/
-
-
更新 JSON 文件中量化 LiteRT 模型的
q_offset和q_scale常量。有关说明,请参阅获取模型常量。 -
使用以下命令将下载的模型文件推送到设备上:
scp <model filename> ubuntu@<IP addr of the target device>:/etc/models示例:
wget https://thundercomm.s3.dualstack.ap-northeast-1.amazonaws.com/uploads/web/rubik-pi-3/tools/rubikpi3_ai_sample_apps_models_labels.zip
unzip rubikpi3_ai_sample_apps_models_labels.zip
cd rubikpi3_ai_sample_apps_models_labels
scp inception_v3_quantized.tflite ubuntu@<IP addr of the target device>:/etc/models/
scp yolonas.labels ubuntu@<IP addr of the target device>:/etc/labels/ -
使用以下命令为测试视频创建目录:
ssh ubuntu@<ip-addr of the target device>mount -o remount, rw /usrmkdir /etc/media/ -
从主机将测试视频文件推送到设备:
scp <filename>.mp4 ubuntu@<IP address of target device>:/etc/media/
- AI 目标检测
- 并行 AI 推理
gst-ai-object-detection 示例应用程序展示了对来自摄像头、视频文件或 RTSP 流的输入流执行目标检测的硬件能力。该 pipeline 接收输入流,对其进行预处理,在 AI 硬件上运行推理,并在屏幕上显示结果。
使用示例
必须将模型和标签文件推送到设备才能运行示例应用程序。有关详细信息,请参阅 过程。
-
开始新的 SSH 会话并启动 HDMI 显示器(如果尚未启动):
ssh ubuntu@<ip-addr of the target device> -
要在 HDMI 显示器上查看示例应用程序,请从 SSH 终端运行以下 export 命令:
export XDG_RUNTIME_DIR=/run/user/$(id -u ubuntu)/ && export WAYLAND_ DISPLAY=wayland-1
如果 Weston 未自动启用,请启动两个安全 shell 实例:一个用于启用 Weston,另一个用于运行应用程序。
-
要启用 Weston,请在第一个 shell 中运行以下命令:
export GBM_BACKEND=msm && export XDG_RUNTIME_DIR=/run/user/$(id -u ubuntu)/ && mkdir -p $XDG_RUNTIME_DIR && weston --continue-without-input --idle-time=0 -
要设置 Wayland Display 环境,请在第二个 shell 中运行以下命令:
export XDG_RUNTIME_DIR=/run/user/$(id -u ubuntu)/ && export WAYLAND_DISPLAY=wayland-1
- 编辑您设备上的
/etc/configs/config_detection.json文件。
{
   "file-path": "/etc/media/video.mp4",
   "ml-framework": "tflite",
   "yolo-model-type": "yolov8",
   "model": "/etc/models/yolov8_det_quantized.tflite",
   "labels": "/etc/labels/yolonas.labels",
   "constants": "YOLOv8,q-offsets=<21.0, 0.0, 0.0>,q-scales=<3.0546178817749023, 0.003793874057009816, 1.0>;",
   "threshold": 40,
   "runtime": "dsp"
}
| 字段 | 值/描述 |
|---|---|
| ml-framework | |
| snpe | 使用 Qualcomm® Neural Processing SDK 模型 |
| tflite | 使用 LiteRT 模型 |
| qnn | 使用 Qualcomm® AI Engine direct 模型 |
| yolo-model-type | |
| yolov5 yolov8 yolonas | 分别运行 YOLOv5、YOLOv8 和 YOLO-NAS 模型。参见示例模型和标签文件。 |
| runtime | |
| cpu | 在 CPU 上运行 |
| gpu | 在 GPU 上运行 |
| dsp | 在数字信号处理器 (DSP) 上运行 |
| Input source | |
| camera | 0 – 主摄像头 1 – 辅助摄像头 |
| file-path | 视频文件的目录路径。 |
| rtsp-ip-port | RTSP 流的地址,格式为 rtsp://<ip>:/<stream> |
-
要启动应用程序,请运行以下命令:
gst-ai-object-detection
-
要停止用例,请按s Ctrl + C.
-
要显示可用的帮助选项,请运行以下命令:
gst-ai-object-detection -h -
GST_DEBUG环境变量控制 GStreamer 调试输出。设置所需级别以允许记录日志。例如,要记录所有警告,可运行以下命令:export GST_DEBUG=2
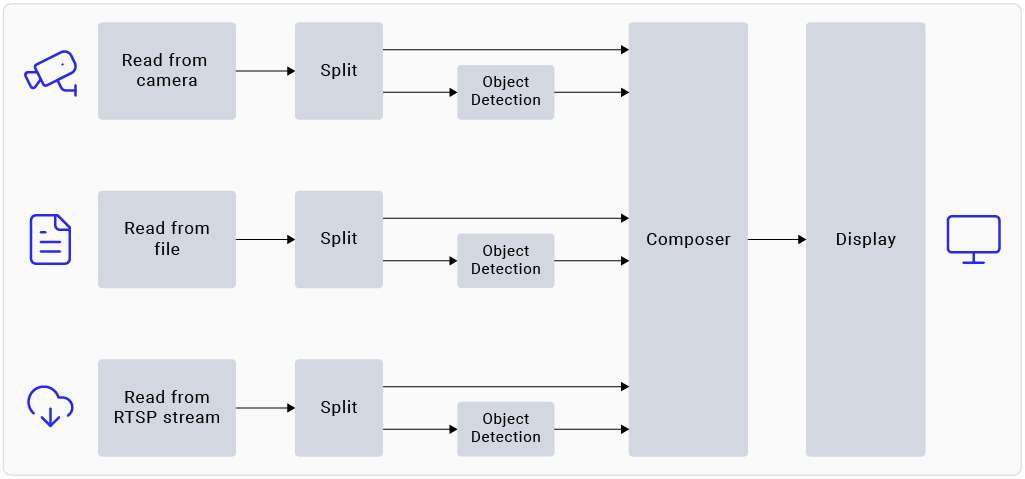
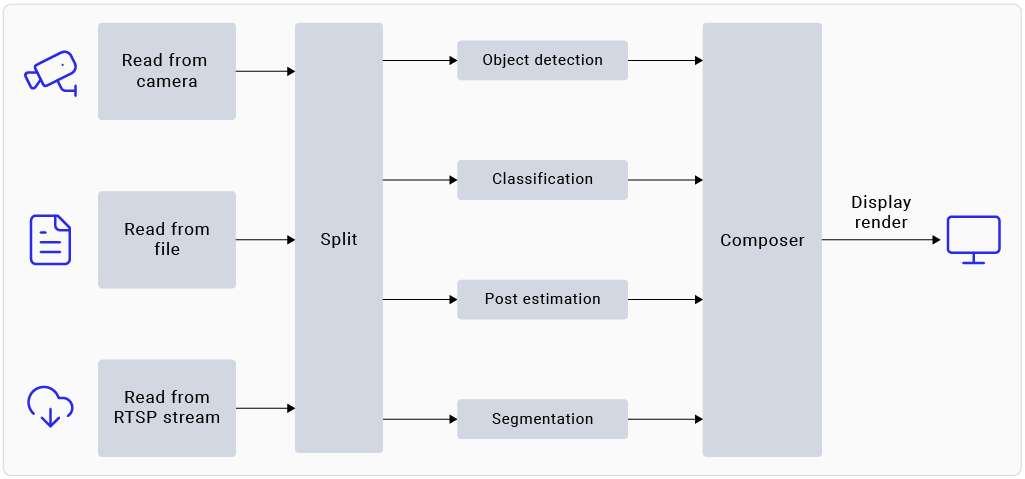
gst-ai-parallel-inference 命令行应用程序演示了对来自摄像头、视频文件或 RTSP 流的输入流执行四个并行 AI 推理的硬件功能。该 pipeline 检测目标、对目标进行分类、检测姿态、并在输入流上分割图像。屏幕并排显示结果。
使用示例
必须将模型和标签文件推送到设备才能运行示例应用程序。有关详细信息,请参阅 程序.
- 开始新的 SSH 会话并启动 HDMI 显示器(如果尚未启动):
ssh ubuntu@<ip-addr of the target device>
- 要在 HDMI 显示器上查看示例应用程序,请从 SSH 终端运行以下 export 命令:
export XDG_RUNTIME_DIR=/run/user/$(id -u ubuntu)/ && export WAYLAND_ DISPLAY=wayland-1
如果 Weston 未自动启用,请启动两个安全 shell 实例:一个用于启用 Weston,另一个用于运行应用程序。
-
要启用 Weston,请在第一个 shell 中运行以下命令:
export GBM_BACKEND=msm && export XDG_RUNTIME_DIR=/run/user/$(id -u ubuntu)/ && mkdir -p $XDG_RUNTIME_DIR && weston --continue-without-input --idle-time=0 -
要设置 Wayland Display 环境,请在第二个 shell 中运行以下命令:
export XDG_RUNTIME_DIR=/run/user/$(id -u ubuntu)/ && export WAYLAND_DISPLAY=wayland-1
- 使用以下命令将下载的模型文件推送到设备上:
scp <model filename> ubuntu@<IP addr of the target device>:/etc/models
示例
wget https://thundercomm.s3.dualstack.ap-northeast-1.amazonaws.com/uploads/web/rubik-pi-3/tools/rubikpi3_ai_sample_apps_models_labels.zip
unzip rubikpi3_ai_sample_apps_models_labels.zip
cd rubikpi3_ai_sample_apps_models_labels
scp yolov8_det_quantized.tflite ubuntu@<IP addr of the target device>:/etc/models/
scp yolov8.labels ubuntu@<IP addr of the target device>:/etc/labels/

scp inception_v3_quantized.tflite ubuntu@<IP addr of the target device>:/etc/models/
scp classification.labels ubuntu@<IP addr of the target device>:/etc/labels/

scp hrnet_pose_quantized.tflite ubuntu@<IP addr of the target device>:/etc/models/
scp hrnet_pose.labels ubuntu@<IP addr of the target device>:/etc/labels/

scp deeplabv3_plus_mobilenet_quantized.tflite ubuntu@<IP addr of the target device>:/etc/models/
scp deeplabv3_resnet50.labels ubuntu@<IP addr of the target device>:/etc/labels/
- 要启动应用程序,请运行以下命令:
gst-ai-parallel-inference
-
要停止用例,请按s Ctrl + C.
-
要显示可用的帮助选项,请运行以下命令:
gst-ai-parallel-inference -h
- Qualcomm AI Hub 经常使用最新的 SDK 版本更新模型。使用错误的模型常量可能会导致结果不准确。如果您遇到此类问题,请更新模型常量。可以使用以下命令为示例应用程序提供模型常量:
gst-ai-parallel-inference -s /etc/media/video.mp4 \
--object-detection-constants="YOLOv8,q-offsets=<21.0, 0.0, 0.0>,q-scales=<3.0546178817749023, 0.003793874057009816, 1.0>;" \
--pose-detection-constants="Posenet,q-offsets=<8.0>,q-scales=<0.0040499246679246426>;" \
--segmentation-constants="deeplab,q-offsets=<0.0>,q-scales=<1.0>;" \
--classification-constants="Inceptionv3,q-offsets=<38.0>,q-scales=<0.17039915919303894>;"
GST_DEBUG环境变量控制 GStreamer 调试输出。设置所需级别以允许记录日志。例如,要记录所有警告,可运行以下命令:
export GST_DEBUG=2
已知问题
在姿态检测中,即使帧中有多个人,模型也只检测一个人。
使用 Inception v3 模型的图像分类是在 ImageNet 数据集上进行训练的。因此,由于该类不包含在数据集中,因此模型无法检测到人。
更多应用程序
发布版本提供了各种示例应用程序。要了解更多信息,请参阅 人工智能、摄像头软件、机器人开发章节。