Get Started
Introduction
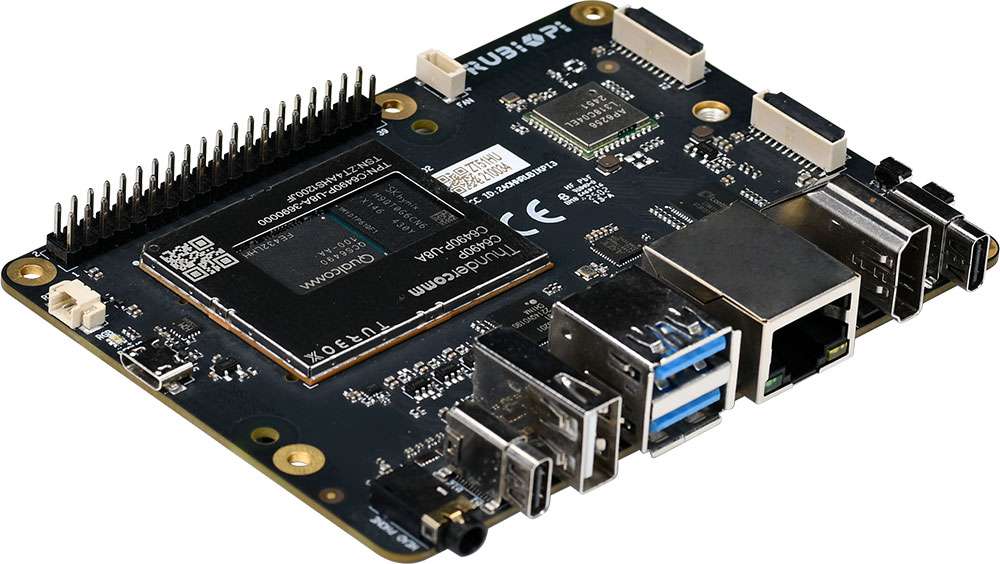
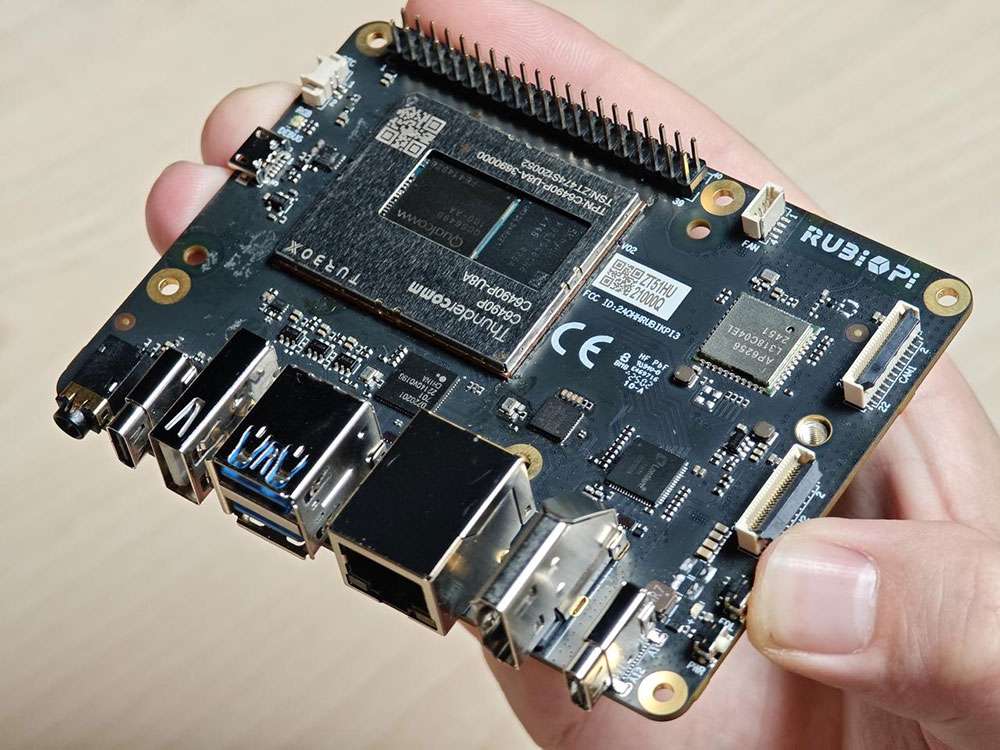
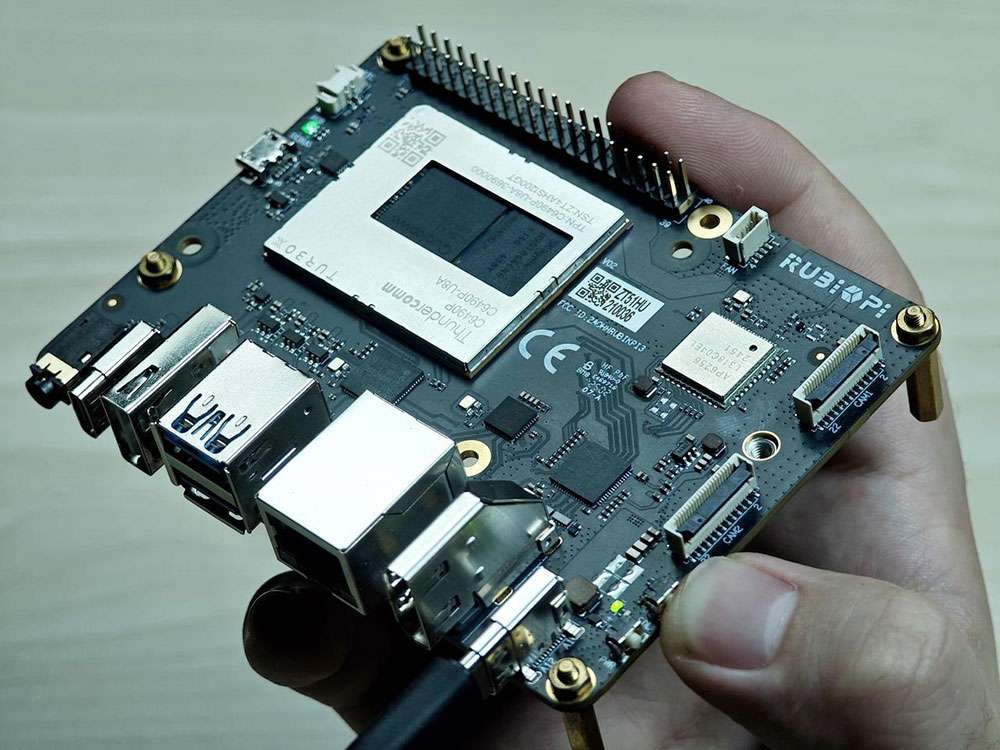
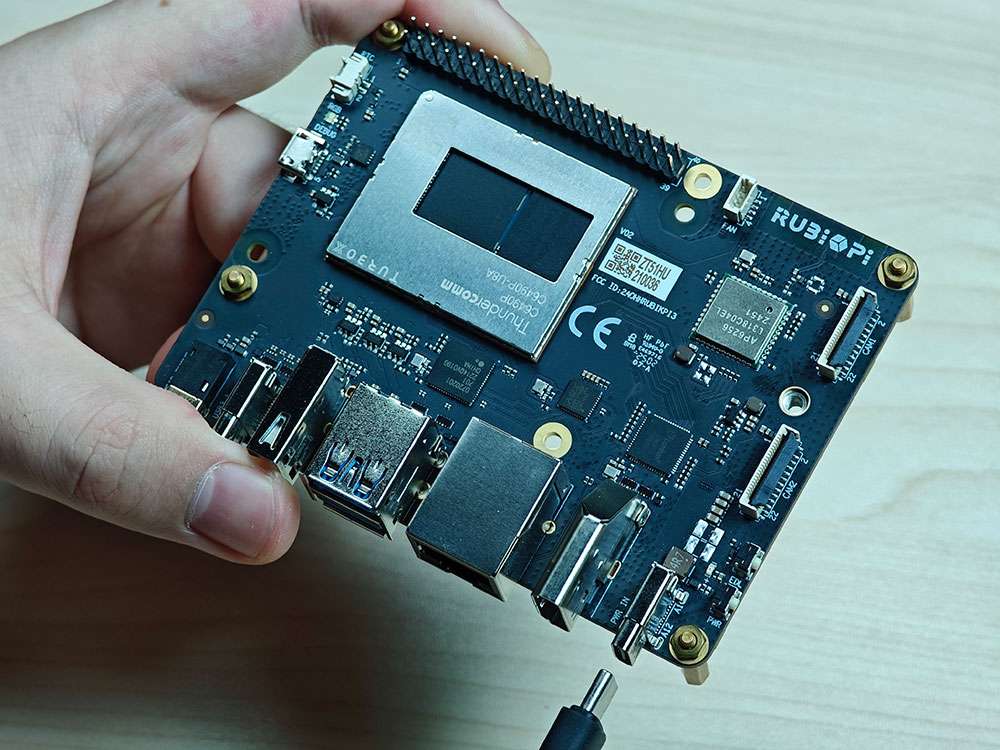
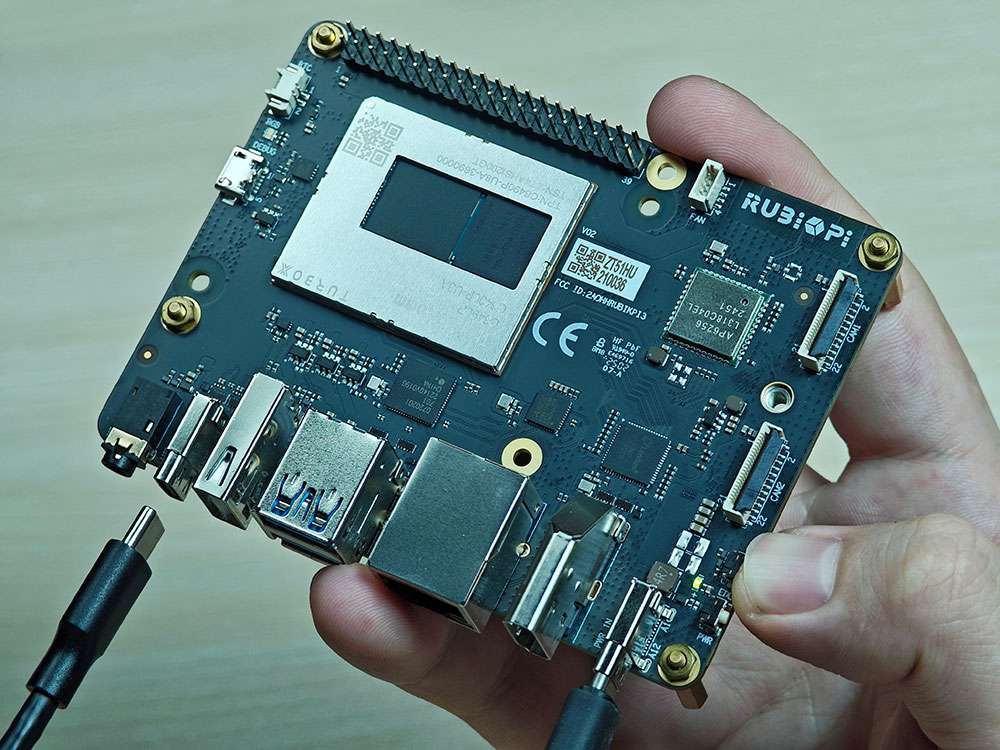
RUBIK Pi 3 is developed based on the Qualcomm QCS6490 processor, which features the Qualcomm® Kryo™ 670 CPU and the Qualcomm® Hexagon™ Processor with fused AI-accelerator architecture. The processor provides exceptional AI performance of 12 TOPS and offers the capability for various machine learning and AI application scenarios.
RUBIK Pi 3 is designed with a wide range of interfaces and functions, such as USB, camera, DisplayPort, HDMI, Ethernet, 3.5mm headphone jack, Wi-Fi, Bluetooth, M.2 connector, fan, RTC, and 40-pin LS connector. These features cater to diverse development needs while facilitating rapid development and efficient debugging.
RUBIK Pi 3 is compatible with various systems, such as Qualcomm Linux, Debian 13, Android 13, and Canonical Ubuntu for Qualcomm Platforms*, providing developers with the flexibility to meet their specific application needs.
*Canonical Ubuntu for Qualcomm Platforms is in the planning phase.
Specifications
| Category | RUBIK Pi 3 Feature |
|---|---|
| SoC | QCS6490 |
| Processor | 1 x Cortex-A78 2.7 GHz 3 x Cortex-A78 2.4 GHz 4 x Cortex-A55 1.9 GHz |
| GPU | Adreno 643 GPU @ Up to 812 MHz |
| VPU | Adreno 633 VPU |
| NPU | 12 TOPS |
| ISP | Spectra ISP capable of on-device machine learning and machine processing |
| RAM | 8 GB LPDDR4x |
| ROM | 128 GB UFS 2.2 |
| Wi-Fi & Bluetooth | Wi-Fi 5 and Bluetooth 5.2 |
| Camera | 2 x 4-lane MIPI CSI D-PHY connector |
| USB | 1 x USB Type-C (USB 3.1 Gen1) 2 x USB Type-A (USB 3.0) 1 x USB Type-A (USB 2.0) |
| GPIO | 28 GPIO pins |
| Ethernet | 1000M |
| M.2 connector | M.2 Key M 2280 (2-lane PCIe 3.0) |
| Audio | 3.5mm headphone jack |
Preparations
-
Computer running Windows 10 and later, or Ubuntu 18 – Ubuntu 22
-
RUBIK Pi 3
-
USB Type-A to Type-C cable
-
USB Type-A to Micro USB cable
-
Power supply (12V 3A Type-C)
Install drivers
Install drivers in a Windows environment
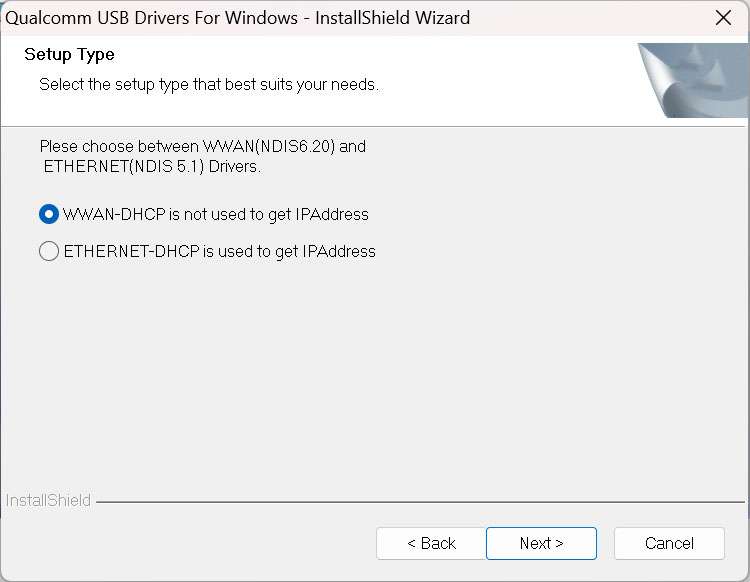
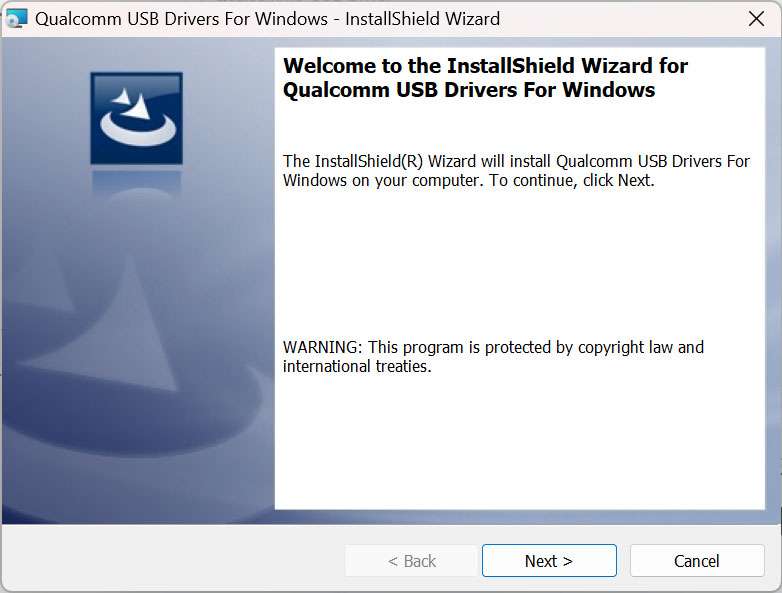
Install QUD
-
Click here to download the Qualcomm USB driver (QUD).
-
Decompress qud.win.1.1_installer_10061.1.zip, run setup.exe as shown in the following figure, and click Next.
- Click Next.
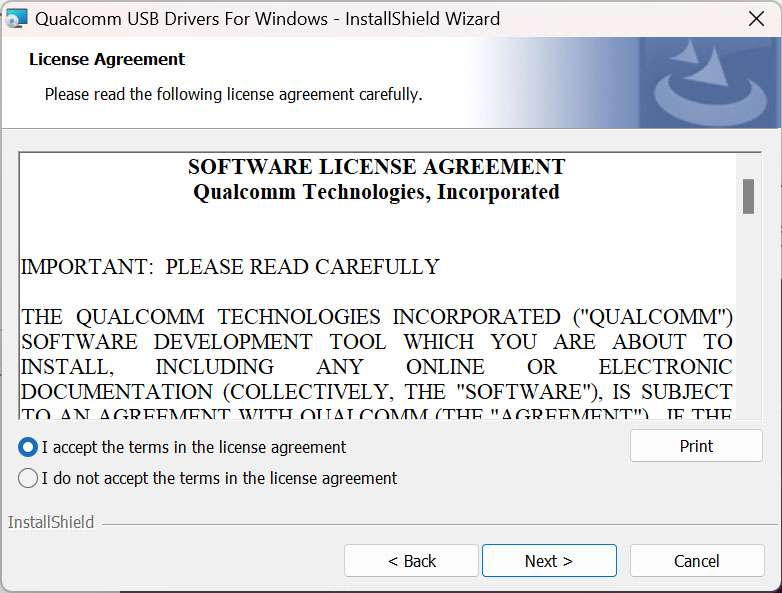
- Select the I accept the terms in the license agreement option and click Next.
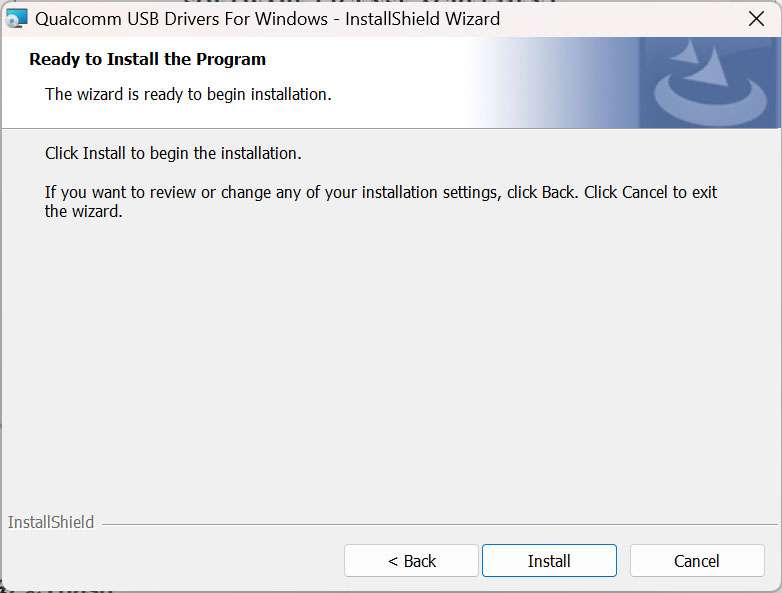
- Click Install.
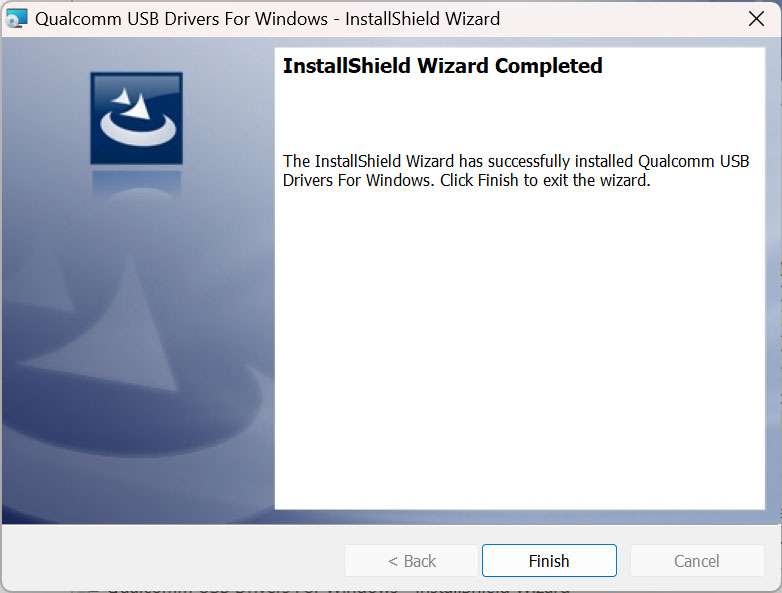
- Click Finish to complete the driver installation.
Install Tflash
-
Click here to download the image flashing tool Tflash.
-
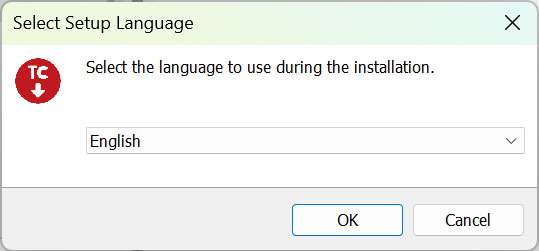
Run TflashSetup_v1.2.0.4.exe. Select your desired language and click OK.
-
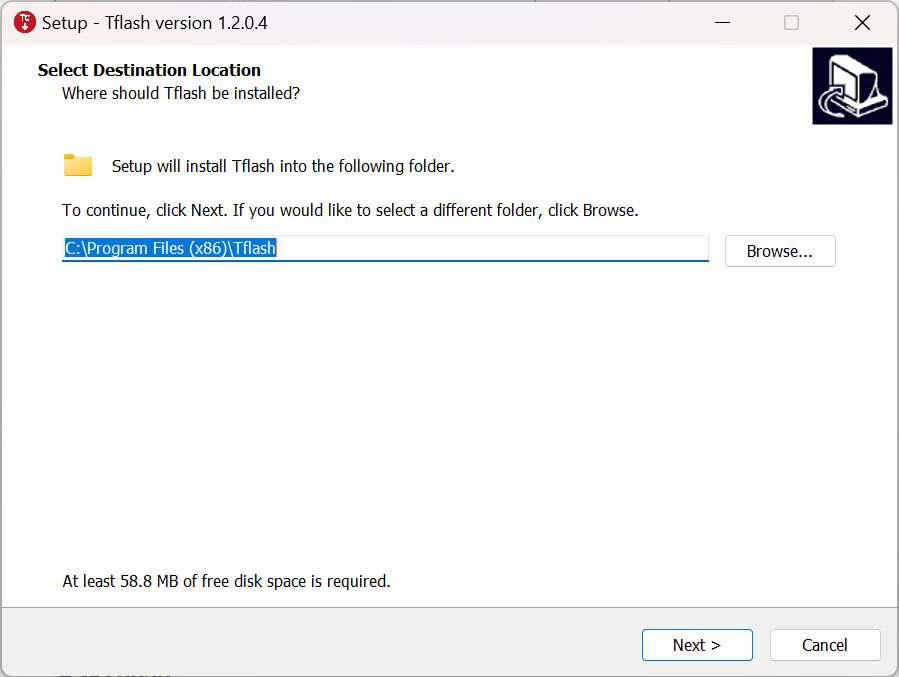
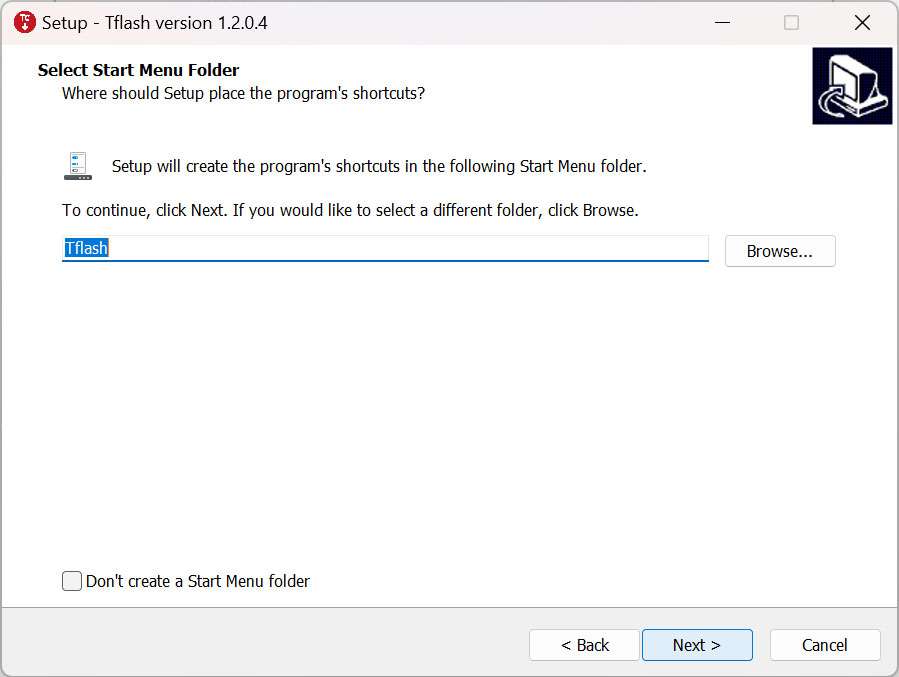
Select the location where you want to install Tflash and click Next.
-
Click Next.
-
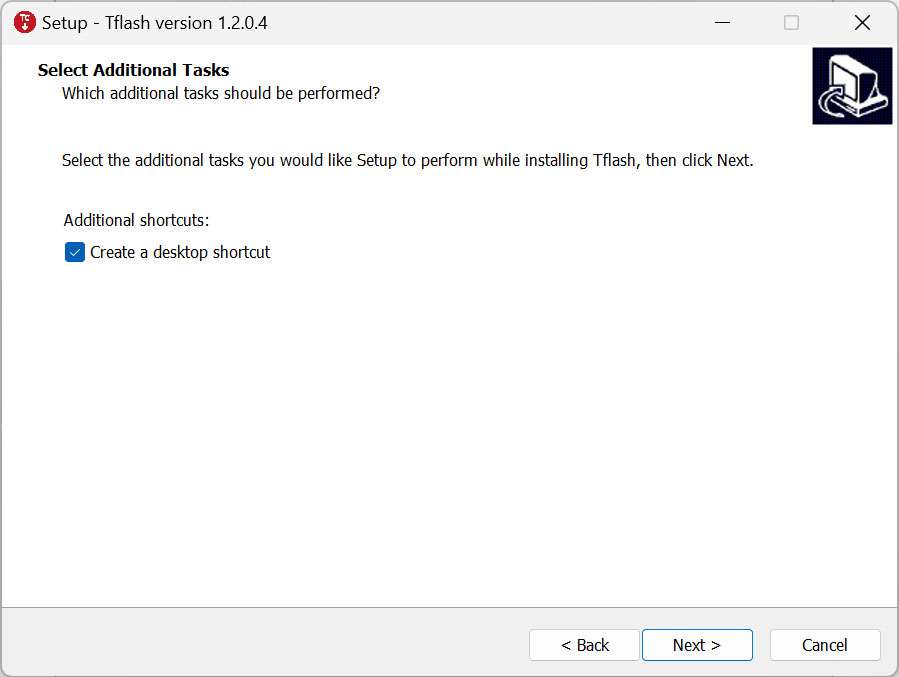
Select the Create a desktop shortcut option and click Next.
-
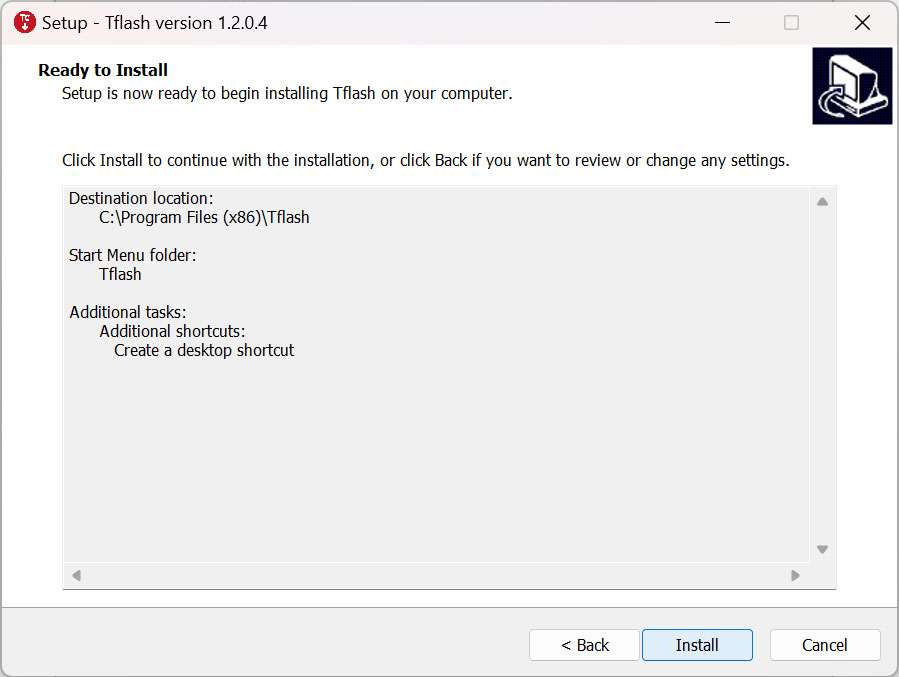
Click Install.
-
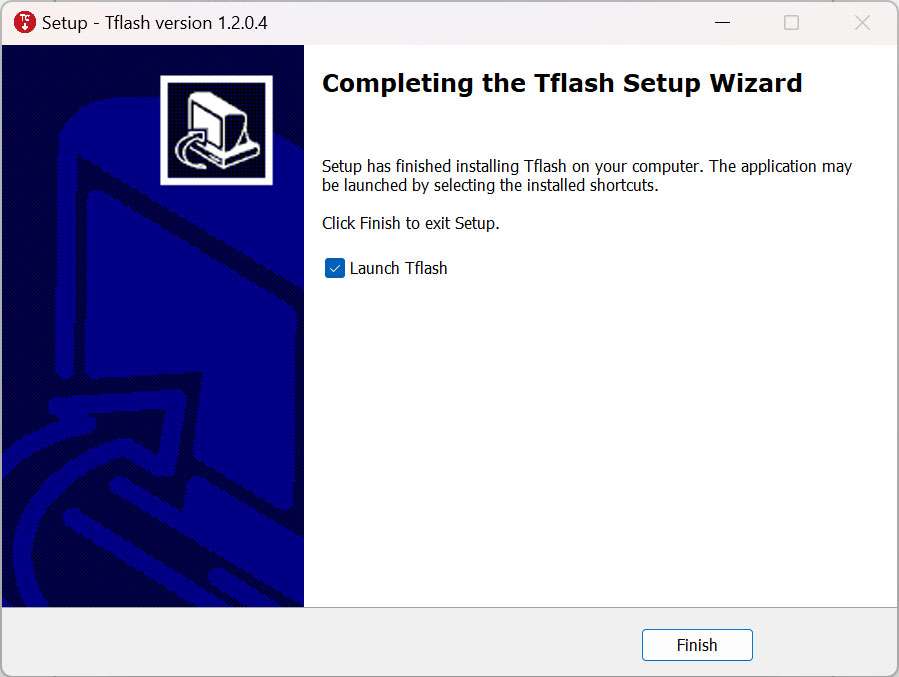
Select the Launch Tflash option and click Finish.
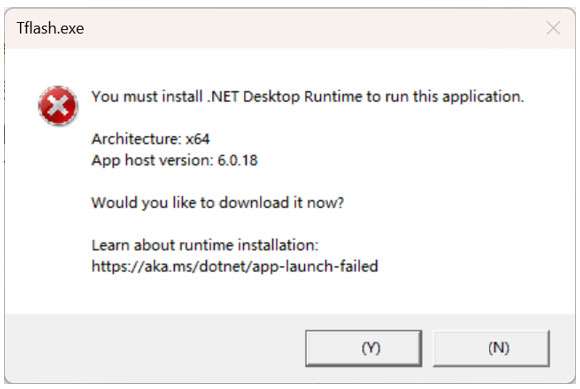
-
If the following error message appears, click (Y). Follow the instructions to download the required installation package.
-
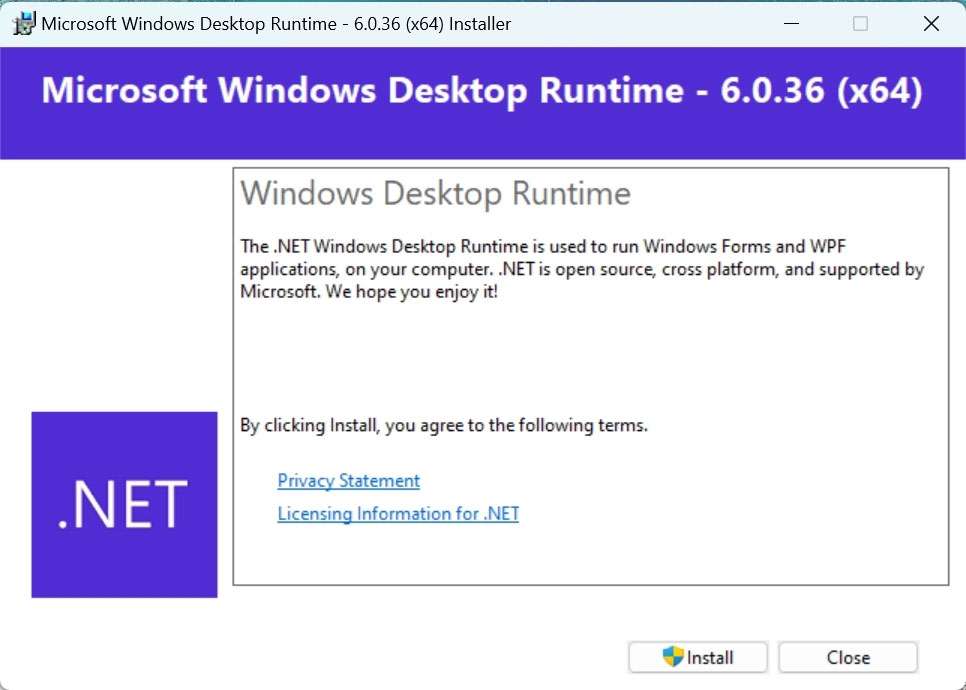
Double-click the package you downloaded and click Install.
-
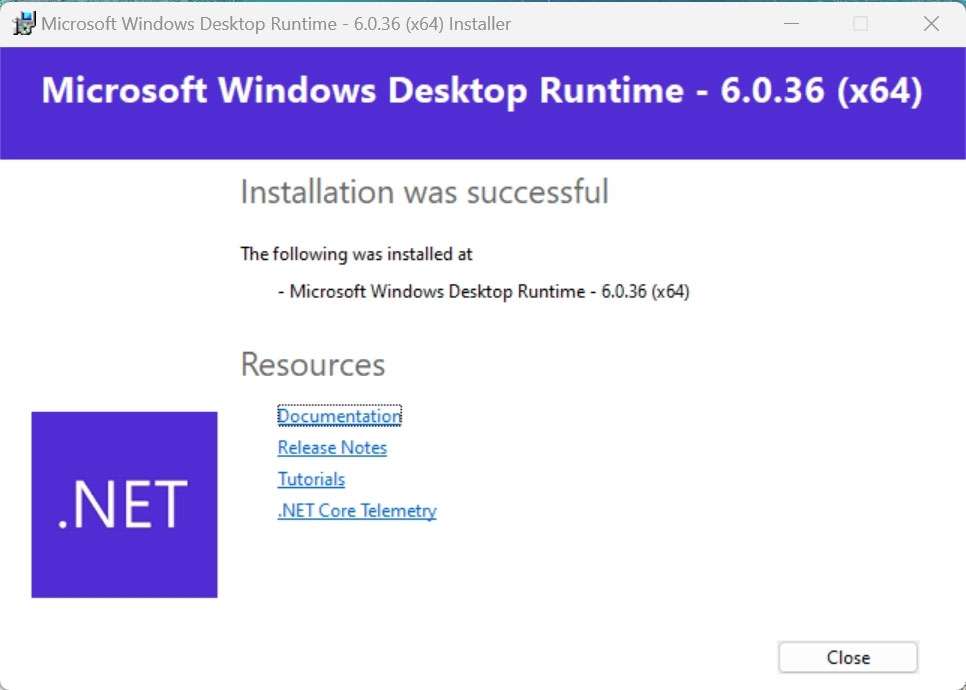
Click Close to complete the installation.
-
After the installation is completed, the following Tflash icon will appear on your desktop and in the Start menu.

Install drivers in an Ubuntu environment
Install Tflash
-
Click here to download the image flashing tool Tflash.
-
Run the following command to install Tflash.
sudo dpkg -i Thundercomm-tflash-v1.0.0.deb
-
After the installation is completed, run the
tflashcommand in the terminal. If the following message appears, it indicates that Tflash has been successfully installed: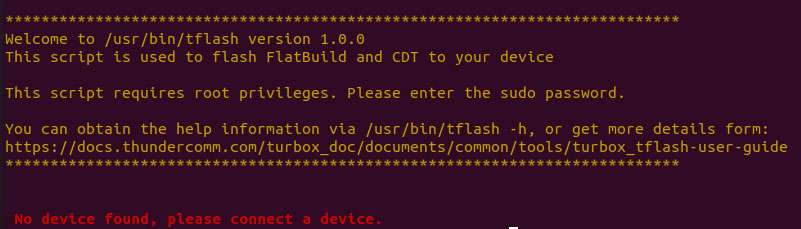
Download images
RUBIK Pi 3 comes with a pre-installed Linux image (not the latest version) for a quick out-of-the-box experience. If you need the latest version of the Linux image or other operating system images, please visit the RUBIK Pi 3 official website to download.
Visit GitHub to download the Linux source code as needed.
We provide the following images:
-
Qualcomm Linux is a simplified desktop system based on Weston. It is suitable for developers who have Linux development experience and seek an in-depth development experience.
-
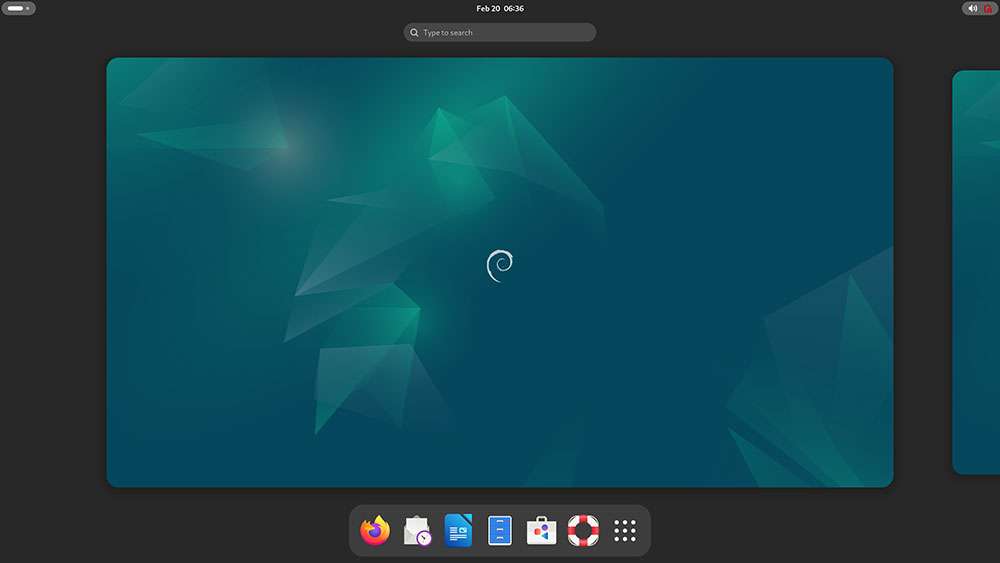
Debian 13: Based on GNOME 48, Debian 13 offers a complete set of system features, a rich software package library, more desktop applications, an enhanced user experience, and abundant development resources, making it ideal for developers who prioritize development convenience.
-
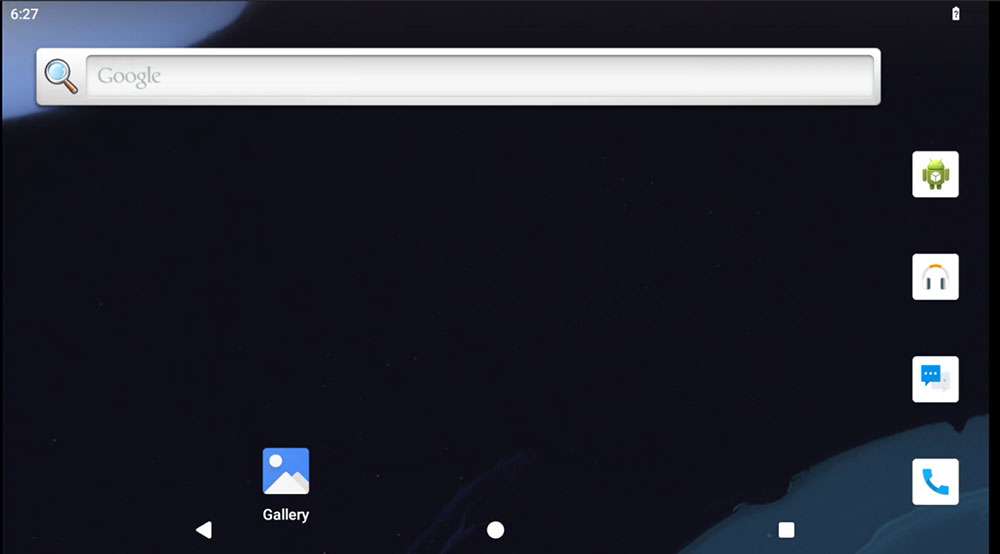
Android 13 is an enhanced system based on Google AOSP, offering an improved experience for developers working on Android applications.
Flash images

Before flashing images, enter flash mode (9008 mode) using one of the following methods:
-
Do not touch the PCB components and metal contacts with your bare hands.
-
Before operation, discharge static electricity using grounding equipment (e.g., anti-static workstation/wrist strap).
-
Do not place the circuit board directly on conductive surfaces (such as metal tables or ungrounded chassis).
Method 1:
-
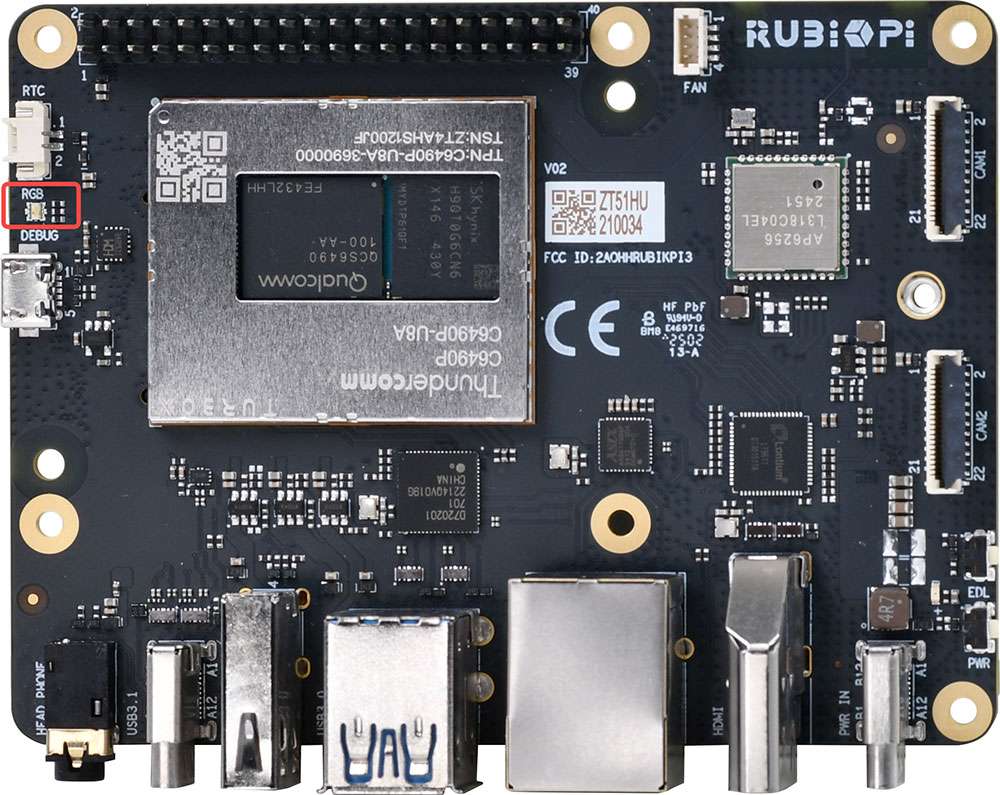
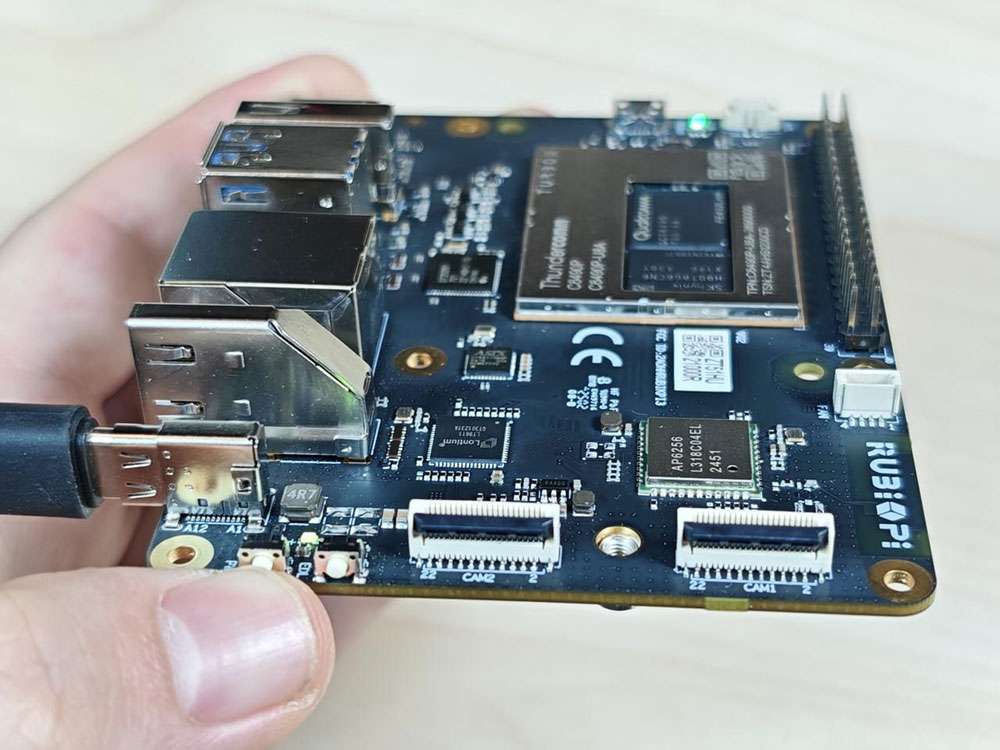
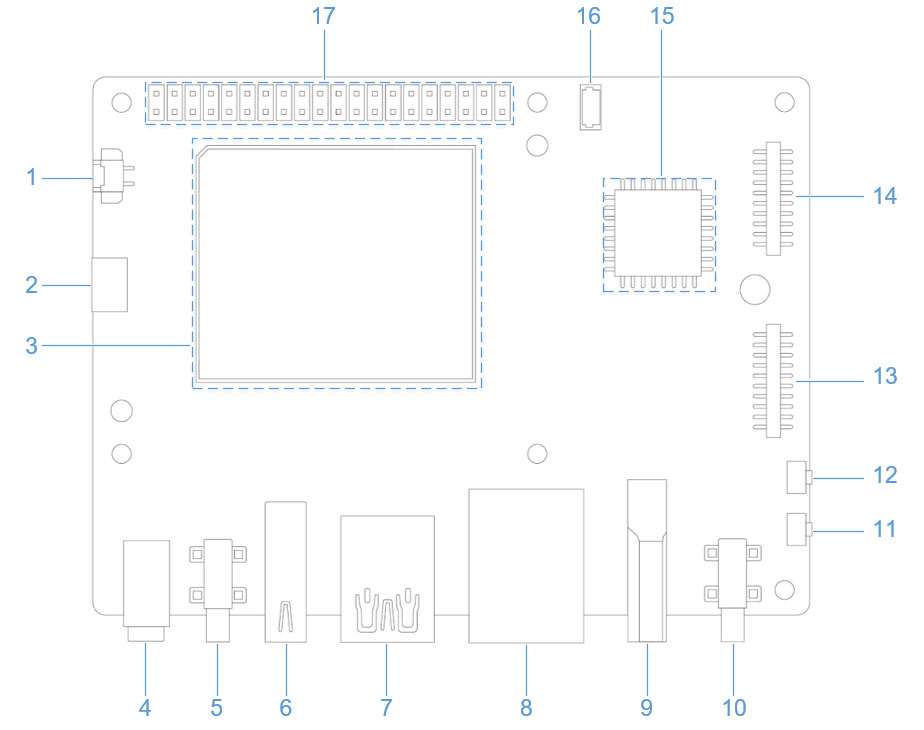
Press and hold the [EDL] button (No. 12 in the figure above).
-
Connect the power supply into port 10, as shown in the figure below.
-
Insert the Type-C cable into port 5 and wait three seconds to enter 9008 mode.

Method 2:
-
Connect the power supply into port 10.
-
Insert the Type-C cable into port 5.
-
After RUBIK Pi 3 boots up, run the following command to enter 9008 mode.
adb shell reboot edl
Flash images on a Windows system
Operation procedure
-
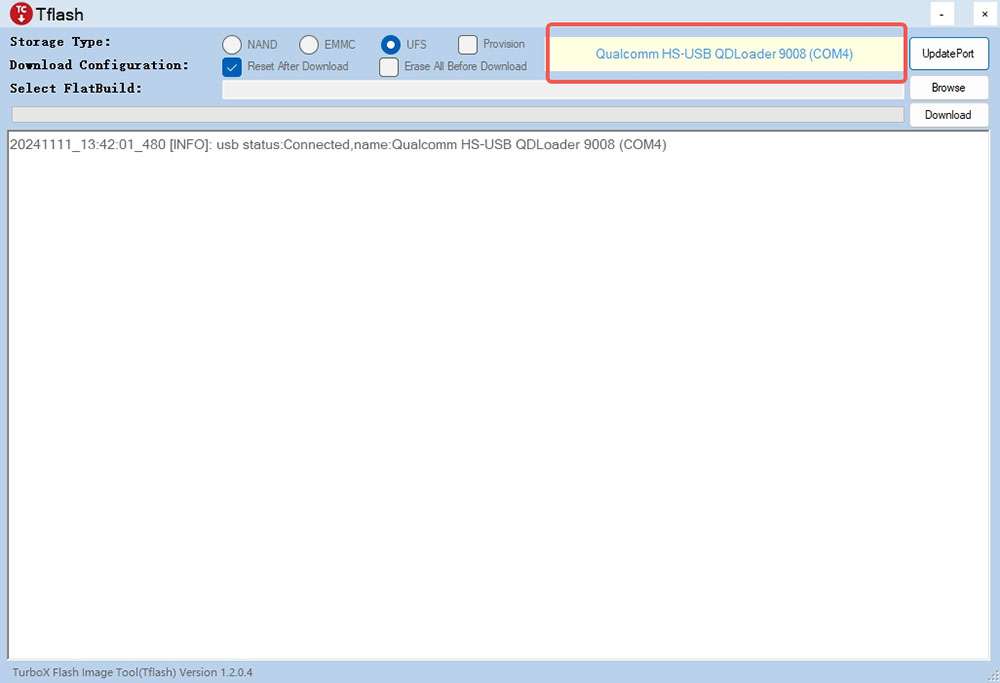
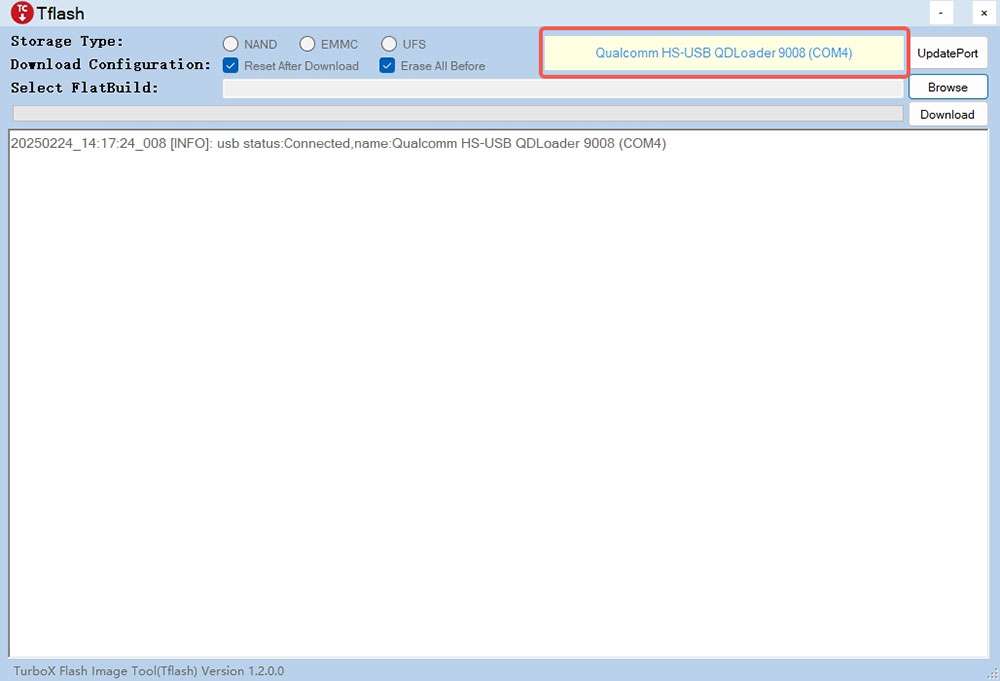
Open the Tflash software. Make sure the device is in 9008 mode, as shown in the following figure:
-
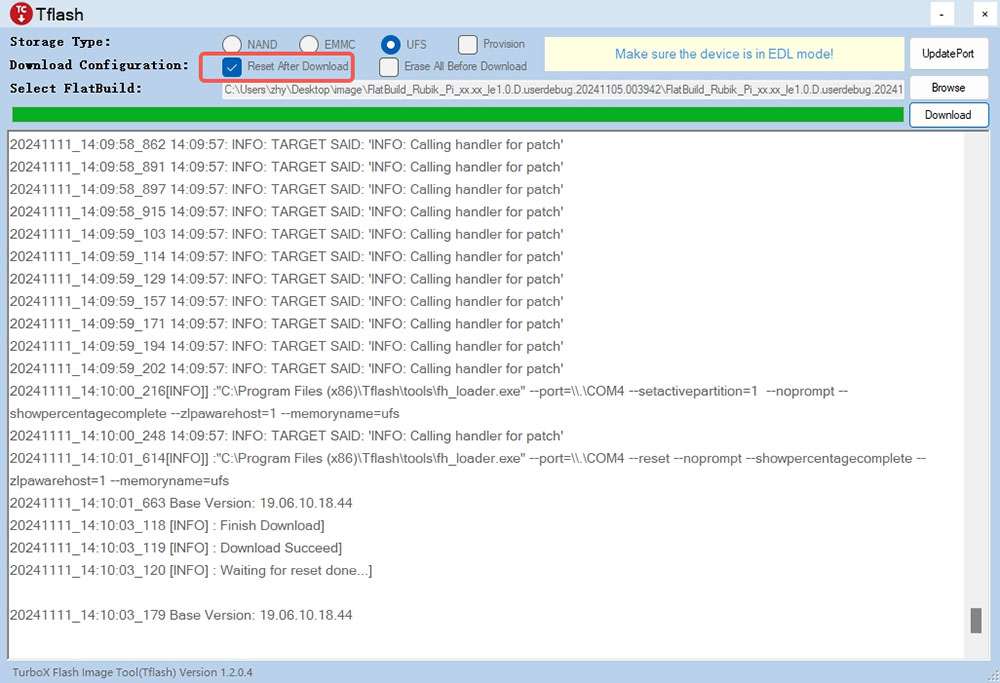
Select the Storage Type of the device to be flashed. For RUBIK Pi 3, select UFS for Storage Type.
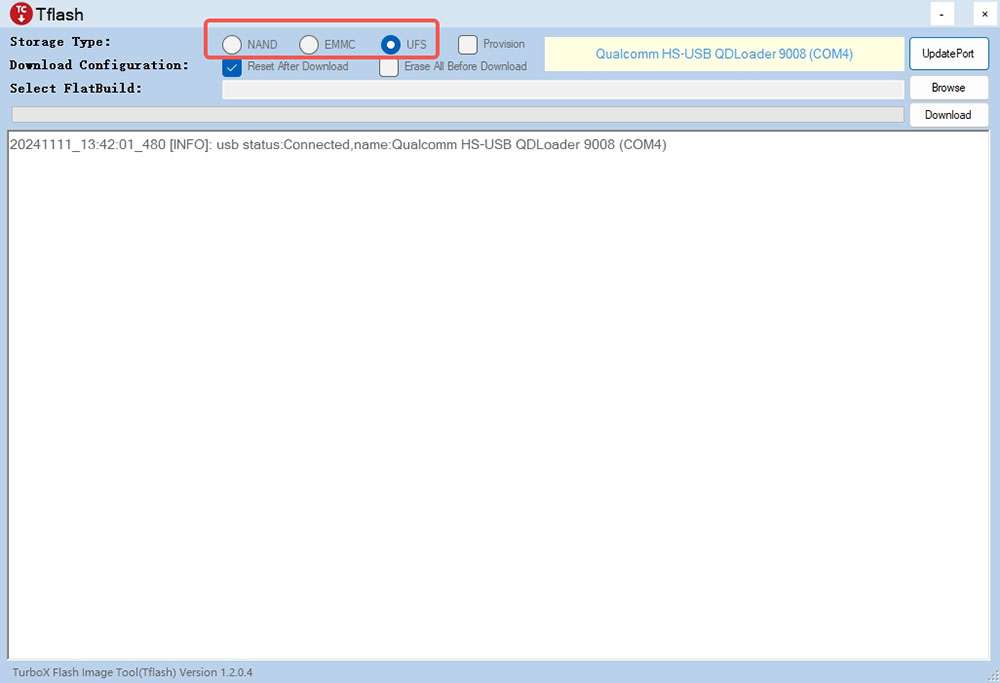
-
Select Reset After Download or Erase All Before Download as needed. Exercise caution when selecting Erase All Before Download.
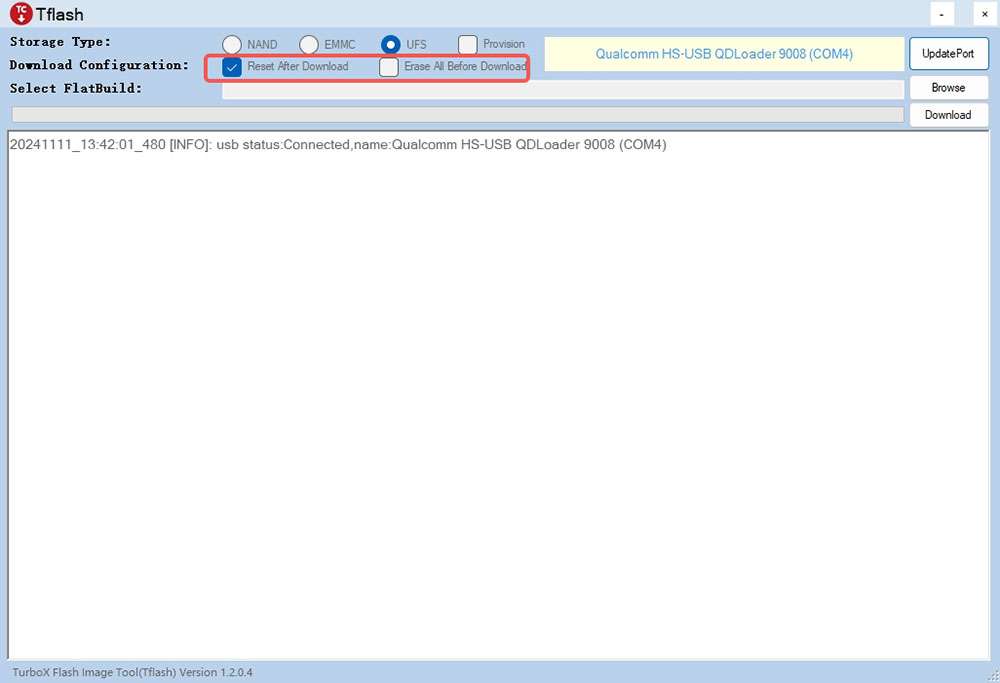
-
Reset After Download: When this option is selected, the device will reboot automatically after image flashing is completed.
-
Erase All Before Download: When this option is selected, the data in each RUBIK Pi 3 UFS partition will be erased before flashing.
note-
The Erase All Before Download option takes effect only when the UFS partitions are the same before and after flashing.
-
Selecting Reset After Download or Erase All Before Download is not a mandatory action. You are not required to select one of them.
-
When flashing images of different operating systems (for example, switching from Android to Debian), it is recommended to select the Erase All Before Download option.
-
-
Flash the FlatBuild image.
-
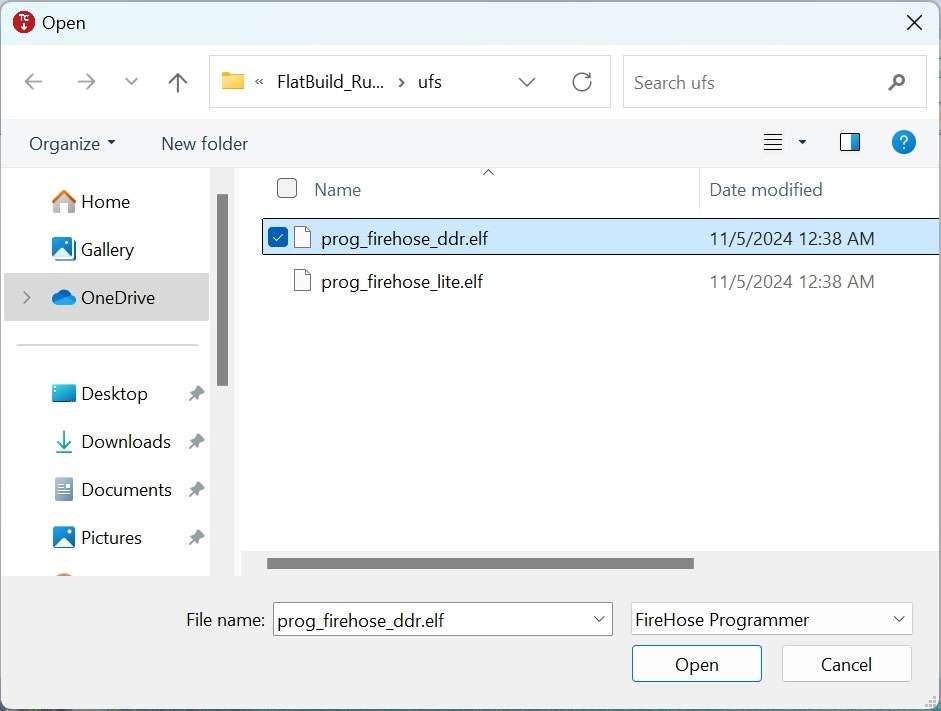
Click Browse.
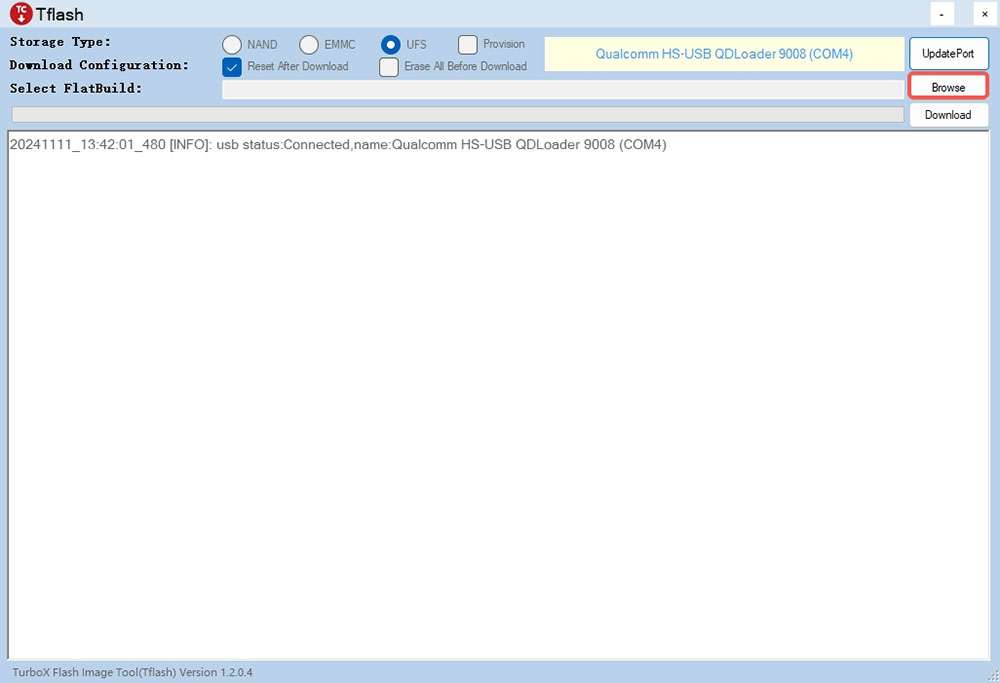
-
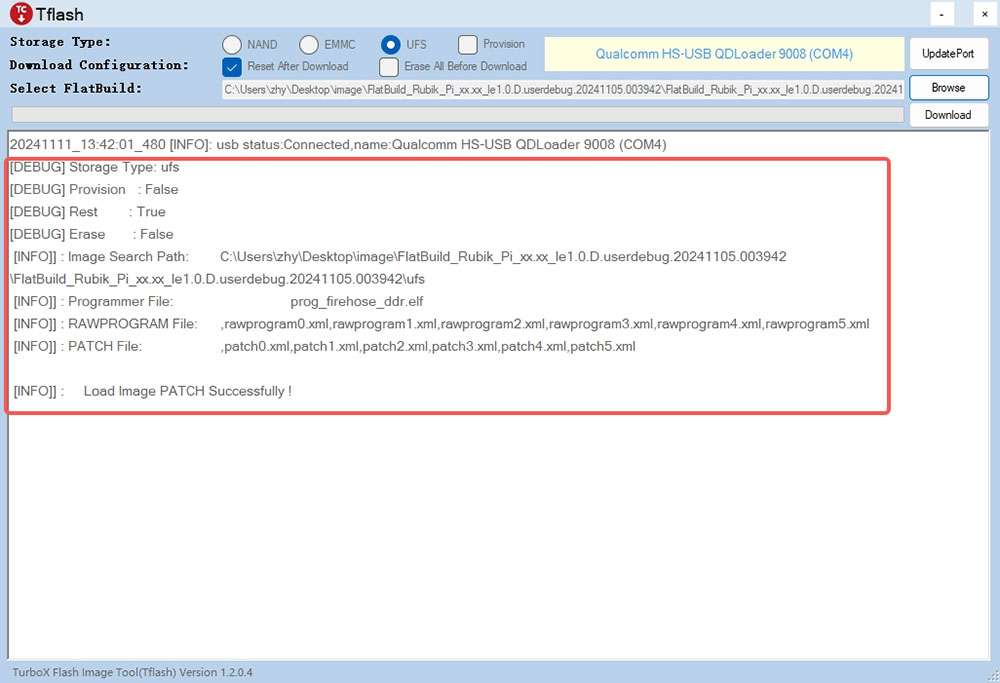
Go to the FlatBuild directory, select Programmer File, select prog_firehose_ddr.elf, and click Open.
-
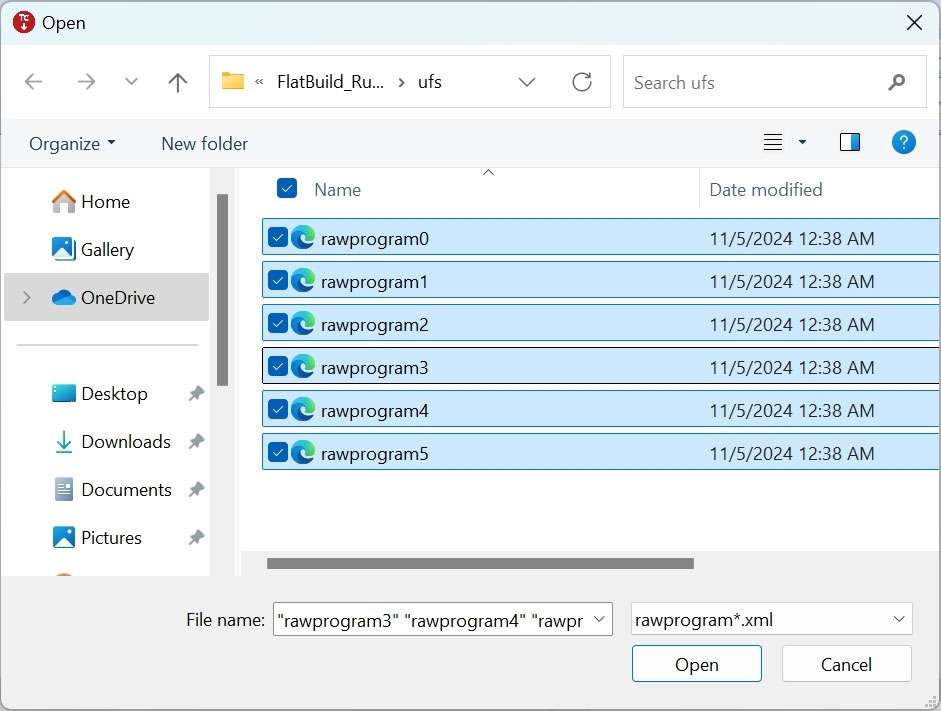
Select all .xml files whose names start with "rawprogram", and click Open.
-
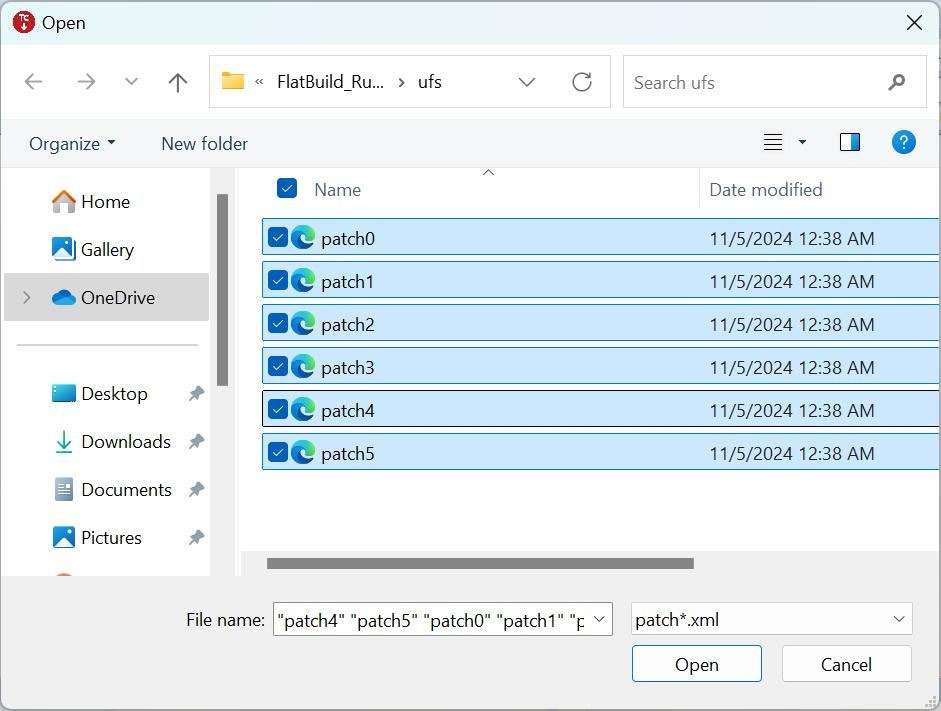
Select all .xml files whose names start with "patch", and click Open.
After the above settings, the related information will be displayed in the Tflash interface.
-
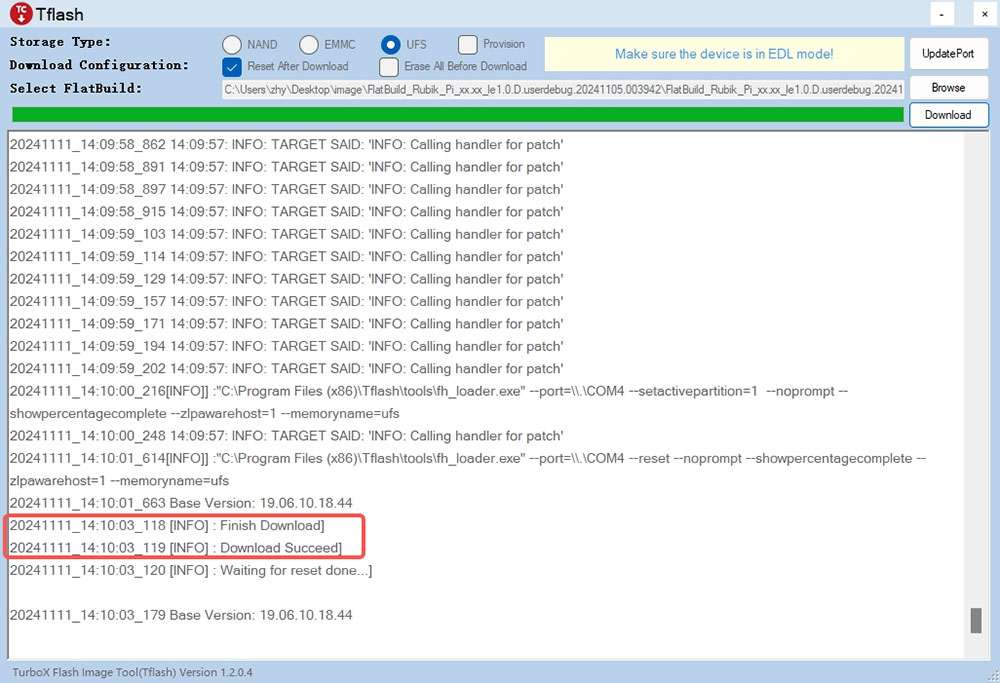
Click Download to start flashing.
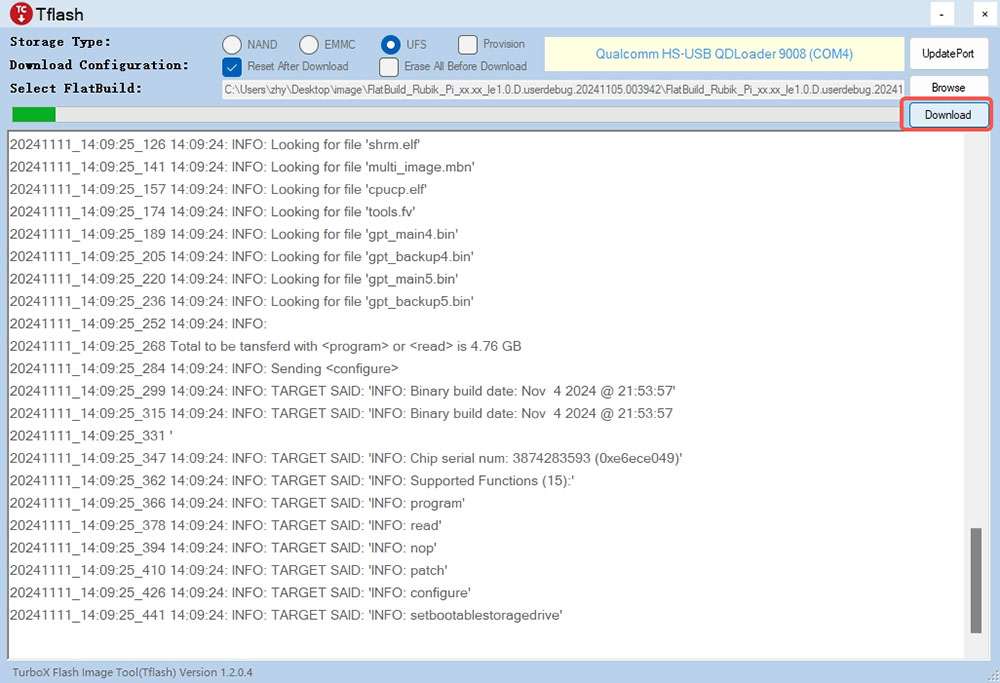
noteThe flashing time varies from computer to computer. The green progress bar shows the flashing progress.
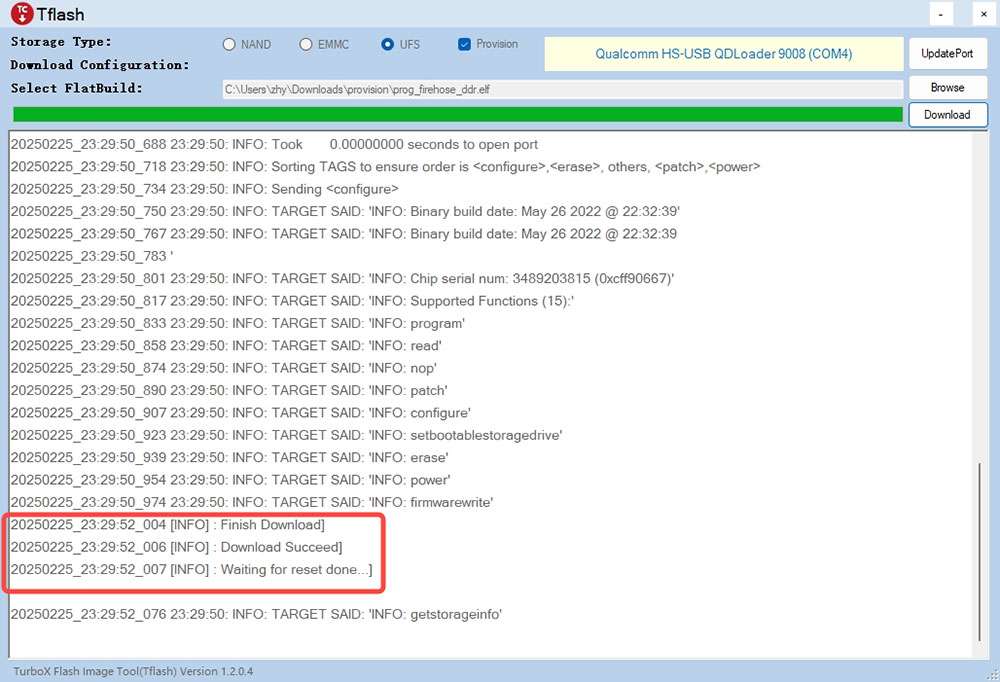
After images are successfully flashed, the following logs will be displayed:
-
If you have selected Reset After Download, the board will reboot automatically after flashing.
-
If you have not selected Reset After Download, disconnect the power cable and USB cable to power off your RUBIK Pi 3, then reconnect the power cable and press the [PWR] button to start your RUBIK Pi 3.
-
Fix boot failures after flashing
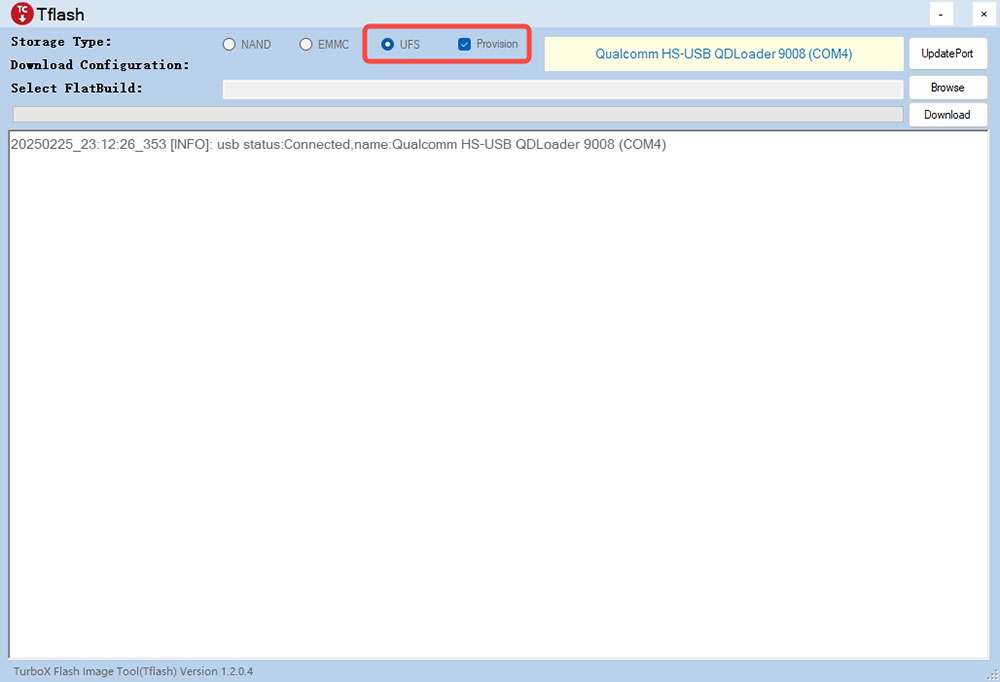
If you fail to flash images or your RUBIK Pi 3 fails to boot up after flashing (the heartbeat LED in the red box below does not blink), try provisioning UFS.
After provisioning, some information stored in the UFS, such as the SN and Ethernet MAC address, may be lost.
The operations to provision UFS are as follows:
-
Enter 9008 mode.
-
Select UFS for Storage Type and select Provision.
-
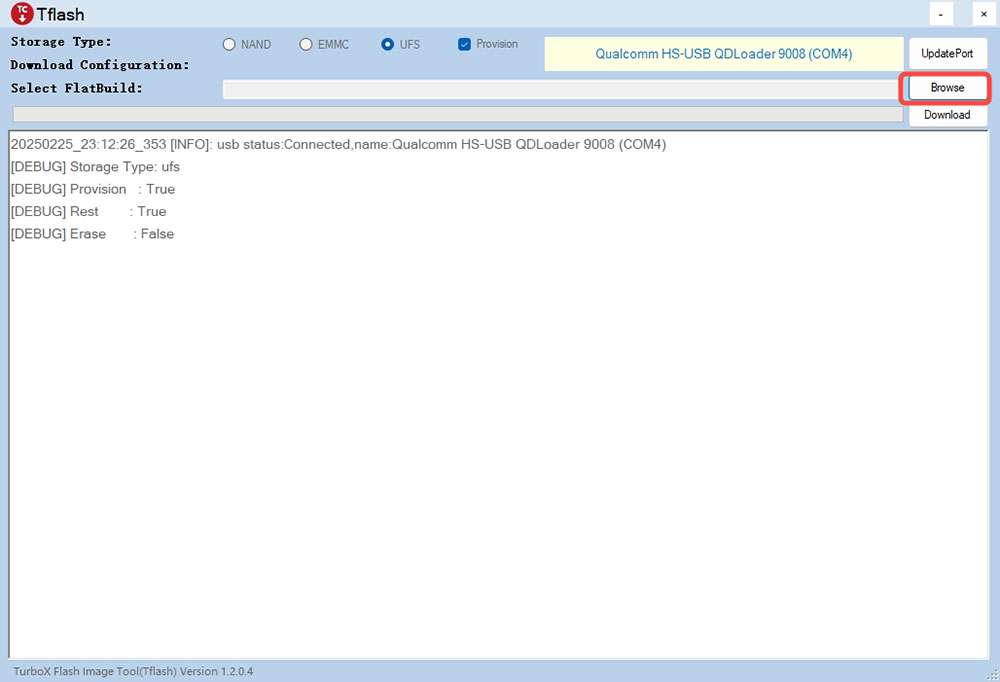
Flash the provision file.
-
Click Browse.
-
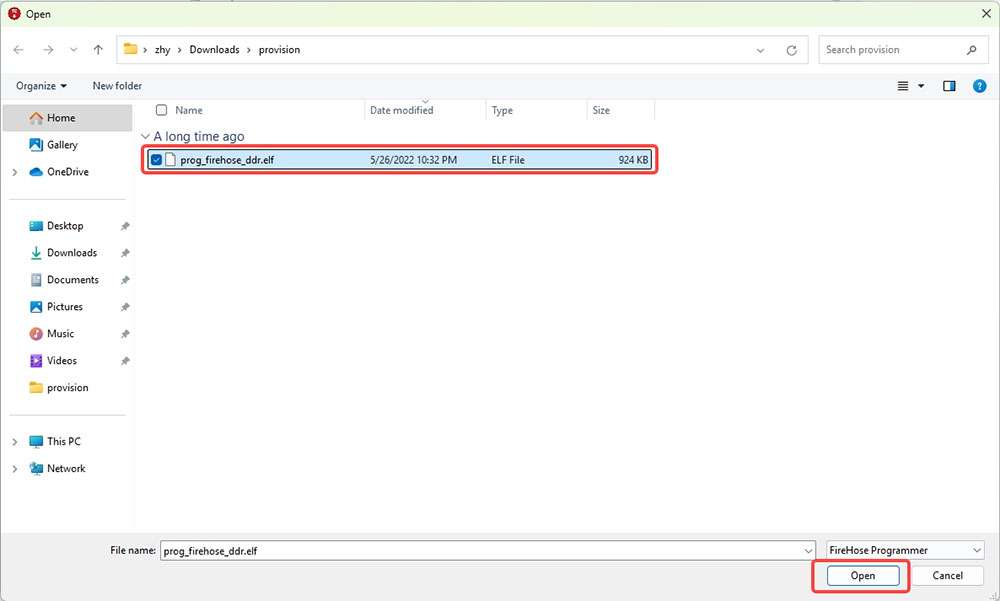
Go to the provision directory in the image package, select prog_firehose_ddr.elf, and click Open.
-
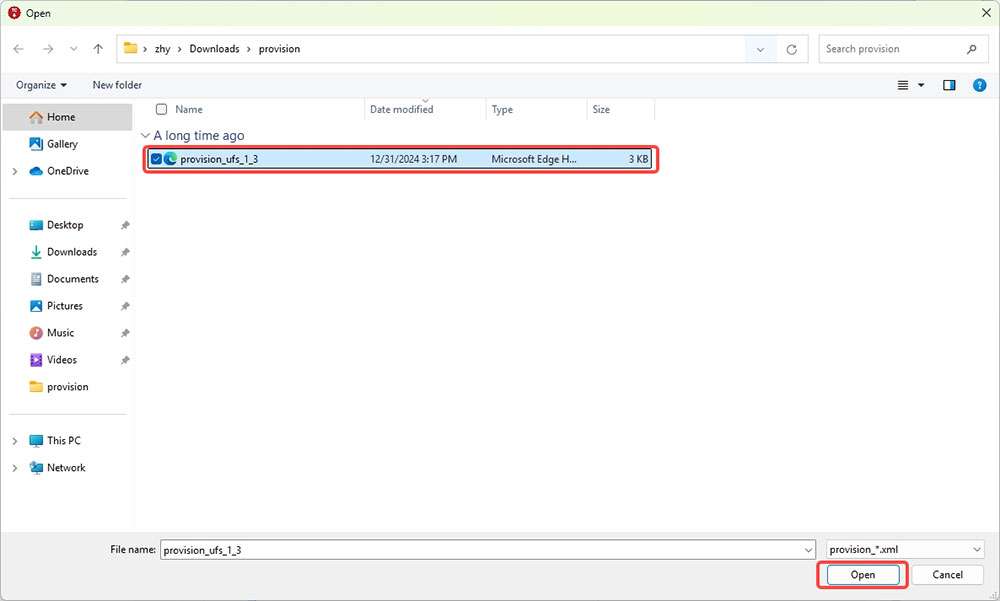
Select the provision_1_3.xml file and click Open.
-
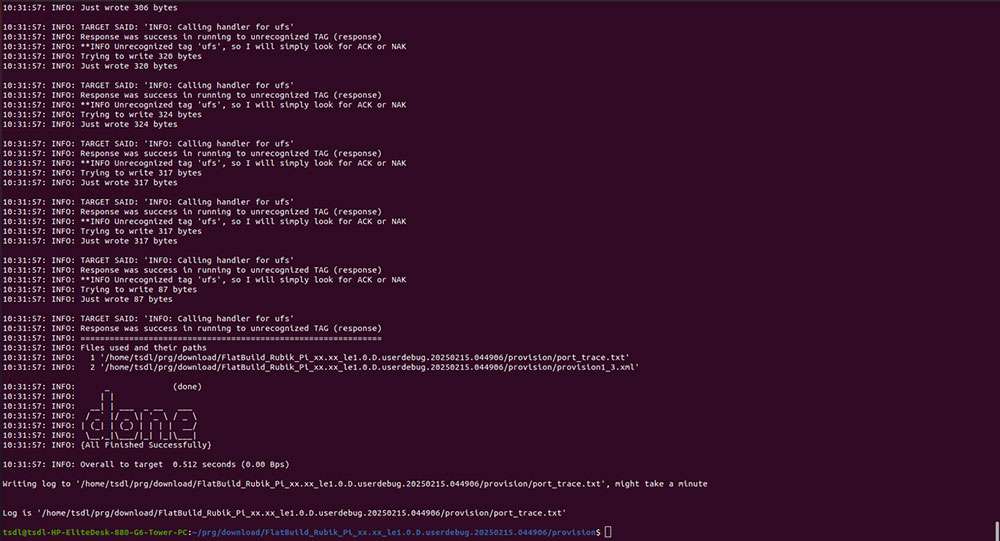
When "Load Image PATCH Successfully!" is displayed in the log, click Download to start provisioning.
When the provisioning is completed, the following log is displayed.
 note
noteAfter provisioning, remove and plug in the power supply and USB cable to restart your RUBIK Pi 3.
-
Flash images on an Ubuntu system
Operation procedure
-
Go to the FlatBuild package directory.
-
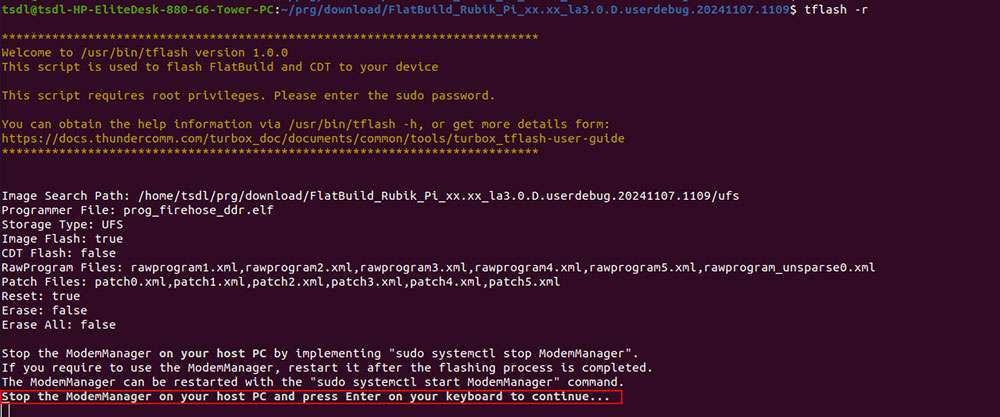
Run
tflash -r.
-
Run the
tflash -hcommand to view more parameters.-rin the above command indicates restarting your RUBIK Pi 3 after flashing is completed. -
When flashing images of different operating systems (for example, switching from Android to Debian), it is recommended to add the
-eparameter (the Erase All Before Download option). -
When running
tflashon your PC, enter your PC login password.
-
When "Stop the ModemManager on your host PC and press Enter on your keyboard to continue..." appears on the screen, press Enter to flash images.
If the following information is displayed after the tflash operation, it indicates that flashing was successful.
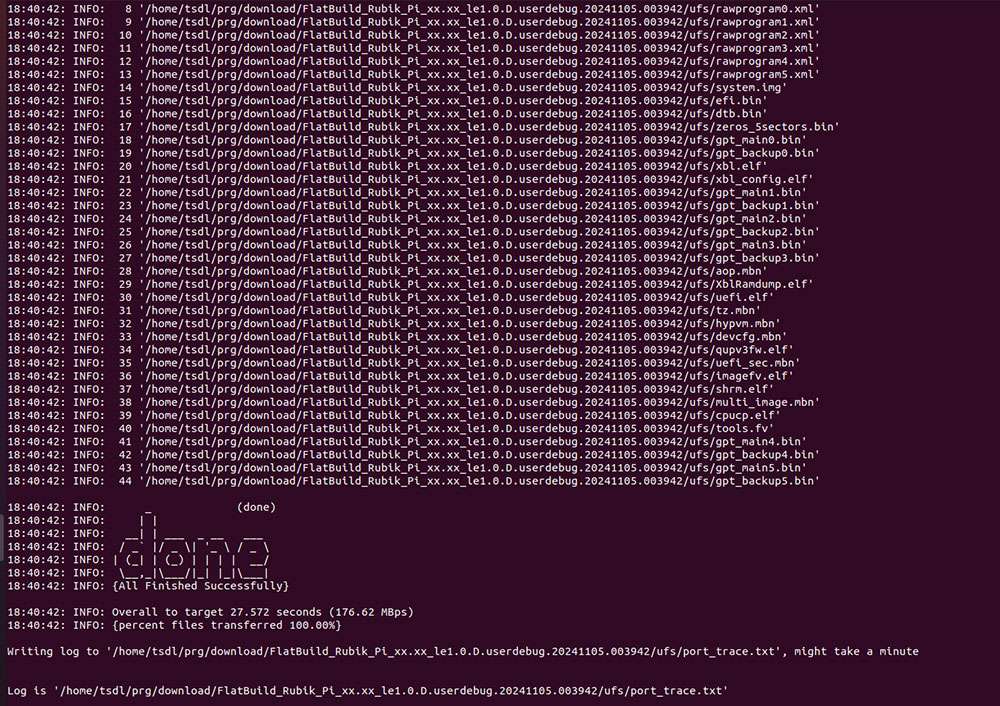
-
After successful image flashing by using the
-rparameter, RUBIK Pi 3 automatically reboots.
Fix boot failures after flashing
If you fail to flash images or your RUBIK Pi 3 fails to boot up after flashing (the heartbeat LED in the red box below does not blink), try provisioning UFS.
After provisioning, some information stored in the UFS, such as the SN and Ethernet MAC address, may be lost.
The operations to provision UFS are as follows:
-
Enter 9008 mode.

-
Go to the provision directory in the image package, run
tflash -E, type "y" and press Enter.
-
When "Stop the ModemManager on your host PC and press Enter on your keyboard to continue..." appears on the screen, press Enter to flash images.

If the following information is displayed after the tflash operation, it indicates that flashing was successful.
After provisioning, remove and plug in the power supply and USB cable to restart your RUBIK Pi 3.
Power-on
For older board versions, connect the power supply and press the [PWR] button to power on your RUBIK Pi 3. Board versions v02 and later support automatic power-on.

Power-off
Run the poweroff command to power off your RUBIK Pi 3.

Reboot
-
Run the
rebootcommand to reboot your RUBIK Pi 3.
-
Press and hold the [PWR] button for 12 seconds to reboot your RUBIK Pi 3.
UART login
Windows
-
Connect port 2 in the following figure to a computer via a UART interface.

-
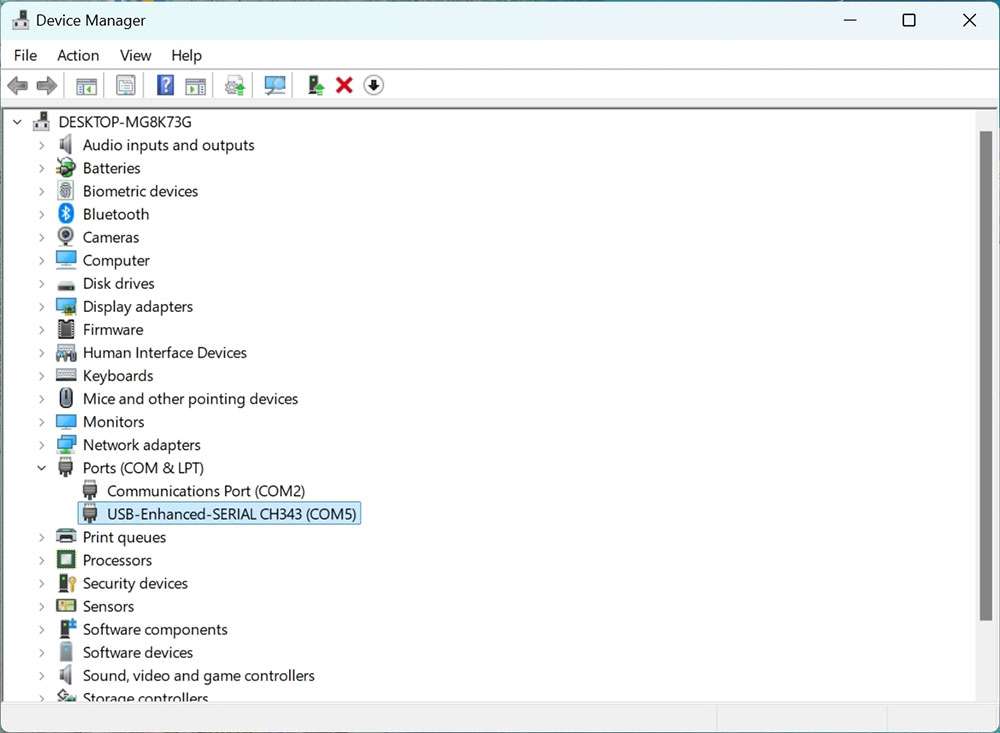
Open the computer settings page, check the corresponding COM port in Device Manager, and record the port.
-
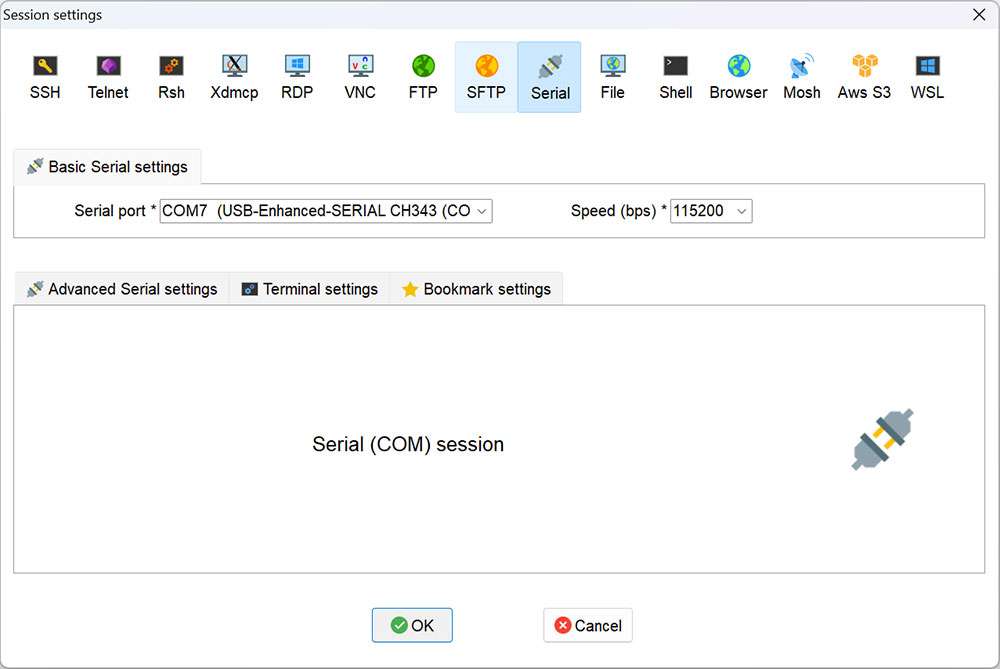
Download MobaXterm at https://mobaxterm.mobatek.net/ and decompress it.

-
Open MobaXterm, select Session > Serial, and set the baud rate of the serial port to 115200.

-
Click OK. Press Enter and type your login name and the default login password to log in:
Login account: root
Login password: rubikpi
tipYou can run the
passwdcommand to change the default password. For example:passwd root.

Ubuntu
-
Connect port 2 in the following figure to a computer via a serial cable.
-
Run the following commands to install minicom:
sudo apt updatesudo apt install minicom
-
Run the following command to check the USB port:
ls /dev/ttyACM*
-
Run the following command to open minicom. Press Enter and type your login name and the default login password to log in:
sudo minicom -D /dev/ttyACM0 -b 115200Login account: root
Login password: rubikpinoteYou can run the
passwdcommand to change the default password. For example:passwd root.
ADB login
Windows
Preparations
-
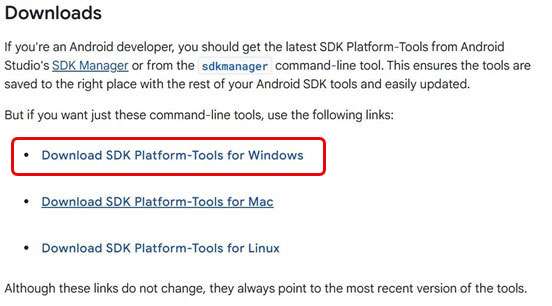
Download the ADB and Fastboot installation package at https://developer.android.google.cn/tools/releases/platform-tools and decompress the package.
-
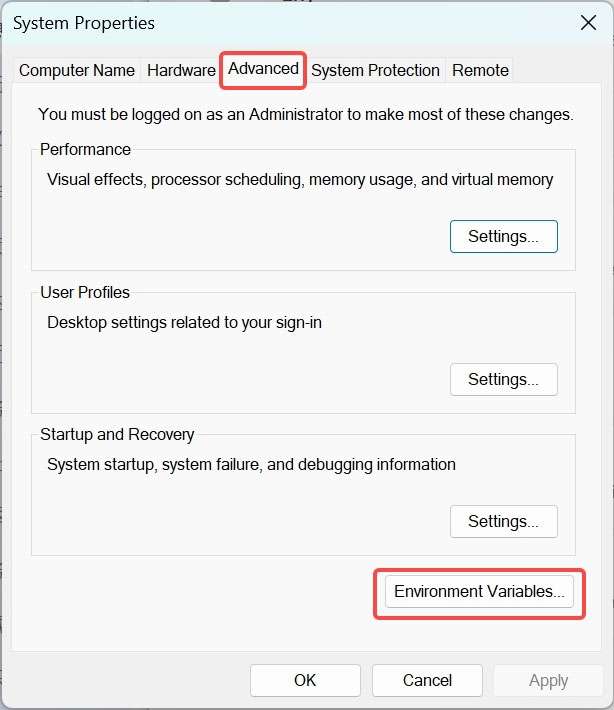
Right-click This PC and choose Properties. Click Advanced and click Environment Variables. Alternatively, right-click This PC and choose Properties. In the search bar, type Advanced system settings and click Environment Variables.
-
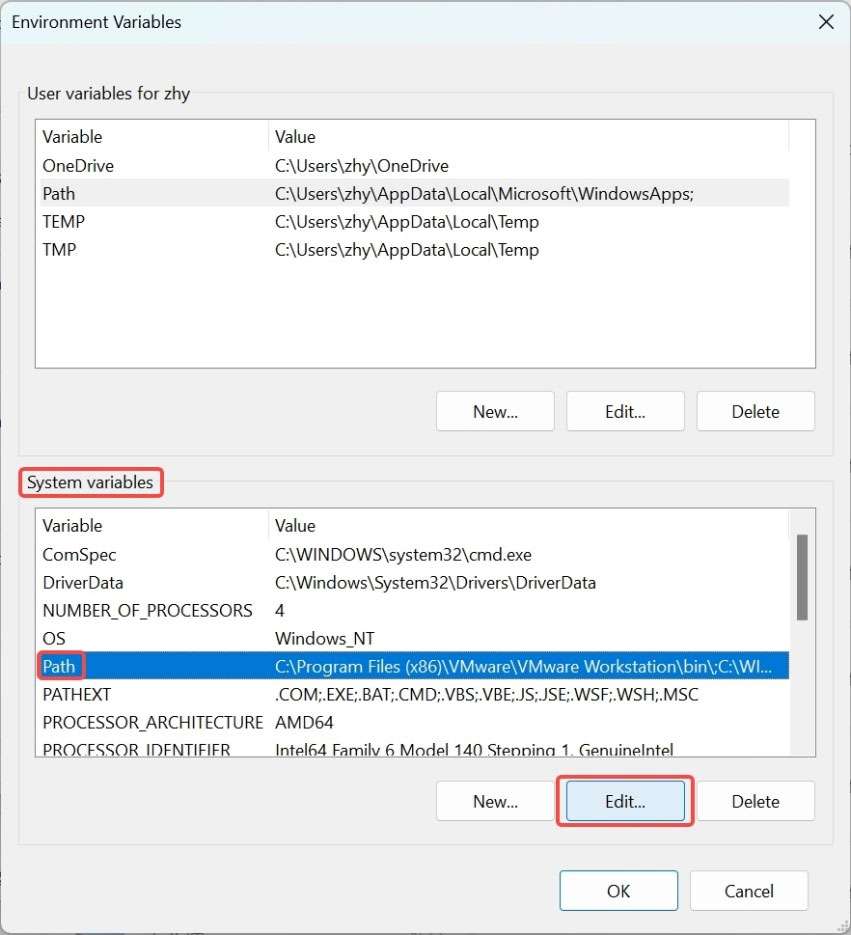
Under System variables, select Path and click Edit.
-
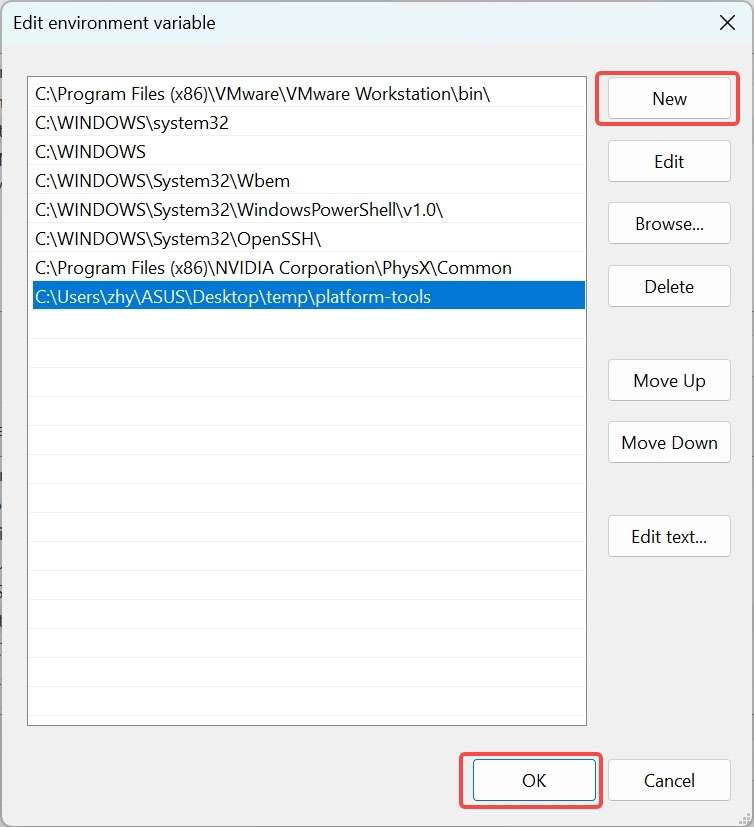
Click New and type the path of decompressed platform-tools in Step 1. Click OK to save the environment variable.
ADB login
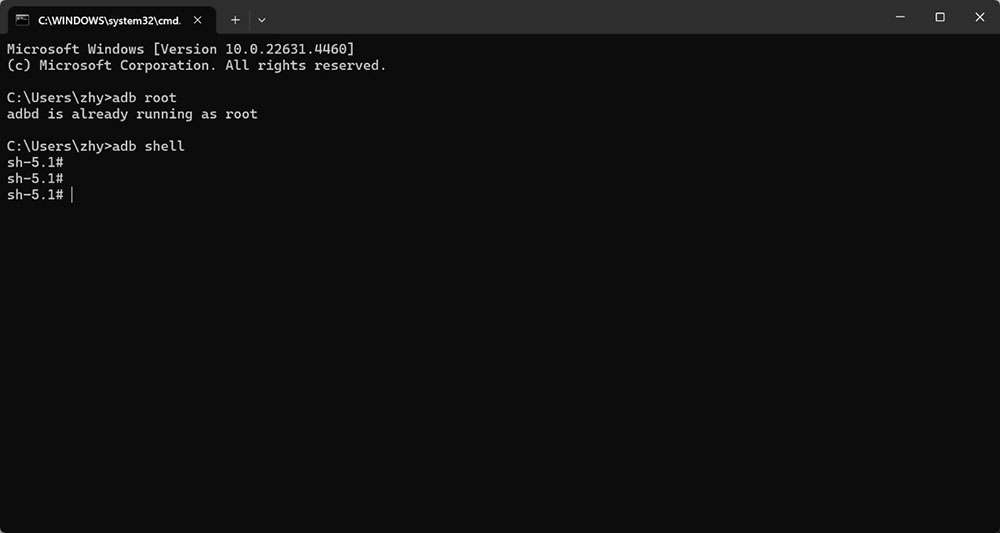
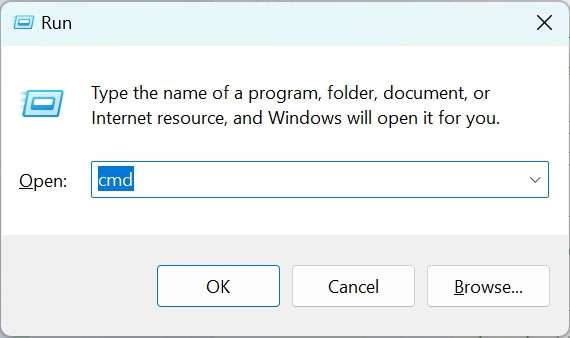
Press Win+R and type "cmd" to open the Windows terminal. Run the following commands to log in to your RUBIK Pi 3:
adb devices # Check if devices are connected
adb root    # Log in as root user
adb shell   # Open the adb terminal
Ubuntu
Preparations
-
Run the following command to install the ADB and Fastboot tools:
sudo apt install git android-tools-adb android-tools-fastboot wget -
Update the udev rules file.
-
Run the following command to open and modify the 51-qcom-usb.rules file.
sudo vi /etc/udev/rules.d/51-qcom-usb.rules -
Add the following content to the file. If the following content already exists, skip this step.
SUBSYSTEMS=="usb", ATTRS{idVendor}=="05c6", ATTRS{idProduct}=="9008", MODE="0666", GROUP="plugdev" -
Run the following command to restart
udev.sudo systemctl restart udev
noteIf your RUBIK Pi 3 is already connected to the PC via USB, unplug and replug the USB cable so that the updated rules can take effect.
-
ADB login
Run the following commands in the terminal to log in to your RUBIK Pi 3:
adb devices # Check if devices are connected
adb root    # Log in as root user
adb shell   # Open the adb terminal

SSH login
Windows
-
Ping the RUBIK Pi 3 IP address.
-
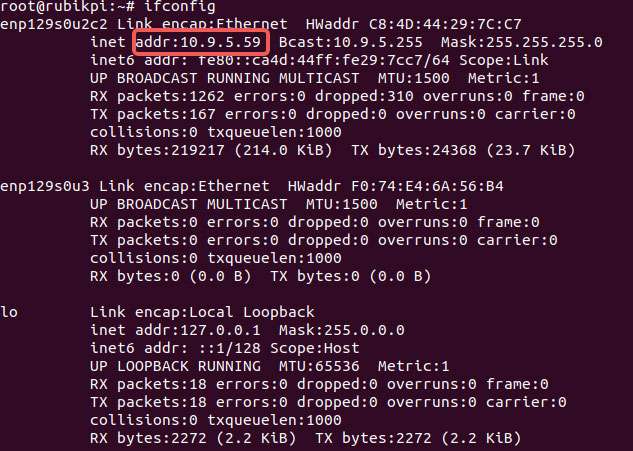
Obtain the IP address.
-
Log in to the backend of the router or use other IP scanning software to obtain the IP address of RUBIK Pi 3.
-
Log in to RUBIK Pi 3 via ADB and run the
ifconfigcommand to obtain the IP address.noteThe IP address may change depending on the network environment, and the device name of RUBIK Pi 3 is "rubikpi".
-
-
Press Win+R, type "cmd" in the pop-up window, and click OK.
- Run the
ping <IP>command in the terminal. For example, the IP address of RUBIK Pi 3 is 10.9.5.59, run the following command and view the execution result.
ping 10.9.5.59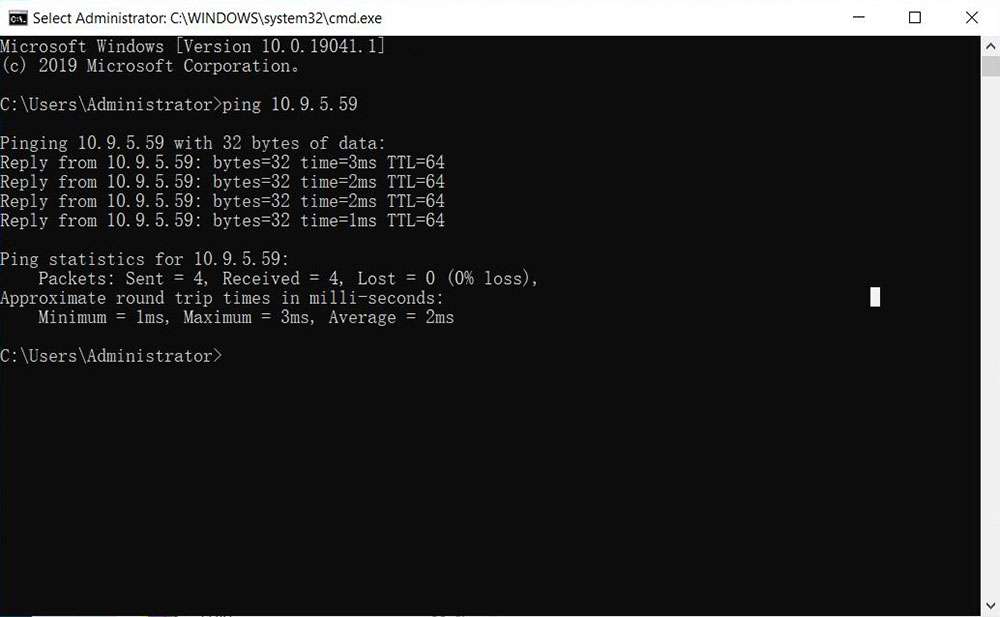
-
-
SSH login.
- Open MobaXterm.

- Click Session and select SSH in the pop-up window.
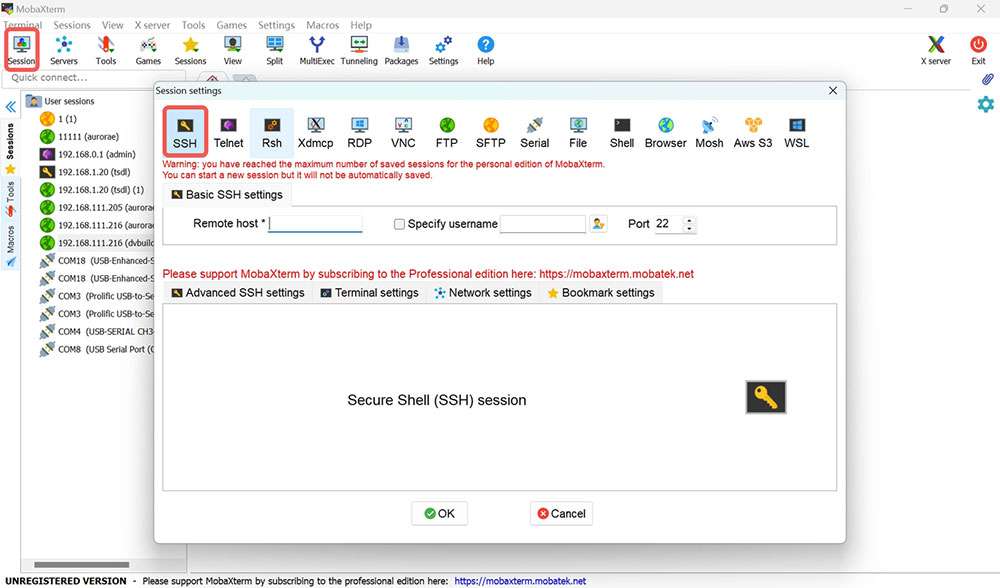
- Type the IP address of the RUBIK Pi 3 you want to log in to and click OK.
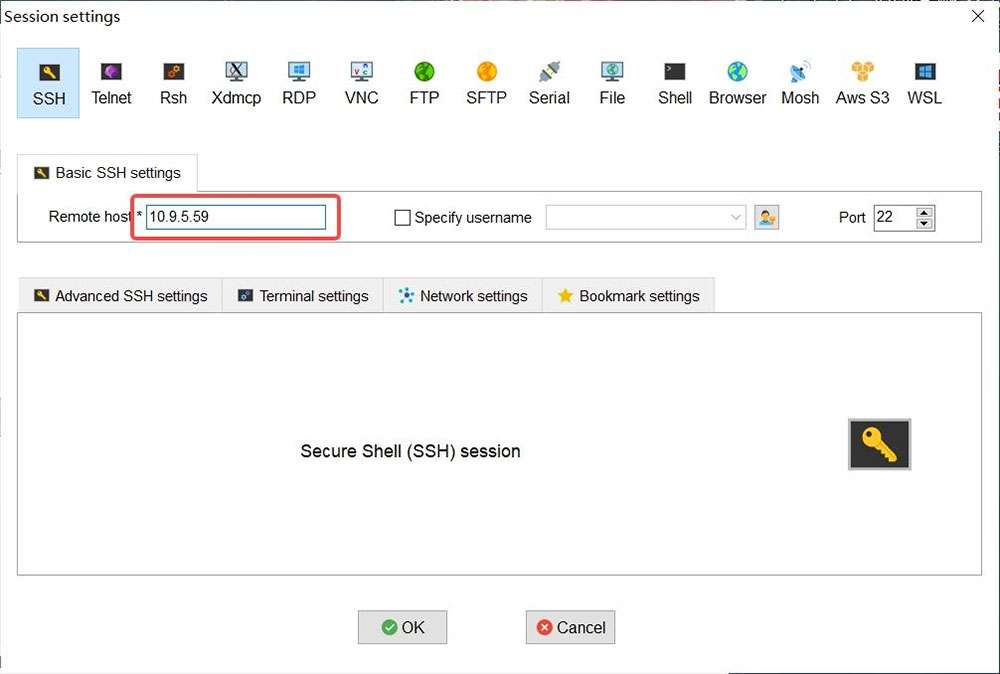
- Type the username, press Enter, type the password, and press Enter to log in to RUBIK Pi 3.

- The following information indicates that the login is successful.

Ubuntu
-
Confirm the network connection.
-
Obtain the RUBIK Pi 3 IP address.
-
Log in to the backend of the router or use other IP scanning software to obtain the IP address of RUBIK Pi 3.
-
Log in to RUBIK Pi 3 via ADB and run the
ifconfigcommand to obtain the IP address.noteThe IP address may change depending on the network environment, and the device name of RUBIK Pi 3 is "rubikpi".
-
-
Run the
ping <IP>command in the Ubuntu terminal. For example, the IP address of RUBIK Pi 3 is 10.9.5.59, run the following command and view the execution result.ping 10.9.5.59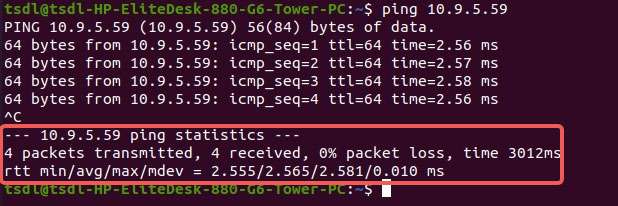
-
-
SSH login.
-
Type the
ssh <user>@<IP>command in the Ubuntu terminal and press Enter, as shown in the following figure.rootindicates the role you want to log in as.10.9.5.59indicates the IP address of RUBIK Pi 3.ssh root@10.9.5.59 -
Type the password and press Enter. The login succeeds.

-
File transfer
ADB
-
In the PC terminal, run the following command to upload the test.txt file to the /opt directory:
adb push test.txt /opt -
In the PC terminal, run the following command to download the test.txt file to your current directory:
adb pull /opt/test.txt ./
SCP
To use Secure Copy Protocol (SCP) transfer, ensure your RUBIK Pi 3 is connected to the network. For example, if the IP address of RUBIK Pi 3 is 10.9.5.59, run the following commands:
Run the ifconfig command on RUBIK Pi 3 to obtain its IP address.
-
In the PC terminal, run the following command to upload the test.txt file to the /opt directory:
scp test.txt root@10.9.5.59:/opt -
In the PC terminal, run the following command to download the test.txt file to your current directory:
scp root@10.9.5.59:/opt/test.txt ./
Set up the Ubuntu development environment
Install software
-
In the Ubuntu terminal, use the following command to install the necessary packages and prepare the host environment for development:
sudo apt updatesudo apt install repo gawk wget git diffstat unzip texinfo gcc build-essential chrpath socat cpio python3 python3-pip python3-pexpect xz-utils debianutils iputils-ping python3-git python3-jinja2 libegl1-mesa libsdl1.2-dev pylint xterm python3-subunit mesa-common-dev zstd liblz4-tool locales tar python-is-python3 file libxml-opml-simplegen-perl vim whiptail bcsudo apt install lib32stdc++6 libncurses5 checkinstall libreadline-dev libncursesw5-dev libssl-dev libsqlite3-dev tk-dev libgdbm-dev libc6-dev libbz2-dev libffi-dev curl git-lfs libncurses5-dev libncursesw5-dev -
Run the following commands in the Ubuntu terminal to install Python 3.10.2. In the Linux kernel packaging process, the
python3.10command is used. If you have installed Python 3.10.2 or later, skip this step.python --version# Download it in a directory of your choicewget https://www.python.org/ftp/python/3.10.2/Python-3.10.2.tgztar -xvf Python-3.10.2.tgzcd Python-3.10.2./configure --enable-optimizationsmakesudo make install
-
Run the following command in the Ubuntu terminal to install pefile.
sudo pip3.10 install pefile
Install cross-compilation tools
-
On the Ubuntu host, visit the RUBIK Pi official website to download the cross-compilation toolchain for RUBIK Pi 3, then run the following command to decompress it.
unzip toolchains_V1.1.0.zipnoteThe cross-compilation tool is an eSDK built using the Yocto Project. The eSDK is a software package generated from the Qualcomm Linux image. It is installed on an Ubuntu host and provides a Yocto-based environment for application development.
For details about eSDK compilation, refer to the Yocto Project User Guide section.
-
Run the following commands in the Ubuntu terminal to install the cross-compilation toolchain.
cd toolchainschmod 755 qcom-wayland-x86_64-qcom-multimedia-image-armv8-2a-qcm6490-idp-toolchain-ext-1.3-ver.1.1.shsh qcom-wayland-x86_64-qcom-multimedia-image-armv8-2a-qcm6490-idp-toolchain-ext-1.3-ver.1.1.sh
-
Follow the prompts to install the cross-compilation environment, type the absolute path to the installation directory, and type "Y".

-
After the installation is completed, go to the installation directory and run the following command to set up the cross-compilation environment.
source environment-setup-armv8-2a-qcom-linuxnoteThe cross-compilation environment is only effective on the current terminal.
If the following error occurs, type the
unset LD_LIBRARY_PATHcommand and run the above command again.
-
Run the following command in the Ubuntu terminal to check the version of the gcc toolchain. If the output is as follows, it indicates that the cross-compilation environment is set up successfully.
aarch64-qcom-linux-gcc -v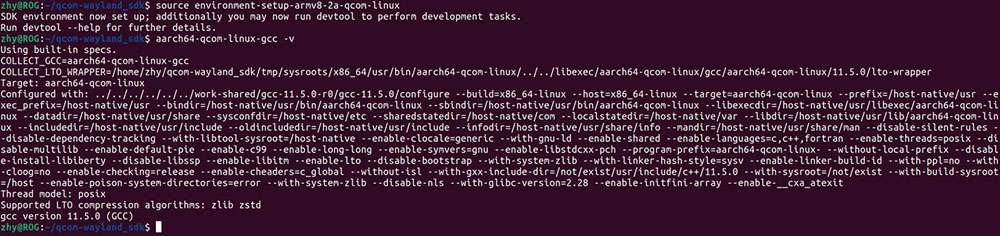
Use the cross-compilation tools
After setting up the cross-compilation environment by using the source environment-setup-armv8-2a-qcom-linux command as described in the previous section, use the following method to cross-compile the executable program of RUBIK Pi 3.
Build the project using Makefile
The header file path sysroot must be set for cross-compilation. Use the --sysroot=dir parameter to specify the path.
aarch64-qcom-linux-gcc --sysroot=/home/zhy/rubikpi/sdk/sysroots/armv8-2a-qcom-linux
In the above command, the cross-compilation toolchain is installed at the /home/zhy/rubikpi/sdk directory of the PC. Change the directory to your actual installation directory.
Build the project using CMake
The following is an example of using aarch64.cmake to set the compilation toolchain:
set(CMAKE_SYSTEM_NAME Linux)
set(CMAKE_SYSTEM_PROCESSOR arm64) #Set the target processor architecture

#Set sysroot
set(TOOLCHAIN_DIR /home/zhy/rubikpi/sdk/sysroots/armv8-2a-qcom-linux)
set(CMAKE_SYSROOT ${TOOLCHAIN_DIR}/sysroots/armv8-2a-qcom-linux)

#Set the cross-compiler
SET(CMAKE_C_COMPILER ${TOOLCHAIN_DIR}/sysroots/x86_64-qcomsdk-linux/usr/bin/aarch64-qcom-linux/aarch64-qcom-linux-gcc)
SET(CMAKE_CXX_COMPILER ${TOOLCHAIN_DIR}/sysroots/x86_64-qcomsdk-linux/usr/bin/aarch64-qcom-linux/aarch64-qcom-linux-g++)

set(CMAKE_FIND_ROOT_PATH_MODE_PROGRAM NEVER)
set(CMAKE_FIND_ROOT_PATH_MODE_LIBRARY ONLY)
set(CMAKE_FIND_ROOT_PATH_MODE_INCLUDE ONLY)
When using CMake to build a project, create a CMakeLists.txt according to the actual situation of the project and run the following command to generate the Makefile.
$ cmake -DCMAKE_TOOLCHAIN_FILE=aarch64.cmake
Set up the Windows 11 development environment
Use WSL to set up an Ubuntu VM on Windows 11.
Windows Subsystem for Linux (WSL) is a Windows feature that allows you to run Linux distributions on Windows, without using virtualization software. Setting up WSL on Windows 11 involves the following tasks:

You can only compile the Qualcomm Linux build using WSL. To flash the software on RUBIK Pi 3, see 1.3.3.1 Flashing images on a Windows system.
Requirements on the host machine
Before setting up an Ubuntu VM using WSL, ensure that your Windows 11 host machine meets the following system requirements:
| Specification | Requirement |
|---|---|
| Processor architecture | x86 or Arm® |
| CPU cores | 8 or more |
| RAM | 8 GB or larger |
| Storage | 300 GB available space |
| Operating System | Windows 11 |
Prerequisites to set up WSL
To set up WSL, you must turn on specific Windows features and set the default WSL version.
-
Windows Subsystem for Linux
-
Virtual Machine Platform
To turn on these features, run the following commands in Windows PowerShell with administrative privileges:
- Windows Subsystem for Linux
Enable-WindowsOptionalFeature -Online -FeatureName Microsoft-Windows-Subsystem-Linux
- Virtual Machine Platform
Enable-WindowsOptionalFeature -Online -FeatureName VirtualMachinePlatform
Restart the Windows 11 host machine after running the commands.
Set the default WSL version
To set Windows Subsystem for Linux 2 as the default Linux distribution, run the following command in Windows PowerShell with administrative privileges:
wsl --set-default-version 2
The output is as follows:
For information on key differences with WSL 2 please visit https://aka.ms/wsl2. The operation completed successfully.
Install the Ubuntu-22.04 Linux distribution
Qualcomm Linux uses the Ubuntu-22.04 Linux distribution. Before installing Ubuntu-22.04, verify if it is available as one of the valid distributions for installation on your Windows 11 host machine.
- To list the distributions available for installation, run the following command in Windows PowerShell:
wsl --list --online
-
Verify that Ubuntu-22.04 is listed as one of the distributions.
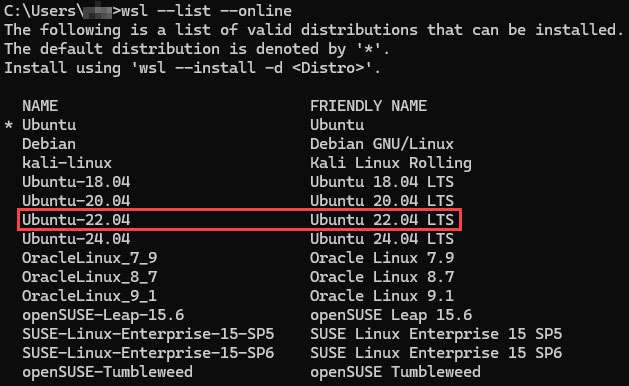
If you do not see Ubuntu-22.04 in the distributions listed, contact Microsoft support.
- To update WSL, run the following command:
wsl --update
- To install Ubuntu 22.04 LTS, run the following command:
wsl --install -d Ubuntu-22.04
- After the installation is complete, set the username and password for the Ubuntu-22.04 Linux distribution you installed.
Create the .wslconfig file for WSL
Use the .wslconfig file to configure settings, such as memory, processors, and swap storage space for Linux distributions running on WSL. The .wslconfig file does not exist by default. Hence, you must create one in the %UserProfile% directory.
To create the .wslconfig file, perform the following steps:
-
In Windows PowerShell, run the
cd ~command to go to the %UserProfile% directory. For example, the directory path can be C:\Users\<UserName>. -
Create a file named .wslconfig with the following contents:
    # Settings apply across all Linux distributions running on WSL 2
    [wsl2]
    # Limits VM memory to use no more than 4 GB, this can be set as whole numbers using GB or MB
    memory=64GB
    # Sets the VM to use two virtual processors
    processors=16
    # Sets amount of swap storage space to 8GB, default is 25% of available RAM
    swap=64GB
    # Sets swapfile path location, default is %USERPROFILE%\AppData\Local\Temp\swap.vhdx
    swapfile=C:\\temp\\wsl-swap.vhdx
    # Enable experimental features
    [experimental]
    # Automatically releases cached memory after detecting idle CPU usage. Set to gradual for slow release, and dropcache for instant release of cached memory.
    autoMemoryReclaim=dropcache
Set the values for memory, processors, and swap size to match with the specifications of your Windows host machine.
- To shut down WSL, run the following command in Windows PowerShell:
wsl --shutdown
- To restart WSL, run the following command in Windows PowerShell:
wsl
Set up the WSL environment
To configure DNS settings for WSL, use the resolv.conf file.
To configure local settings for the Ubuntu-22.04 Linux distribution you installed, use the wsl.conf file. The settings in the wsl.conf file are automatically applied every time you run WSL.
Configure DNS settings for WSL (resolv.conf file)
In a Linux terminal window, use the sudo command to add the following contents in the /etc/resolv.conf file:
sudo rm /etc/resolv.conf
sudo bash -c 'echo "nameserver 8.8.8.8" > /etc/resolv.conf'
When you close the Linux terminal window, the nameserver reverts to its default nameserver automatically. To save the changes you made to the resolv.conf file permanently, run the following command:
sudo chattr -f +i /etc/resolv.conf
To change the write permissions and modify the resolv.conf file, run the following command:
sudo chattr -f -i /etc/resolv.conf
Configure local settings for Ubuntu-22.04 (wsl.conf file)
In the Linux terminal window, use the sudo command to add the following contents in the /etc/wsl.conf file:
[network]
generateResolvConf = false
[automount]
options = "metadata"
[boot]
command = service docker start
In Windows PowerShell, run the following command to restart WSL:
wsl --shutdown
Enable long path support for Git
To enable long path support for Git, run the following command in the Linux terminal window:
git config --global core.longpaths true
Optional: Change the Ubuntu installation drive
By default, Ubuntu is installed on the C drive. If the C drive on your Windows host machine does not have enough disk space for builds, you can move the Ubuntu installation to another drive.
To move the Ubuntu installation to another drive, perform the following steps:
-
Open Add or Remove Programs and find the Ubuntu installation in the list.
-
In the Control Panel, choose Programs > Programs and Features.
-
Right-click the Ubuntu installation for which you want to change the drive, and select Uninstall or Uninstall/Change.
The following dialog box appears.

-
Click Move.
-
Select the drive that you want to move the Ubuntu installation to, and click Move.
To access the WSL workspace, go to the following path using the Windows File Explorer:
\\wsl$
Set up an Ubuntu Server VM on an Arm64 Mac using UTM
UTM is an open-source VM host for macOS(®), which allows you to run other operating systems on Macs, including Ubuntu. Setting up an Ubuntu Server VM using UTM on an Arm64 Mac involves the following tasks:

Host machine requirements
Before setting up an Ubuntu Server VM using UTM, ensure that your Arm64 Mac host machine meets the following system requirements:
| Specification | Requirement |
|---|---|
| Processor architecture | Arm64 To verify that the architecture of your Mac is Arm64, run the |
| CPU cores | 8 or more |
| RAM | 8 GB or larger |
| Storage | 300 GB free space for the UTM VM |
| Operating system | macOS 14 |
If your Arm64 Mac host machine meets the system requirements, download the following software:
| Software | Description |
|---|---|
| UTM virtualization software | Download the UTM virtualization software from the UTM website. |
| Ubuntu server ISO | All Ubuntu 22.04 64-bit ARM (ARMv8/AArch64) Server LTS versions are supported. We recommend downloading the latest version of Ubuntu Server 22.04 ISO (e.g., ubuntu-22.04.5-live-server-arm64.iso) from the Ubuntu website. |
Install UTM on an Arm64 Mac
-
Double-click the UTM.dmg file downloaded earlier and drag the UTM icon onto the Applications icon.

-
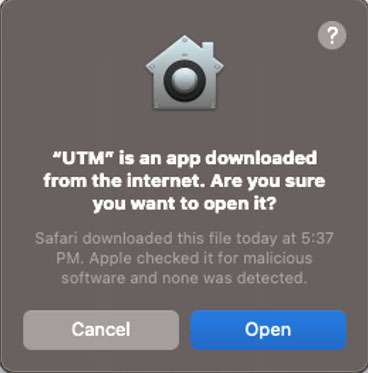
While installing UTM, if you see the following dialog box, click Open:
-
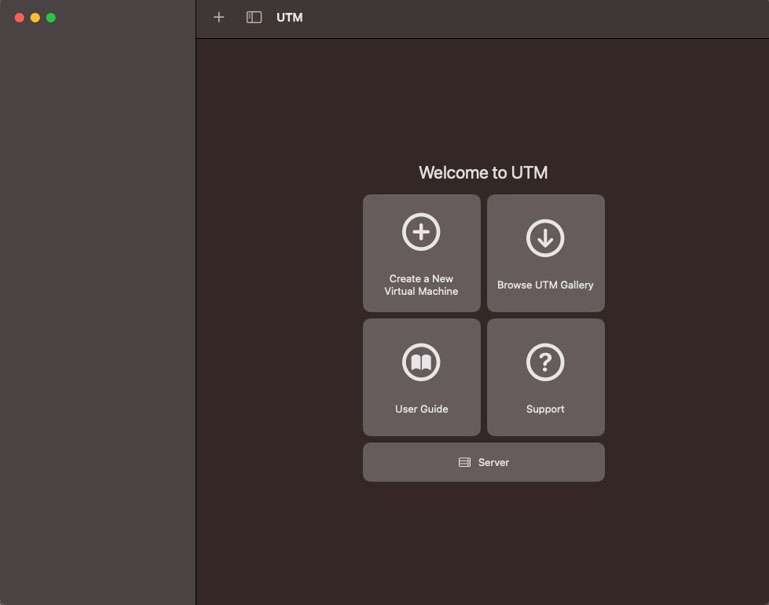
Open Launchpad, search for "UTM", and click UTM.
The UTM main window appears.
Create a VM in UTM
-
In the UTM main window, click Create a New Virtual Machine.
-
On the Start screen, click Virtualize.
-
On the Operating System screen, select the Linux OS.
-
On the Linux screen, browse and select the Ubuntu ISO image you downloaded, and click Continue.
-
On the Hardware screen, specify the memory and CPU cores you want to allocate to the Ubuntu VM, and click Continue. The recommended values are as follows:
-
Memory: About 70% of the available memory
-
CPU cores: At least 50% of the available cores
If you leave the CPU Cores field blank or set it to 0, UTM allocates all the host machine cores to the VM. Allocating all CPU cores to the VM can make the host machine slow or unresponsive.
-
To know the memory size and the CPU core count of a Mac host machine, see the instructions in the macOS User Guide.
- On the Storage screen, specify the drive size for the VM, and click Continue.
It is recommended that you allocate at least 300 GB of storage space for the VM.
-
If you want to share a directory between the host machine and the VM, do the following on the Shared Directory screen:
-
Browse and select the directory.
-
Click Continue.
-
-
On the Summary screen, do the following:
-
Review the configuration summary for the VM that you are creating.
-
Provide a name to the VM.
-
Click Save. The newly created VM is listed in the UTM main window.

-
Install Ubuntu Server in UTM
-
Run UTM.
-
In the UTM main window, click the Play icon to run the Ubuntu ISO image through virtualization.
-
Select Try or Install Ubuntu Server using the arrow keys and press Enter.

-
Select a language, and press Enter.
-
Optional: You may see a screen to update the installer. Select one of the following options and press Enter:
-
Update to the new installer
-
Continue without updating
-
-
Select a keyboard layout, select Done, and press Enter.
-
Select the Ubuntu Server installation base, select Done, and press Enter.
-
Select the appropriate network interface, select Done, and press Enter.
-
Select the appropriate proxy configuration, select Done, and press Enter.
-
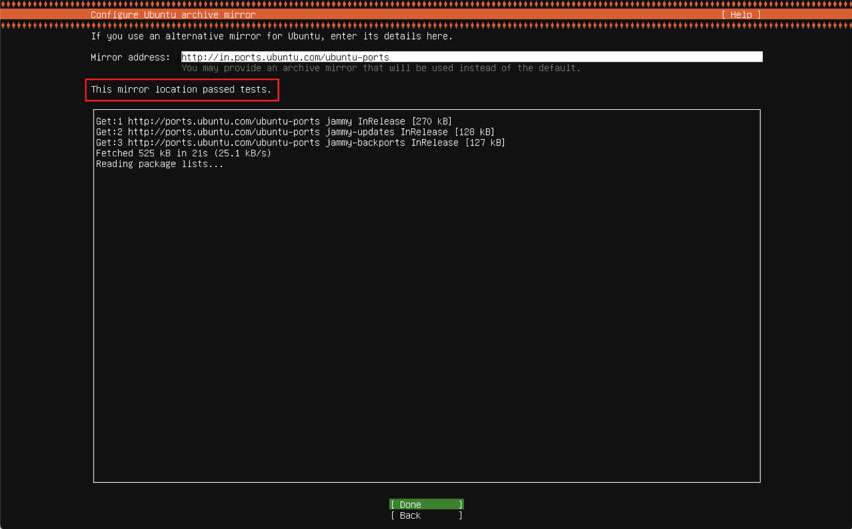
If necessary, configure the mirror address and wait until the mirror location passes all the tests, select Done, and press Enter.
-
Select Use an entire disk > Set up this disk as an LVM group, select Done, and press Enter.
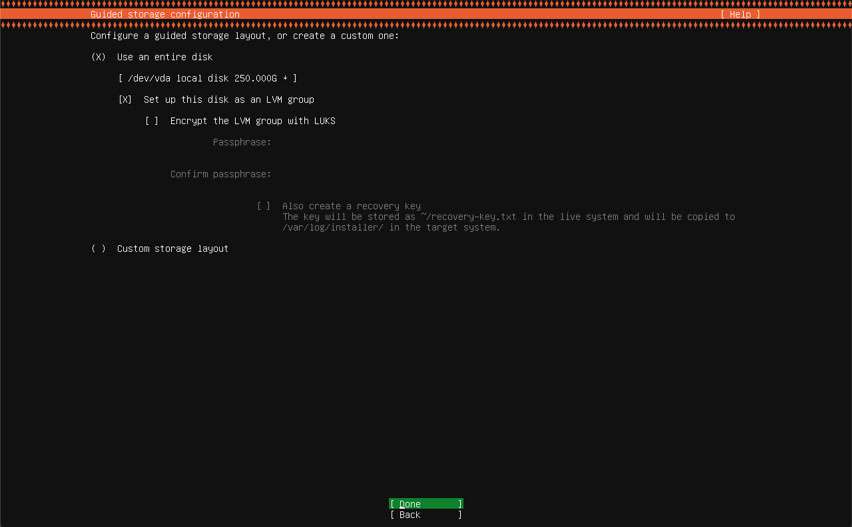
-
Configure the storage space as follows:
- Under the USED DEVICES section, select ubuntu-lv and press Enter to view additional options.
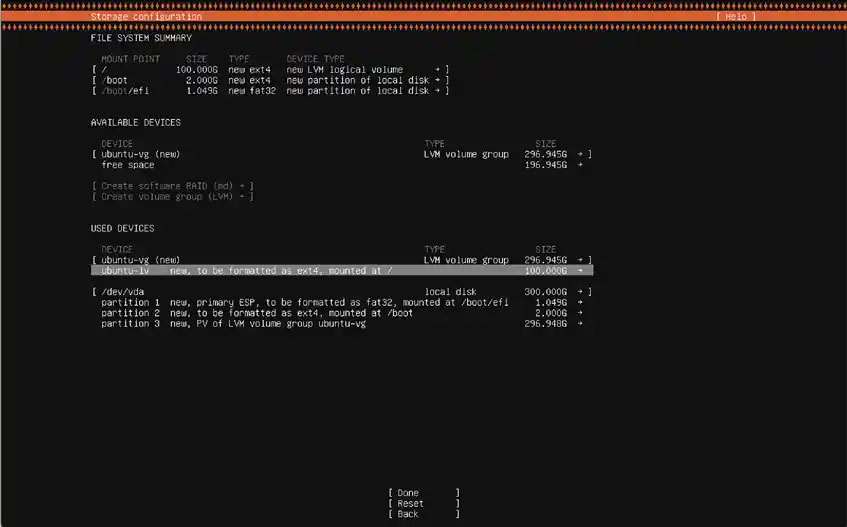
- In the dialog box, select Edit, and press Enter.

-
In the Size field, type 296.000G, select Save, and press Enter. The updated size should now reflect for the ubuntu-lv entry.
-
Select Done and press Enter.
-
To set up your profile, specify the required details, select Save, and press Enter.
-
Skip the Ubuntu Pro upgrade option, select Continue, and press Enter.
-
Optional: Select Install OpenSSH Server to set up SSH, select Done, and press Enter.
OpenSSH is not required for syncing, compiling, and flashing Qualcomm Linux. Install the OpenSSH server only if you want to allow secure remote access for the Ubuntu VM.
- Select a Docker snap, select Done, and press Enter.
Wait for the installation process to complete.
The installation process may suggest multiple Docker channels, such as stable and candidate. Select an appropriate Docker channel to continue with the installation.
-
After the installation is successful, click the Power icon to shut down and stop the VM.

-
In the Confirmation dialog box, click OK. After the VM is stopped, close the window.
-
In the UTM main window, in the CD/DVD drop-down list, select Clear.

-
Confirm that the ISO image association is cleared/empty against the CD/DVD option.

-
To run the Ubuntu VM, click the Play icon.

-
After the Ubuntu operating system boots successfully, enter the credentials to log in and access the shell.

-
Run the following commands to update the Ubuntu operating system and install the graphical desktop environment, followed by a reboot:
sudo apt update && sudo apt upgrade -ysudo apt install ubuntu-desktop -yreboot -
Log in to the Ubuntu VM you created.
Access RUBIK Pi 3 from the UTM VM
-
Connect RUBIK Pi 3 to the host machine.
The UTM software may show you a dialog box to confirm whether the virtualized Ubuntu operating system should have access to RUBIK Pi 3.
-
If you see a dialog box as follows, click Confirm:

-
After clicking Confirm, if you see the following USB disconnection error, click OK to ignore it:

-
-
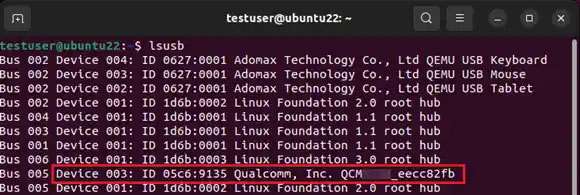
To verify if the Ubuntu VM can access RUBIK Pi 3, run the
lsusbcommand in a Linux terminal window.
RUBIK Pi 3 is shown in the output as follows:

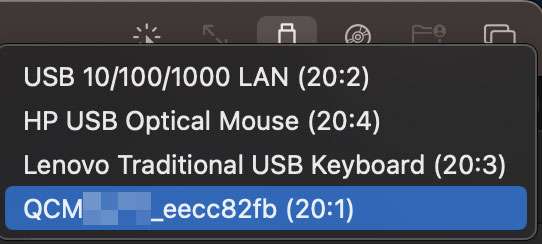
If RUBIK Pi 3 is not detected in the Ubuntu VM, do the following:
- Click USB Devices in the toolbar of the UTM VM window.
- Select QCMXXXX_xxxxxxxx.
If you do not see RUBIK Pi 3 listed as one of the USB devices, in UTM settings, click Input in the left panel, and set the value in the Maximum Shared USB Devices field to 10.
Configure sleep and wake settings for Mac, and power settings for Ubuntu
To ensure that the Mac host machine and the Ubuntu VM do not go to sleep due to inactivity, do the following:
-
To configure the sleep and wake settings for the Mac host machine, see macOS User Guide.
-
To configure the power settings for Ubuntu, do the following:
-
In System Settings for Ubuntu, click Power.
-
Turn off Automatic Suspend.
-
To sync, build, and flash Qualcomm Linux, see Yocto Project User Guide and Linux kernel.
Set up an Ubuntu VM on an x86_64 Mac using UTM
UTM is an open-source VM host for macOS, which allows you to run other operating systems on Macs, including Ubuntu. Setting up an Ubuntu VM using UTM on an x86_64 Mac involves the following tasks:

Host machine requirements
Before setting up an Ubuntu VM using UTM, ensure that your x86_64 Mac host machine meets the following system requirements:
| Specification | Requirement |
|---|---|
| Processor architecture | x86_64 To verify that the architecture of your Mac is x86_64, run the |
| CPU cores | 8 or more |
| RAM | 8 GB or larger |
| Storage | 300 GB free space for the UTM VM |
| Operating system | macOS 13 or higher |
If your x86_64 Mac host machine meets the system requirements, download the following software:
| Software | Description |
|---|---|
| UTM virtualization software | Download from the UTM website |
| Ubuntu ISO | All Ubuntu 22.04 64-bit PC (AMD64) Desktop LTS versions are supported. We recommend that you download the latest version of Ubuntu 22.04 ISO (for example, ubuntu-22.04.5-desktop-amd64.iso) from the Ubuntu website |
Install UTM on an x86_64 Mac
-
Double-click the UTM.dmg file downloaded earlier and drag the UTM icon onto the Applications icon.
-
While installing UTM, if you see the following dialog box, click Open:

-
Open Launchpad, search for "UTM", and click UTM.
The UTM main window appears.

Create a VM in UTM
-
In the UTM main window, click Create a New Virtual Machine.
-
On the Start screen, click Virtualize.
-
On the Operating System screen, select the Linux OS.
-
On the Linux screen, browse and select the Ubuntu ISO image you downloaded, and click Continue.
-
On the Hardware screen, specify the memory and CPU cores you want to allocate to the Ubuntu VM, and click Continue. The recommended values are:
-
Memory: About 70% of the available memory
-
CPU cores: At least 50% of the available cores
-
If you leave the CPU Cores field blank or set it to 0, UTM allocates all the host machine cores to the VM. Allocating all CPU cores to the VM can make the host machine slow or unresponsive.
To know the memory size and the CPU core count of a Mac host machine, see the instructions in the macOS User Guide.
- On the Storage screen, specify the drive size for the VM, and click Continue.
It is recommended that you allocate at least 300 GB for the VM.
-
If you want to share a directory between the host machine and the VM, do the following on the Shared Directory screen:
-
Browse and select the directory.
-
Click Continue.
-
-
On the Summary screen, do the following:
-
Review the configuration summary for the VM that you are creating.
-
Provide a name to the VM.
-
Click Save. The newly created VM is listed in the UTM main window.
-
Install Ubuntu in UTM
-
In the UTM main window, click the Play icon to run the Ubuntu ISO image through virtualization.

-
Select Try or Install Ubuntu using the arrow keys and press Enter.

-
On the Welcome screen, select a language, and click Install Ubuntu.
-
On the Keyboard Layout screen, select a keyboard layout, and click Continue.
-
On the Updates and other software screen, Normal installation is selected by default. Select the Minimal installation option button if you do not want to install all the Ubuntu operating system features.
-
On the Installation type screen, select the Erase disk and install Ubuntu option button, and click Install Now.
The Erase disk and install Ubuntu option erases only the storage area allocated to the VM. It does not erase any other data or system files on the host machine.
-
On the Write the changes to disk? dialog box, click Continue.
-
On the Where are you? screen, select the appropriate time zone.
-
On the Who are you? screen, specify the required details, and click Continue to start the installation.
-
After the installation is completed, click Restart Now.
-
To shut down and stop the VM, click the Power icon.

-
In the Confirmation dialog box, click OK. After the VM is stopped, close the window.
-
In the UTM main window, in the CD/DVD drop-down list, select Clear.

-
Confirm that the ISO image association is cleared/empty against the CD/DVD option.
-
To run the Ubuntu VM, click the Play icon.
-
Log in to the Ubuntu VM you created.
Access RUBIK Pi 3 from the UTM VM
-
Connect RUBIK Pi 3 to the host machine.
The UTM software may show you a dialog box to confirm whether the virtualized Ubuntu operating system should have access to RUBIK Pi 3.
If you see a dialog box as follows, click Confirm:

After clicking Confirm, if you see the following USB disconnection error, click OK to ignore it.

- To verify if the Ubuntu VM can access RUBIK Pi 3, run the
lsusbcommand in a Linux terminal window.
RUBIK Pi 3 is shown in the output as follows:
If RUBIK Pi 3 is not detected in the Ubuntu VM, do the following:
- Click USB Devices in the toolbar of the UTM VM window.
- Select QCMXXXX_xxxxxxxx.
If you do not see RUBIK Pi 3 listed as one of the USB devices, in UTM settings, click Input in the left panel, and set the value in the Maximum Shared USB Devices field to 10.
Configure sleep and wake settings for Mac, and power settings for Ubuntu
To ensure that the Mac host machine and the Ubuntu VM do not go to sleep due to inactivity, do the following:
-
To configure the sleep and wake settings for the Mac host machine, see macOS User Guide.
-
To configure the power settings for Ubuntu, do the following:
-
In System Settings for Ubuntu, click Power.
-
Turn off Automatic Suspend.
noteTo sync, build, and flash Qualcomm Linux, see Yocto Project User Guide and Linux kernel.
-
Linux kernel
It is advisable to conduct Linux kernel development in an environment running Ubuntu 18 – Ubuntu 22.
Download code
git clone https://github.com/rubikpi-ai/linux.git
git submodule init
git submodule update
Directory analysis
After the git clone operation, the RUBIK Pi 3 Linux repository is as shown in the following figure:

The major folders and files are described as follows:
| Name | Description |
|---|---|
| arch | Architecture-related directory |
| block | Block device-related directory |
| certs | Certification and signature-related directory |
| crypto | Encryption-related directory |
| documentation | Documentation-related directory |
| drivers | Driver-related directory |
| firmware | Firmware-related directory |
| fs | File system-related directory |
| include | Header file-related directory |
| init | Kernel initialization-related directory |
| ipc | Inter-process communication-related directory |
| kernel | Directory of the kernel core code |
| lib | Directory of kernel core library code |
| mm | Directory of memory management-related code |
| net | Directory of network protocol-related code |
| samples | Directory of kernel compilation examples |
| scripts | Directory of kernel compilation and configuration scripts |
| security | Security architecture-related directory |
| sound | Audio system-related directory |
| tools | Directory of kernel interaction tools |
| usr | initramfs-related directory, used to generate the initramfs |
| virt | Directory that provides Kernel-based Virtual Machine (KVM) technologies |
| rust | Rust-related directory |
| rubikpi | RUBIK Pi 3 related directory for storing compilation tools |
| techpack | Qualcomm platform-related driver |
| .config | Configuration file for final kernel compilation |
| Makefile | Main file used to compile the kernel |
| Kbuild | Script for configuring kernel settings |
| Kconfig | Configuration file for the graphical configuration interface |
| MAINTAINERS | List of maintainers |
| CREDITS | Linux contributors |
| COPYING | Copyright statement |
| rubikpi_build.sh | Compilation and packaging scripts provided by RUBIK Pi 3 |
| rubikpi_flash.sh | Flash scripts provided by RUBIK Pi 3 |
Device tree
The top-level device tree of RUBIK Pi 3 is rubikpi3.dts, which is located in the arch/arm64/boot/dts/qcom directory. It is recommended that all modifications to the device tree be made in this file.
In addition, during the development process, the sc7280.dtsi in the same level of directory may be frequently checked. sc7280.dtsi has nodes commonly used during the development process, including GPIO, SPI, I2C, UART, CPU, and GPU.
On the Qualcomm platform, drivers and device trees related to display, graphics, camera, video, and other components are separated from the main Linux kernel source and maintained in independent repositories. Follow the Yocto Project User Guide to download the Yocto project source code. You can then navigate to the layers/meta-qcom-hwe directory, where the .bb files provide information about the specific code repositories.
For example, to view the device tree configuration for the camera, check the layers/meta-qcom-hwe/recipes-multimedia/cameradlkm/cameradlkm_1.0.bb file. The content is as follows:
SRCPROJECT = "git://git.codelinaro.org/clo/le/platform/vendor/opensource/camera-kernel.git;protocol=https"
SRCBRANCH  = "camera-kernel.qclinux.1.0.r1-rel"
SRCREV     = "0f2b11fac7f13f76a9e9f8e25ae2de5c97b23169"
-
The repository address is: https://git.codelinaro.org/clo/le/platform/vendor/opensource/camera-kernel.git
-
The branch is
camera-kernel.qclinux.1.0.r1-rel -
The commit is
0f2b11fac7f13f76a9e9f8e25ae2de5c97b23169
To ensure that the board works correctly after the compiled device tree is flashed to it, RUBIK Pi 3 stores these device tree repositories independent of the Linux kernel source in the directory arch/arm64/boot/dts/qcom.
-
Display: arch/arm64/boot/dts/qcom/display-devicetree
-
Camera: arch/arm64/boot/dts/qcom/camera-devicetree
-
Graphics: arch/arm64/boot/dts/qcom/graphics-devicetree
-
Video: arch/arm64/boot/dts/qcom/video-devicetree
When using the ./rubikpi_build.sh -d command to compile the device tree, it will first compile the kernel device tree rubikpi3.dtb as the base device tree. Then, it will overlay the device trees from the sub-repositories onto the base device tree, and finally, it will overlay the arch/arm64/boot/dts/thundercomm/rubikpi3/rubikpi3-overlay.dtso device tree. It is recommended to incorporate any modifications to the sub-repository device trees into the rubikpi3-overlay.dtso.
Compile code
-
Run the following command to set up the cross-compilation environment. For details, refer to Install cross-compilation tools.
source <your toolchains directory>/environment-setup-armv8-2a-qcom-linuxnoteThe cross-compilation environment is only effective on the current terminal.
If the following error occurs, input the
unset LD_LIBRARY_PATHcommand and run the above command again.
-
Go to the kernel directory and compile the kernel.
./rubikpi_build.sh -anote-
The first compilation takes a longer time based on different computer configurations. In most cases, it takes less than 20 minutes. Subsequent compilations are only performed on modified code.
-
The kernel directory can be cleaned up using the
./rubikpi_build.sh -ccommand, after which all compilation artifacts and some configuration content will be deleted.
-
-
Go to the kernel directory. Package the kernel and device tree image.
./rubikpi_build.sh -dp -ip

If the following error occurs when you package the image:

Run the following command to modify the .mtoolsrc file, add mtools_skip_check=1, and try packaging the image again.
vim ~/.mtoolsrc
During the update in March 2025, if non-official images of RUBIK Pi 3 are flashed, copy efi.bin in the corresponding image package to the rubikpi/tools/pack directory before packaging.
Running the ./rubikpi_build.sh command completes step 2 and step 3.
-
Go to the kernel directory and flash the kernel and device tree image.
./rubikpi_flash.sh -d -i -rnoteBefore flashing, ensure that RUBIK Pi 3 has entered fastboot mode. Use one of the following methods to enter fastboot mode:
- In the RUBIK Pi 3 terminal, input
reboot bootloader. When RUBIK Pi 3 enters fastboot mode, the blue indicator lights up. - Press and hold the [PWR] button until the blue indicator lights up.
- In the RUBIK Pi 3 terminal, input
-
For details about how to use the
./rubikpi_build.shand./rubikpi_flash.shscripts, use the–hparameter.
Run the ./rubikpi_buils.sh -h command to view how to use the build script.
Sample output
Usage:
  bash ./rubikpi_build.sh [options]

Options:
  -h, --help              display this help message
  -dp, --dtb_package      generate a burnable device tree image
  -ip, --image_package    generate a burnable kernel image
  -a, --build_all         Complete compilation of kernel
  -d, --build_dts         Complete compilation of device tree
  -gc, --generate_config  Generate. config file
  -c, --clean             Clean up workspace
Run the ./rubikpi_flash.sh -h command to view how to use the flashing script.
Sample output
Usage:
  bash ./rubikpi_flash.sh [options]

Options:
  -h, --help     display this help message
  -r, --reboot   exit fastboot mode
  -d, --dtb      flash device tree image
  -i, --image    flash kernel image
Compile the ko driver module separately
-
Create a Makefile as follows. Change
KDIRto the actual kernel source code directory.obj-m += hello.oKDIR:=/home/rubikpi/kernel-6.6PWD?=$(shell pwd)all:make -C $(KDIR) M=$(PWD) modulesecho $(PWD)clean:rm -f *.ko *.o *.mod *.mod.o *.mod.c *.symvers *.order -
Create a hello.c file as follows:
#include <linux/module.h>#include <linux/init.h>static int hello_init(void){printk("hello RUBIK Pi!\n");return 0;}static void hello_exit(void){printk("bye RUBIK Pi!\n");}module_init(hello_init);module_exit(hello_exit);MODULE_LICENSE("GPL");MODULE_VERSION("V1.0");MODULE_AUTHOR("RUBIK Pi"); -
Run the following commands to compile the ko module:
export ARCH=arm64export CROSS_COMPILE=aarch64-qcom-linux-make -
Transfer hello.ko to your RUBIK Pi 3 using the ADB or SCP method.
-
Run the following commands on your RUBIK Pi 3 to verify that the compilation artifact is valid.
insmod hello.kormmod hello.kodmesg | grep "RUBIK Pi"
Configure the kernel
Run the following commands to configure the Linux kernel using menuconfig:
cd linux
make ARCH=arm64 menuconfig
After the configuration is completed, run the following commands to save the configuration.
make ARCH=arm64 savedefconfig
cp defconfig ./arch/arm64/configs/rubik_pi3_defconfig