User Guide to rubikpi_config
rubikpi_config is a configuration tool that runs on RUBIK Pi 3.
The rubikpi_config command allows for easy configuration of the 40-pin, LED, fan, and other interfaces.
rubikpi_config has two modes:
-
Command-line mode
Use commands like
rubikpi_config pin i2c1 enableto configure interfaces. -
Menu mode
Run the
rubikpi_configcommand to enter menu mode and follow the prompts to configure interfaces.
In the official released image, the rubikpi_config tool may not be the latest version. If you encounter any issues during use, visit (https://github.com/rubikpi-ai/tools/tree/rubikpi_config) and follow the instructions in README to update the tool.
Command-line mode
Run the rubikpi_config -h command to check how to use the tool. The output is as follows:
This is the config tool for RUBIK Pi.

Select working mode:
 rubikpi_config                        ---> When executed without arguments, enter the menu mode
 rubikpi_config [function] [args...]   ---> When executed with arguments, enter cmdline mode

CMDLINE MODE:

rubikpi_config [function] -h         View Help Information

function:
 pin                           40 pin header function control(e.g. i2c1, spi2)
 fan                           Fan status control
 temp                          Temperature information view
 res                           Resource information view(e.g. CPU usage, memory usage)
 led                           LED parameter settings
 thermal                       Thermal switch settings
 debug                         Debugging information printing
 display                       Display parameter settings(e.g. resolut)
 audio                         audio information view and parameter settings
 wifi                          WiFi quick connection
 bt                            Switching protocol stack

OTHER

-h, --help                    Print help information
-v                            Print version information
40-pin
- Check how to use rubikpi_config:
rubikpi_config pin -h
Sample output:
This is the config tool for RUBIK Pi.
PIN
Use examples
rubikpi_config pin [operation port] [enable/disable]
operation port:
i2c1, i2c3, spi2, uart2_2w, uart2_4w, i2c2, spi6, uart6_2w, uart6_4w, i2c6, spi8, uart8_2w, uart8_4w, i2c8, spi12, uart12_2w, uart12_4w, i2c12, i2s2
-
Examples of some commands:
-
Enable UART6 in two-wire mode:
rubikpi_config pin uart6_2w enableSample output:
Note: The update is complete and will take effect after restart.After restarting the system, the
/dev/ttyHS6node will appear. Use the method described in UART to test UART6. -
Get the enable status of UART6 in two-wire mode:
rubikpi_config pin uart6_2wSample output:
uart6_2w current status:enable
-
Debug
- Check how to use rubikpi_config:
rubikpi_config debug -h
Sample output:
This is the config tool for RUBIK Pi.
debug print
Use examples:
rubikpi_config debug uart                Get serial port printing status
rubikpi_config debug uart on             Enable serial port printing
rubikpi_config debug uart off            Close serial port printing
-
Examples of some commands:
- Turn off the UART serial terminal:
rubikpi_config debug uart off
Sample output:
Console status set success

The modification will take effect after the system restarts
After the serial terminal is restarted, there will be no printed output once the kernel is loaded.
Thermal
- Check how to use rubikpi_config:
rubikpi_config thermal -h
Sample output:
This is the config tool for RUBIK Pi.
thermal
Use examples:
rubikpi_config thermal cpu [enabled/disabled]        cpu thermal on/off control
rubikpi_config thermal cpu                           cpu thermal status get
-
Examples of some commands:
- Obtain the current CPU thermal management status:
rubikpi_config thermal cpuSample output:
current cpu thermal is:disabled
Fan
- Check how to use rubikpi_config:
rubikpi_config fan -h
Sample output:
This is the config tool for RUBIK Pi.
FAN
Use examples:
rubikpi_config fan speed [speed_value]
speed value:
speed value: 0-255, 0 is stop, 255 is max speed
-
Examples of some commands:
- Set the fan speed to 255:
rubikpi_config fan speed 255
Before setting the fan speed to a fixed value, disable CPU thermal management using the rubikpi_config thermal disable command.
LED
- Check how to use rubikpi_config:
rubikpi_config led -h
Sample output:
This is the config tool for RUBIK Pi.
LED
Use examples:
rubikpi_config led heartbeat [on/off]             heartbeat led on/off control
rubikpi_config led heartbeat [blue/green/red]     heartbeat led Color selection
rubikpi_config led heartbeat                      heartbeat brightness and color get
rubikpi_config led brightness [0-511]             heartbeat brightness set
rubikpi_config led [blue/green/red] [0-511]       led brightness set
rubikpi_config led [blue/green/red]               led brightness get
rubikpi_config led off                            leds off
-
Examples of some commands:
- Disable the heartbeat LED:
rubikpi_config led heartbeat off
Display
- Check how to use rubikpi_config:
rubikpi_config display -h
Sample output:
This is the config tool for RUBIK Pi.
display
Use examples:
rubikpi_config display resolut [resolution_value]
resolution_value:
edidAdaptiveResolution 1280x720x60 1920x1080x60 2560x1440x60, 3840x2160x30
-
Examples of some commands:
- Fix the HDMI OUT resolution to 1080P display.
rubikpi_config display resolut 1920x1080x60Sample output. The configuration takes effect after the system is restarted:
The update is complete and will take effect after restart.
BT
- Check how to use rubikpi_config:
rubikpi_config bt -h
Sample output:
This is the config tool for RUBIK Pi.
BT
Use examples:
rubikpi_config bt protocol             Retrieve the current protocol stack
rubikpi_config bt protocol bsa         Set the protocol stack to BSA
rubikpi_config bt protocol bluez       Set the protocol stack to BlueZ
-
Examples of some commands:
- Switch the BT protocol stack to Bluetooth Stack for Android (BSA):
rubikpi_config bt protocol bsaSample output:
Setting successful
Audio
- Check how to use rubikpi_config:
rubikpi_config audio -h
Sample output:
AUDIO
Use examples:
rubikpi_config audio card                   audio card info
rubikpi_config audio pcm                    audio pcm info
rubikpi_config audio output [hdmi/headset]  audio output info view and setting
rubikpi_config audio volume [vol_val]       audio volume info view and setting
-
Examples of some commands:
- Set the output volume to 180 (range: 0 – 191).
rubikpi_config volume 180
Wi-Fi
- Check how to use rubikpi_config:
rubikpi_config wifi -h
Sample output:
This is the config tool for RUBIK Pi.
WIFI
Use examples:
rubikpi_config wifi                      Network card status
rubikpi_config wifi connect              Connect to Wi-Fi according to the configuration
                                         (/etc/rubikpi_config/rubikpi_config.ini) in the configuration file
rubikpi_config wifi scan                 Scan nearby Wi-Fi signals
rubikpi_config wifi [ssid] [passphrase]  Connect to the corresponding Wi-Fi based on account and password
rubikpi_config wifi down                 Turn off Wi-Fi
rubikpi_config wifi up                   Turn on Wi-Fi
sh-5.1#
-
Examples of some commands:
- Scan for nearby Wi-Fi networks.
rubikpi_config wifi scanSample output:
SSID:SSID: DLSP-V6SSID: ThunderSoft-DumpSSID: ThunderSoft-OfficeSSID: ThunderSoft-DumbSSID: ThunderSoft-OfficeSSID: ThunderSoft-DumpSSID: ThunderSoft-GuestSSID: ThunderSoft-DumbSSID: DLSP-V6
Temperature
- Check how to use rubikpi_config:
rubikpi_config temp -h
Sample output:
This is the config tool for RUBIK Pi.
TEMP
Use examples:
rubikpi_config temp all                all zone temperature
rubikpi_config temp zone [zone_num]    znoe temperature
-
Examples of some commands:
- Display the temperature of all temperature zones:
rubikpi_config temp allSample output:
Thermal zone 0 pm7325-thermal:37.00 °CThermal zone 1 pm8350c-thermal:37.00 °CThermal zone 2 pm8350c-bcl-lvl0:0.00 °CThermal zone 3 pm8350c-bcl-lvl1:0.00 °CThermal zone 4 pm8350c-bcl-lvl2:0.00 °CThermal zone 5 aoss0-thermal:48.00 °CThermal zone 6 cpu0-thermal:48.40 °CThermal zone 7 cpu1-thermal:47.70 °CThermal zone 8 cpu2-thermal:47.70 °CThermal zone 9 cpu3-thermal:47.30 °CThermal zone 10 cpuss0-thermal:47.70 °CThermal zone 11 cpuss1-thermal:48.40 °CThermal zone 12 cpu4-thermal:48.00 °CThermal zone 13 cpu5-thermal:46.90 °CThermal zone 14 cpu6-thermal:47.70 °CThermal zone 15 cpu7-thermal:47.30 °CThermal zone 16 cpu8-thermal:47.70 °CThermal zone 17 cpu9-thermal:47.70 °CThermal zone 18 cpu10-thermal:48.40 °CThermal zone 19 cpu11-thermal:48.00 °CThermal zone 20 aoss1-thermal:48.80 °CThermal zone 21 gpuss0-thermal:48.00 °CThermal zone 22 gpuss1-thermal:48.00 °CThermal zone 23 nspss0-thermal:47.60 °CThermal zone 24 nspss1-thermal:47.60 °CThermal zone 25 video-thermal:48.00 °CThermal zone 26 ddr-thermal:48.80 °CThermal zone 27 mdmss0-thermal:48.00 °CThermal zone 28 mdmss1-thermal:46.50 °CThermal zone 29 mdmss2-thermal:46.90 °CThermal zone 30 mdmss3-thermal:48.00 °CThermal zone 31 camera0-thermal:48.80 °CThermal zone 32 xo-thermal:43.82 °CThermal zone 33 quiet-thermal:46.78 °CThermal zone 34 sdm-skin-thermal:45.23 °CThermal zone 35 qcom-battmgr-bat:25.00 °C
Resource
- Check how to use rubikpi_config:
rubikpi_config res -h
Sample output:
This is the config tool for RUBIK Pi.
res
Use examples:
rubikpi_config res all    Display CPU, memory and disk information
rubikpi_config res mem    Display memory information
rubikpi_config res cpu    Display CPU information
rubikpi_config res disk   Display disk information
-
Examples of some commands:
- Display the CPU usage:
rubikpi_config res cpuSample output:
CPU Usage: 0.25%
Menu mode
Run the rubikpi_config command to enter menu mode:
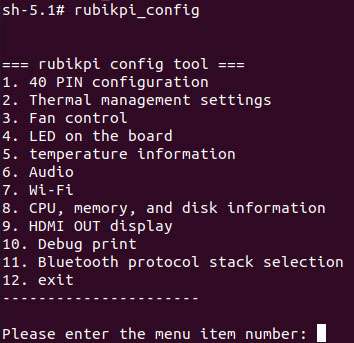
Type an item number as needed and press Enter.
For example, set the brightness of the heartbeat LED to 20:
- Type "4" and press Enter to go to LED settings:

- Type "1" and press Enter to go to heartbeat light settings:
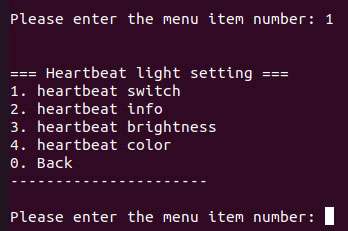
- Type "3" and press Enter to set the heartbeat LED brightness:

- Type the brightness: Type "20" and press Enter.

- Press Ctrl + C to exit the configuration tool.