Genie
使用 Qualcomm Gen AI Inference Extensions (Genie) 可以在 Dragonwing 开发板上的 NPU 上运行一定数量的大语言模型 (LLM) 和视觉语言模型 (VLM)。这些模型已经过高通移植和优化,以在硬件上尽可能高效运行。Genie 仅支持部分手动移植模型。如果您想要的模型未列出,请参考 Run LLMs / VLMs using llama.cpp 将模型部署至 CPU 作为备选方案。
安装 AI Runtime SDK - 社区版
首先安装 AI Runtime SDK - 社区版。在开发板上打开终端,或建立 SSH 会话,然后执行以下操作:
wget -qO- https://cdn.edgeimpulse.com/qc-ai-docs/device-setup/install_ai_runtime_sdk_2.35.sh | bash
查找支持的模型
在以下几处找到与 Genie 兼容的 LLM 模型:
-
Aplux model zoo:
1️⃣ 在芯片平台下,选择:- RB3 Gen 2 Vision Kit: 'Qualcomm QCS6490'
- 魔方派 3: 'Qualcomm QCS6490'
2️⃣ 在自然语言处理下,选择文字生成。
-
Qualcomm AI Hub:
1️⃣ 在 Chipset 下,选择:- RB3 Gen 2 Vision Kit: 'Qualcomm QCS6490 (Proxy)'
- 魔方派 3: 'Qualcomm QCS6490 (Proxy)'
2️⃣ 在 Domain/Use Case 下,选择 Generative AI。
以 Qwen2.5-0.5B-Instruct 模型为例进行部署。该模型可兼容所有Dragonwing开发板。
运行 Qwen2.5-0.5B-Instruct
下载模型时,您将需要 3 个文件:
- 一个或多个
*.serialized.bin文件。这些文件包含模型的权重。 tokenizer.json是一个序列化的配置文件,用于定义如何将文本分割为令牌,并建立字符、子词与 LLM 使用的整数 ID 之间的映射。此类文件通常可以从 HuggingFace 的模型库下载。Genie 支持的模型的链接: quic/ai-hub-apps: LLM On-Device Deployment > Prepare Genie configs。- Genie 配置文件,介绍通过 Genie 运行此模型的说明。AI Hub 中的模型可以在 GitHub 上找到:quic/ai-hub-apps: tutorials/llm_on_genie/configs/genie。
基于所有这些文件运行 Qwen2.5-0.5B-Instruct。在开发板上打开终端,或建立 SSH 会话,然后执行以下操作:
1️⃣ 将模型下载到开发板。
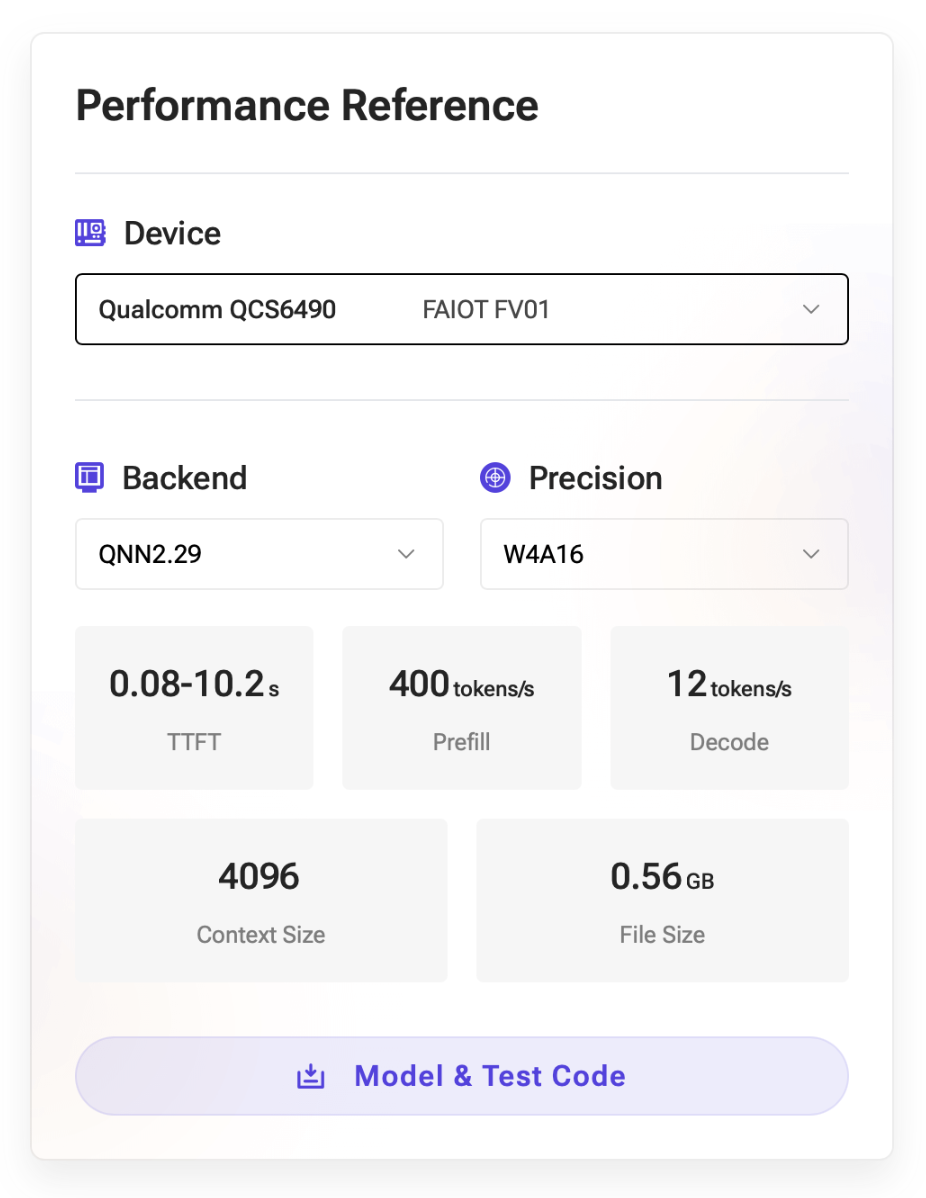
a. 前往 Aplux model zoo: Qwen2.5-0.5B-Instruct。
b. 注册 Aplux 账号。
c. 在“设备”下,选择 QCS6490。
d. 点击“下载模型&代码”。

e. 下载完成后,通过 SSH 将 ZIP 文件推送到开发板:
i. 找到开发板的 IP 地址。在您的开发板上运行:
ifconfig | grep -Eo 'inet (addr:)?([0-9]*\.){3}[0-9]*' | grep -Eo '([0-9]*\.){3}[0-9]*' | grep -v '127.0.0.1'

# ... Example:
# 192.168.1.253
ii. Push the .zip file. Run from your computer:
scp qnn229_qcs6490_cl4096.zip ubuntu@192.168.1.253:~/qnn229_qcs6490_cl4096.zip
2️⃣ 解压模型。在开发板上:
mkdir -p genie-models/
unzip -d genie-models/qwen2.5-0.5b-instruct/ qnn229_qcs6490_cl4096.zip
rm qnn229_qcs6490_cl4096.zip
3️⃣ 运行你的模型:
cd genie-models/qwen2.5-0.5b-instruct/

genie-t2t-run -c ./qwen2.5-0.5b-instruct-htp.json -p '<|im_start|>system
    You are Qwen, created by Alibaba Cloud. You are a helpful assistant that responds in English.<|im_end|><|im_start|>user
    What is the capital of the Netherlands?<|im_end|><|im_start|>assistant'

# Using libGenie.so version 1.9.0
#
# [BEGIN]:
# The capital of the Netherlands is Amsterdam.[END]
太棒了,现在您已成功在Genie环境下运行该大语言模型。
通过 QAI AppBuilder 提供 UI 或 API
要在你的应用程序中使用 Genie 模型,您可以使用 QAI AppBuilder 库。AppBuilder repo 既有与 OpenAI 兼容的会话补全 API,也有与您的模型交互的 Web UI(类似llama.cpp )。
积极开发:AppBuilder 目前处于积极开发阶段。我们已经尽可能地固定了版本,但使用更新版本的 AppBuilder 可能无法与以下指南兼容。
1️⃣ 安装 AppBuilder:
sudo apt install -y yq

# Clone the repository (can switch back to upstream once https://github.com/quic/ai-engine-direct-helper/pull/16 is landed)
git clone https://github.com/edgeimpulse/ai-engine-direct-helper
cd ai-engine-direct-helper
git submodule update --init --recursive
git checkout linux-paths

# Create a new venv
python3 -m venv .venv
source .venv/bin/activate

# Build the wheel
pip3 install setuptools
python setup.py bdist_wheel
pip3 install ./dist/qai_appbuilder-*-linux_aarch64.whl

# Install other dependencies
pip3 install \
    uvicorn==0.35.0 \
    pydantic_settings==2.10.1 \
    fastapi==0.116.1 \
    langchain==0.3.27 \
    langchain-core==0.3.75 \
    langchain-community==0.3.29 \
    sse_starlette==3.0.2 \
    pypdf==6.0.0 \
    python-pptx==1.0.2 \
    docx2txt==0.9 \
    openai==1.107.0 \
    json-repair==0.50.1 \
    qai_hub==0.36.0 \
    py3_wget==1.0.13 \
    torch==2.8.0 \
    transformers==4.56.1 \
    gradio==5.44.1 \
    diffusers==0.35.1

# Where you've downloaded the weights, and created the config files before
WEIGHTS_DIR=~/genie-models/qwen2.5-0.5b-instruct/
MODEL_NAME=qwen2_5-0_5b-instruct

# Create a new directory and link the files
mkdir -p samples/genie/python/models/$MODEL_NAME
cd samples/genie/python/models/$MODEL_NAME

# Patch up config
cp $WEIGHTS_DIR/*instruct-htp.json config.json
jq --arg pwd "$PWD" '.dialog.tokenizer.path |= if startswith($pwd + "/") then . else $pwd + "/" + . end' config.json > tmp && mv tmp config.json
jq --arg pwd "$PWD" '.dialog.engine.backend.extensions |= if startswith($pwd + "/") then . else $pwd + "/" + . end' config.json > tmp && mv tmp config.json
jq --arg pwd "$PWD" '.dialog.engine.model.binary["ctx-bins"] |= map(if startswith($pwd + "/") then . else $pwd + "/" + . end)' config.json > tmp && mv tmp config.json

# Symlink other files
ln -s $WEIGHTS_DIR/*.json .
ln -s $WEIGHTS_DIR/*okenizer.json tokenizer.json
ln -s $WEIGHTS_DIR/*.serialized.bin .
echo "prompt_tags_1: <|im_start|>system\nYou are Qwen, created by Alibaba Cloud. You are a helpful assistant.<|im_end|>\n<|im_start|>user\nGive me a short introduction to large language model.
prompt_tags_2: <|im_end|>\n<|im_start|>assistant\n" > prompt.conf

# Navigate back to samples/ directory
cd ../../../..

# Create empty tokenizer files, otherwise they will be downloaded... (which will fail)
if [ ! -f genie/python/models/Phi-3.5-mini/tokenizer.json ]; then
    echo '{}' > genie/python/models/Phi-3.5-mini/tokenizer.json
fi
if [ ! -f genie/python/models/IBM-Granite-v3.1-8B/tokenizer.json ]; then
    echo '{}' > genie/python/models/IBM-Granite-v3.1-8B/tokenizer.json
fi
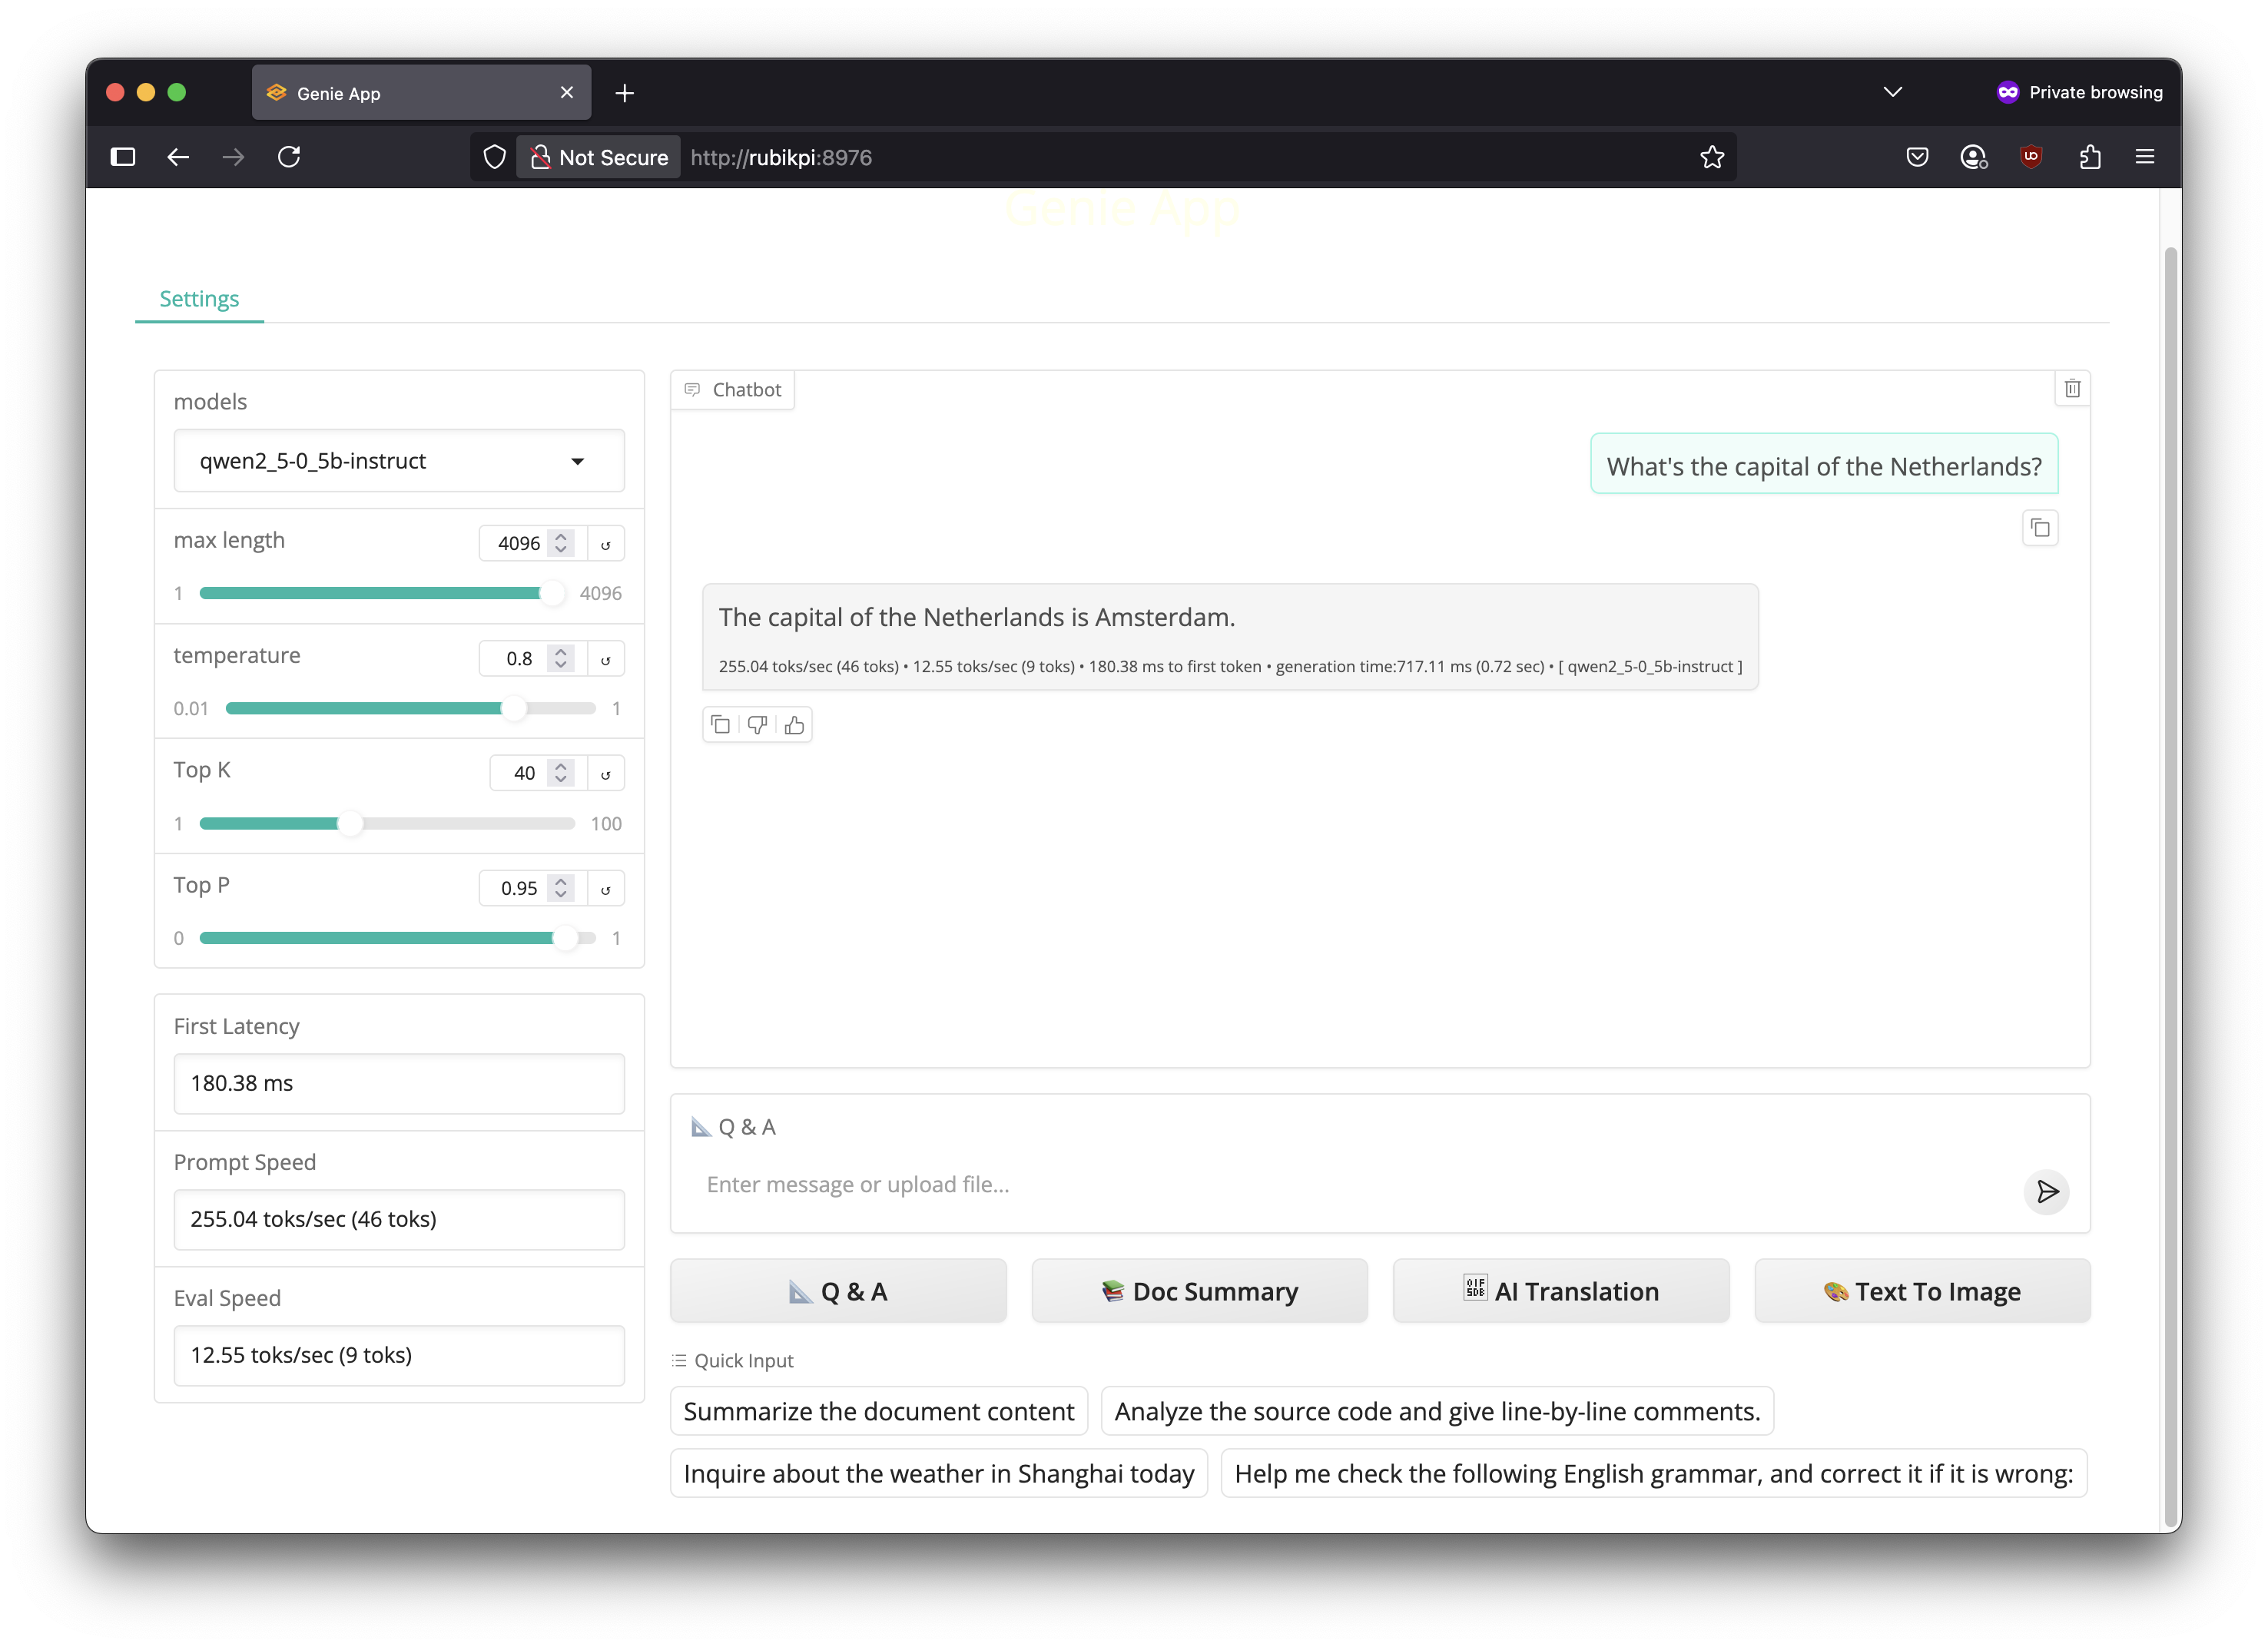
2️⃣ 运行 Web UI(从samples/目录)��:
# Find the IP address of your development board
ifconfig | grep -Eo 'inet (addr:)?([0-9]*\.){3}[0-9]*' | grep -Eo '([0-9]*\.){3}[0-9]*' | grep -v '127.0.0.1'

# ... Example:
# 192.168.1.253

# Run the Web UI
python webui/GenieWebUI.py
现在在网络浏览器(您的计算机上)打开 http://192.168.1.253:8976(替换为您的 IP)来与模型进行交互。确保首先通过“模型”下拉菜单选择模型。

3️⃣ 您还可以通过 OpenAI 会话补全 API 以编程方式访问此服务器。例如在 Python中:
a. 启动服务器(从samples/目录):
python genie/python/GenieAPIService.py --modelname "qwen2_5-0_5b-instruct" --loadmodel --profile
b. 从新终端创建一个新的虚拟环境(venv)并安装requests:
python3 -m venv .venv-chat
source .venv/bin/activate
pip3 install requests
c. 创建一个新文件chat.py:
import requests

# if running from your own computer, replace localhost with the IP address of your development board
url = "http://localhost:8910/v1/chat/completions"

payload = {
    "model": "qwen2_5-0_5b-instruct",
    "messages": [
        {"role": "system", "content": "You are a helpful assistant."},
        {"role": "user", "content": "Explain Qualcomm in one sentence."}
    ],
    "temperature": 0.7,
    "max_tokens": 200
}

response = requests.post(url, headers={ "Content-Type": "application/json" }, json=payload)
print(response.json())
d. 运行chat.py:
python3 chat.py

# {'id': 'genie-llm', 'model': 'IBM-Granite', 'object': 'chat.completion', 'created': 1757512757, 'choices': [{'index': 0, 'message': {'role': 'assistant', 'content': 'Qualcomm is a leading American technology company that designs, manufactures, and markets mobile phone chips and other wireless communication products.', 'tool_call_id': None, 'tool_calls': None}, 'finish_reason': 'stop'}], 'usage': {'prompt_tokens': 0, 'completion_tokens': 0, 'total_tokens': 0}}
(模型总是返回 IBM-Granite,可以忽略此信息)
提示与技巧
从 HuggingFace 下载需要身份验证的文件
如果您要下载需要权限或身份验证的文件,例如 Llama-3.2-1B-Instruct 的 tokenizer.json 文件,请按以下步骤:
1️⃣ 前往 HuggingFace的模型页面,登录(或注册),并填写表单以获取访问该模型的权限。
2️⃣ 在 https://huggingface.co/settings/tokens 创建一个具有“读取”权限的新 HuggingFace 访问令牌,并在开发板上进行配置:
export HF_TOKEN=hf_gs...

# Optionally add ^ to ~/.bash_profile to ensure it gets loaded automatically in the future.
3️⃣ 获得访问权限后,就可以下载分词器(tokenizer):
wget --header="Authorization: Bearer $HF_TOKEN" https://huggingface.co/meta-llama/Llama-3.2-1B-Instruct/resolve/main/tokenizer.json