Set Up Your Device
This chapter describes the basic setup workflow for RUBIK Pi 3 running Android 15. Complete power-on, debug UART setup, ADB login, software version verification, HDMI monitor connection, mouse and keyboard connection, and EDL mode setup in the following order.
Let's Get Started
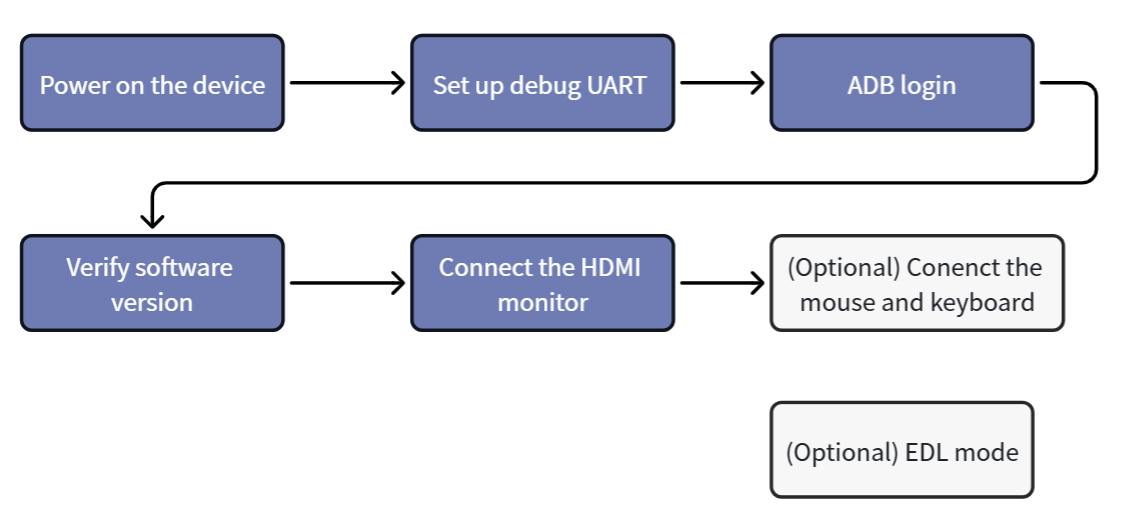
Power on the device
Connect a 12 V/3 A USB Type-C power adapter.
RUBIK Pi 3 supports Power Delivery (PD) 3.0 power input. A Type-C 12V 3A power adapter compliant with PD 3.0 is required for input power. Refer to Peripheral Compatibility List for the verified accessories.
The power indicator LED near the power port will turn on if the power adapter meets requirements and power negotiation succeeds. If the adapter does not meet requirements, the LED will remain off and the device will not boot.
Connect a USB Type-C to USB Type-A or a Type-C cable for ADB debugging and flashing.
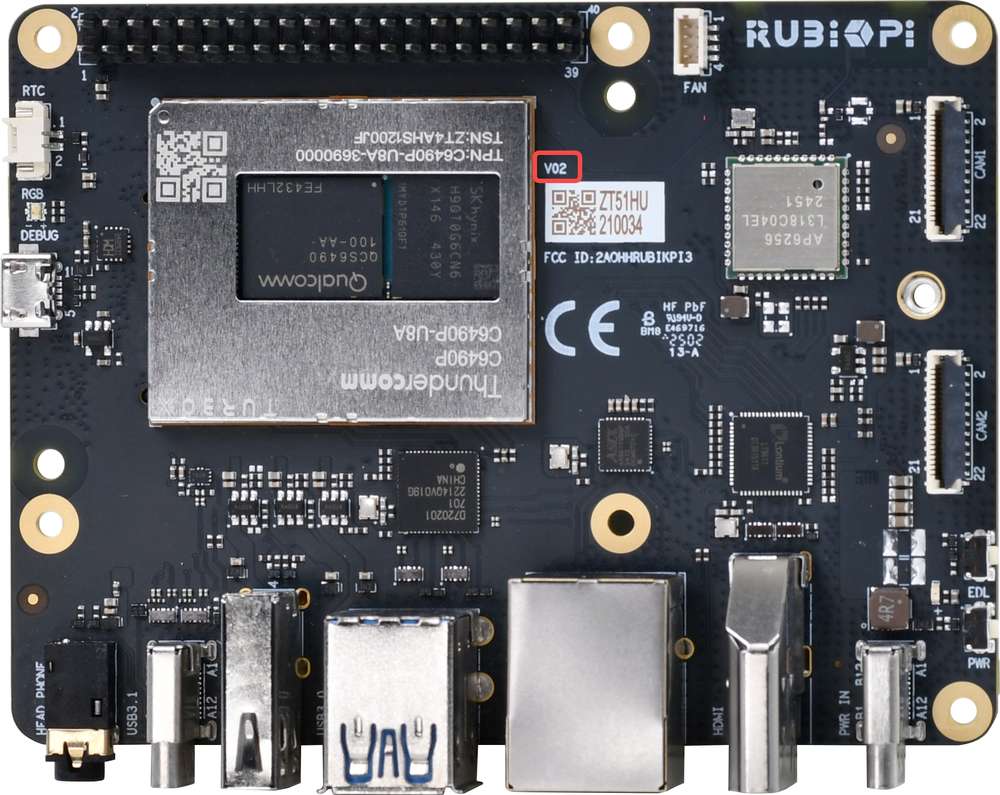
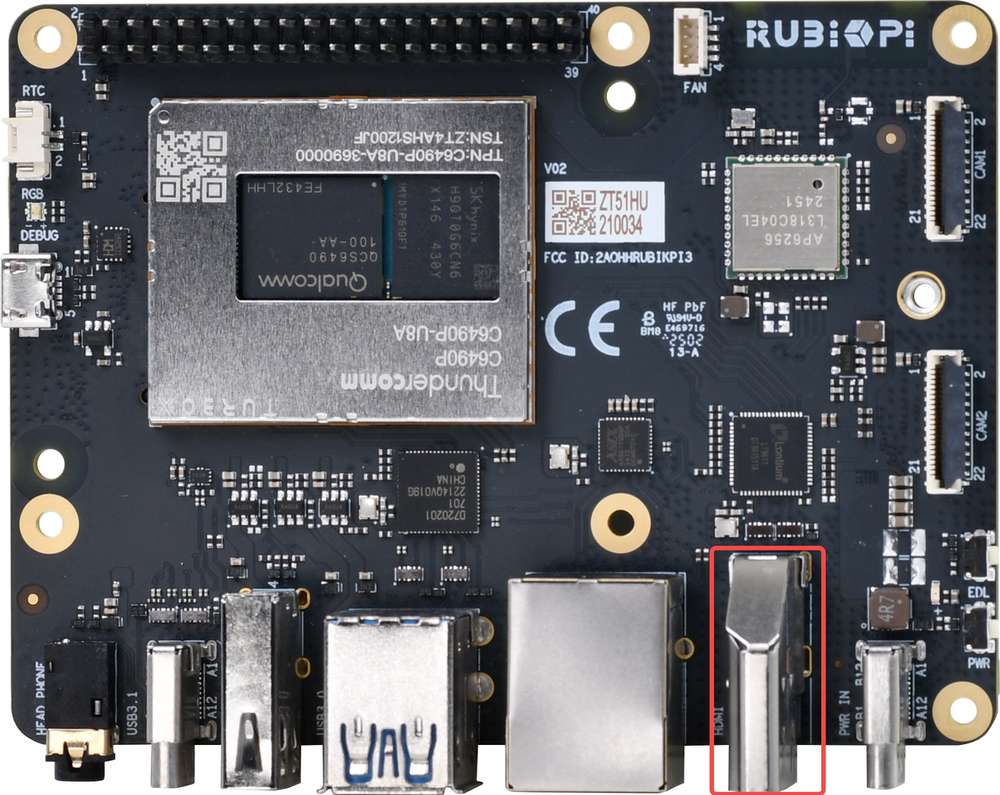
Board versions v02 and later support automatic power-on after the power adapter is connected. You can check the hardware version number at the following location on the board. In the example below, the hardware version is V02.
If the blue LED on the board is constantly lit, it indicates that the power button was pressed for too long, and the board is in fastboot mode. Please refer to FAQ to exit the fastboot mode.
Set up the debug UART
The debug UART displays diagnostic messages and provides access to the device via a UART shell.
-
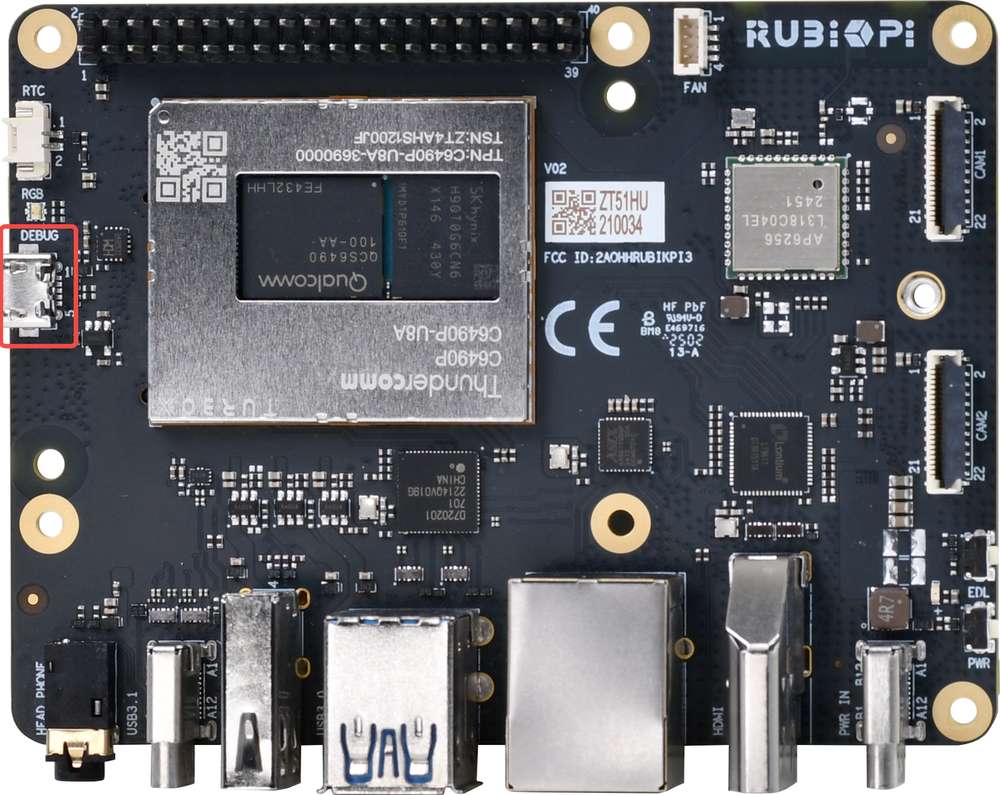
Connect a Micro-USB cable to the Micro-USB port on your RUBIK Pi 3.
-
Connect the other end of the Micro-USB cable to the host. Follow one of the following instructions based on the host operating system.
- Ubuntu host
- Windows host
- macOS host
-
Run the following commands to install screen for accessing the UART console.
sudo apt updatesudo apt install screen -
Run the following command to check the USB port:
ls /dev/ttyACM*Sample output
/dev/ttyACM0 -
Run the following command to open the debug UART session.
sudo screen <serial_port> 115200Example:
sudo screen /dev/ttyACM0 115200
-
Download and install PuTTY for your Windows host.
-
Open the PuTTY application from the list of installed programs in the Start menu.
-
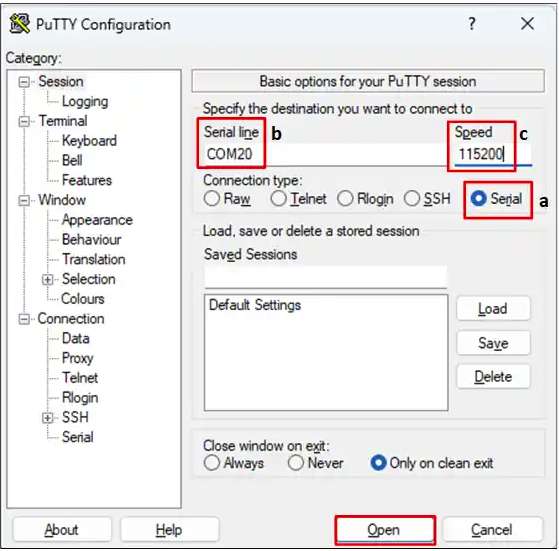
In the PuTTY Configuration dialog box, select Serial.
-
Specify the serial line based on the UART port detected in Windows Device Manager.
-
Set the baud rate to
115200. -
Click Open to start the PuTTY session.
If the UART port is not detected, download the driver and update it using Windows Device Manager:
- On x86 systems: USB to UART serial driver.
- On Arm(®) systems: Visit https://oemdrivers.com/usb-ft232r-usb-uart-arm64 and download FTDI CDM VCP Drivers.
-
Run the following command to check the serial device connected to the macOS host.
ls /dev/cu.* -
Find your device in the list of serial devices.

-
Run the following command to open the serial device.
screen <serial_device_node> 115200Example:
screen /dev/cu.usbserial-DM03SDQQ 115200
If no serial log or shell prompt appears, check the Micro USB connection and reconnect the cable.
ADB login
Android Debug Bridge (ADB) is used to establish a debugging connection between the host and the RUBIK Pi 3 Android 15 system. Connect the host to the USB Type-C port on RUBIK Pi 3 with a USB Type-C data cable.
The following commands apply to Android userdebug images. User images may not support adb root.
- Windows host
- Ubuntu host
Preparation
- Download and extract ADB and Fastboot from https://developer.android.google.cn/tools/releases/platform-tools.
- Add the
platform-toolsdirectory to the WindowsPathenvironment variable. - Press Win + R and enter
cmdto open a Windows terminal.
Login
Run the following commands in the terminal to log in to RUBIK Pi 3:
adb devices
adb root
adb shell
Preparation
-
Install ADB and Fastboot:
sudo apt updatesudo apt install git android-tools-adb android-tools-fastboot wget -
Update the udev rules file:
sudo vi /etc/udev/rules.d/51-qcom-usb.rules -
Add the following line to the file if it does not already exist:
SUBSYSTEMS=="usb", ATTRS{idVendor}=="05c6", ATTRS{idProduct}=="9008", MODE="0666", GROUP="plugdev" -
Restart
udev:sudo systemctl restart udev
If RUBIK Pi 3 is already connected to the host, reconnect the USB cable for the updated rule to take effect.
Login
Run the following commands in the terminal to log in to RUBIK Pi 3:
adb devices
adb root
adb shell
After successful login to RUBIK Pi 3, the terminal enters the Android shell, where you can run debugging commands such as getprop, logcat, and dmesg.
Verify the software version
After setup, run the following commands on the host to verify the Android version:
adb shell getprop ro.product.model
adb shell getprop ro.build.version.release
adb shell getprop ro.build.id
adb shell getprop ro.build.display.id
adb shell getprop ro.build.fingerprint
Sample output:
Thundercomm Rubik Pi 3
15
AQ3A.250612.001
qssi-userdebug 15 AQ3A.250612.001 45468 test-keys
Thundercomm/rubikpi/rubikpi:15/AQ3A.250612.001/45468:userdebug/test-keys
You can also choose Settings > About phone in the Android graphical interface to view device information.
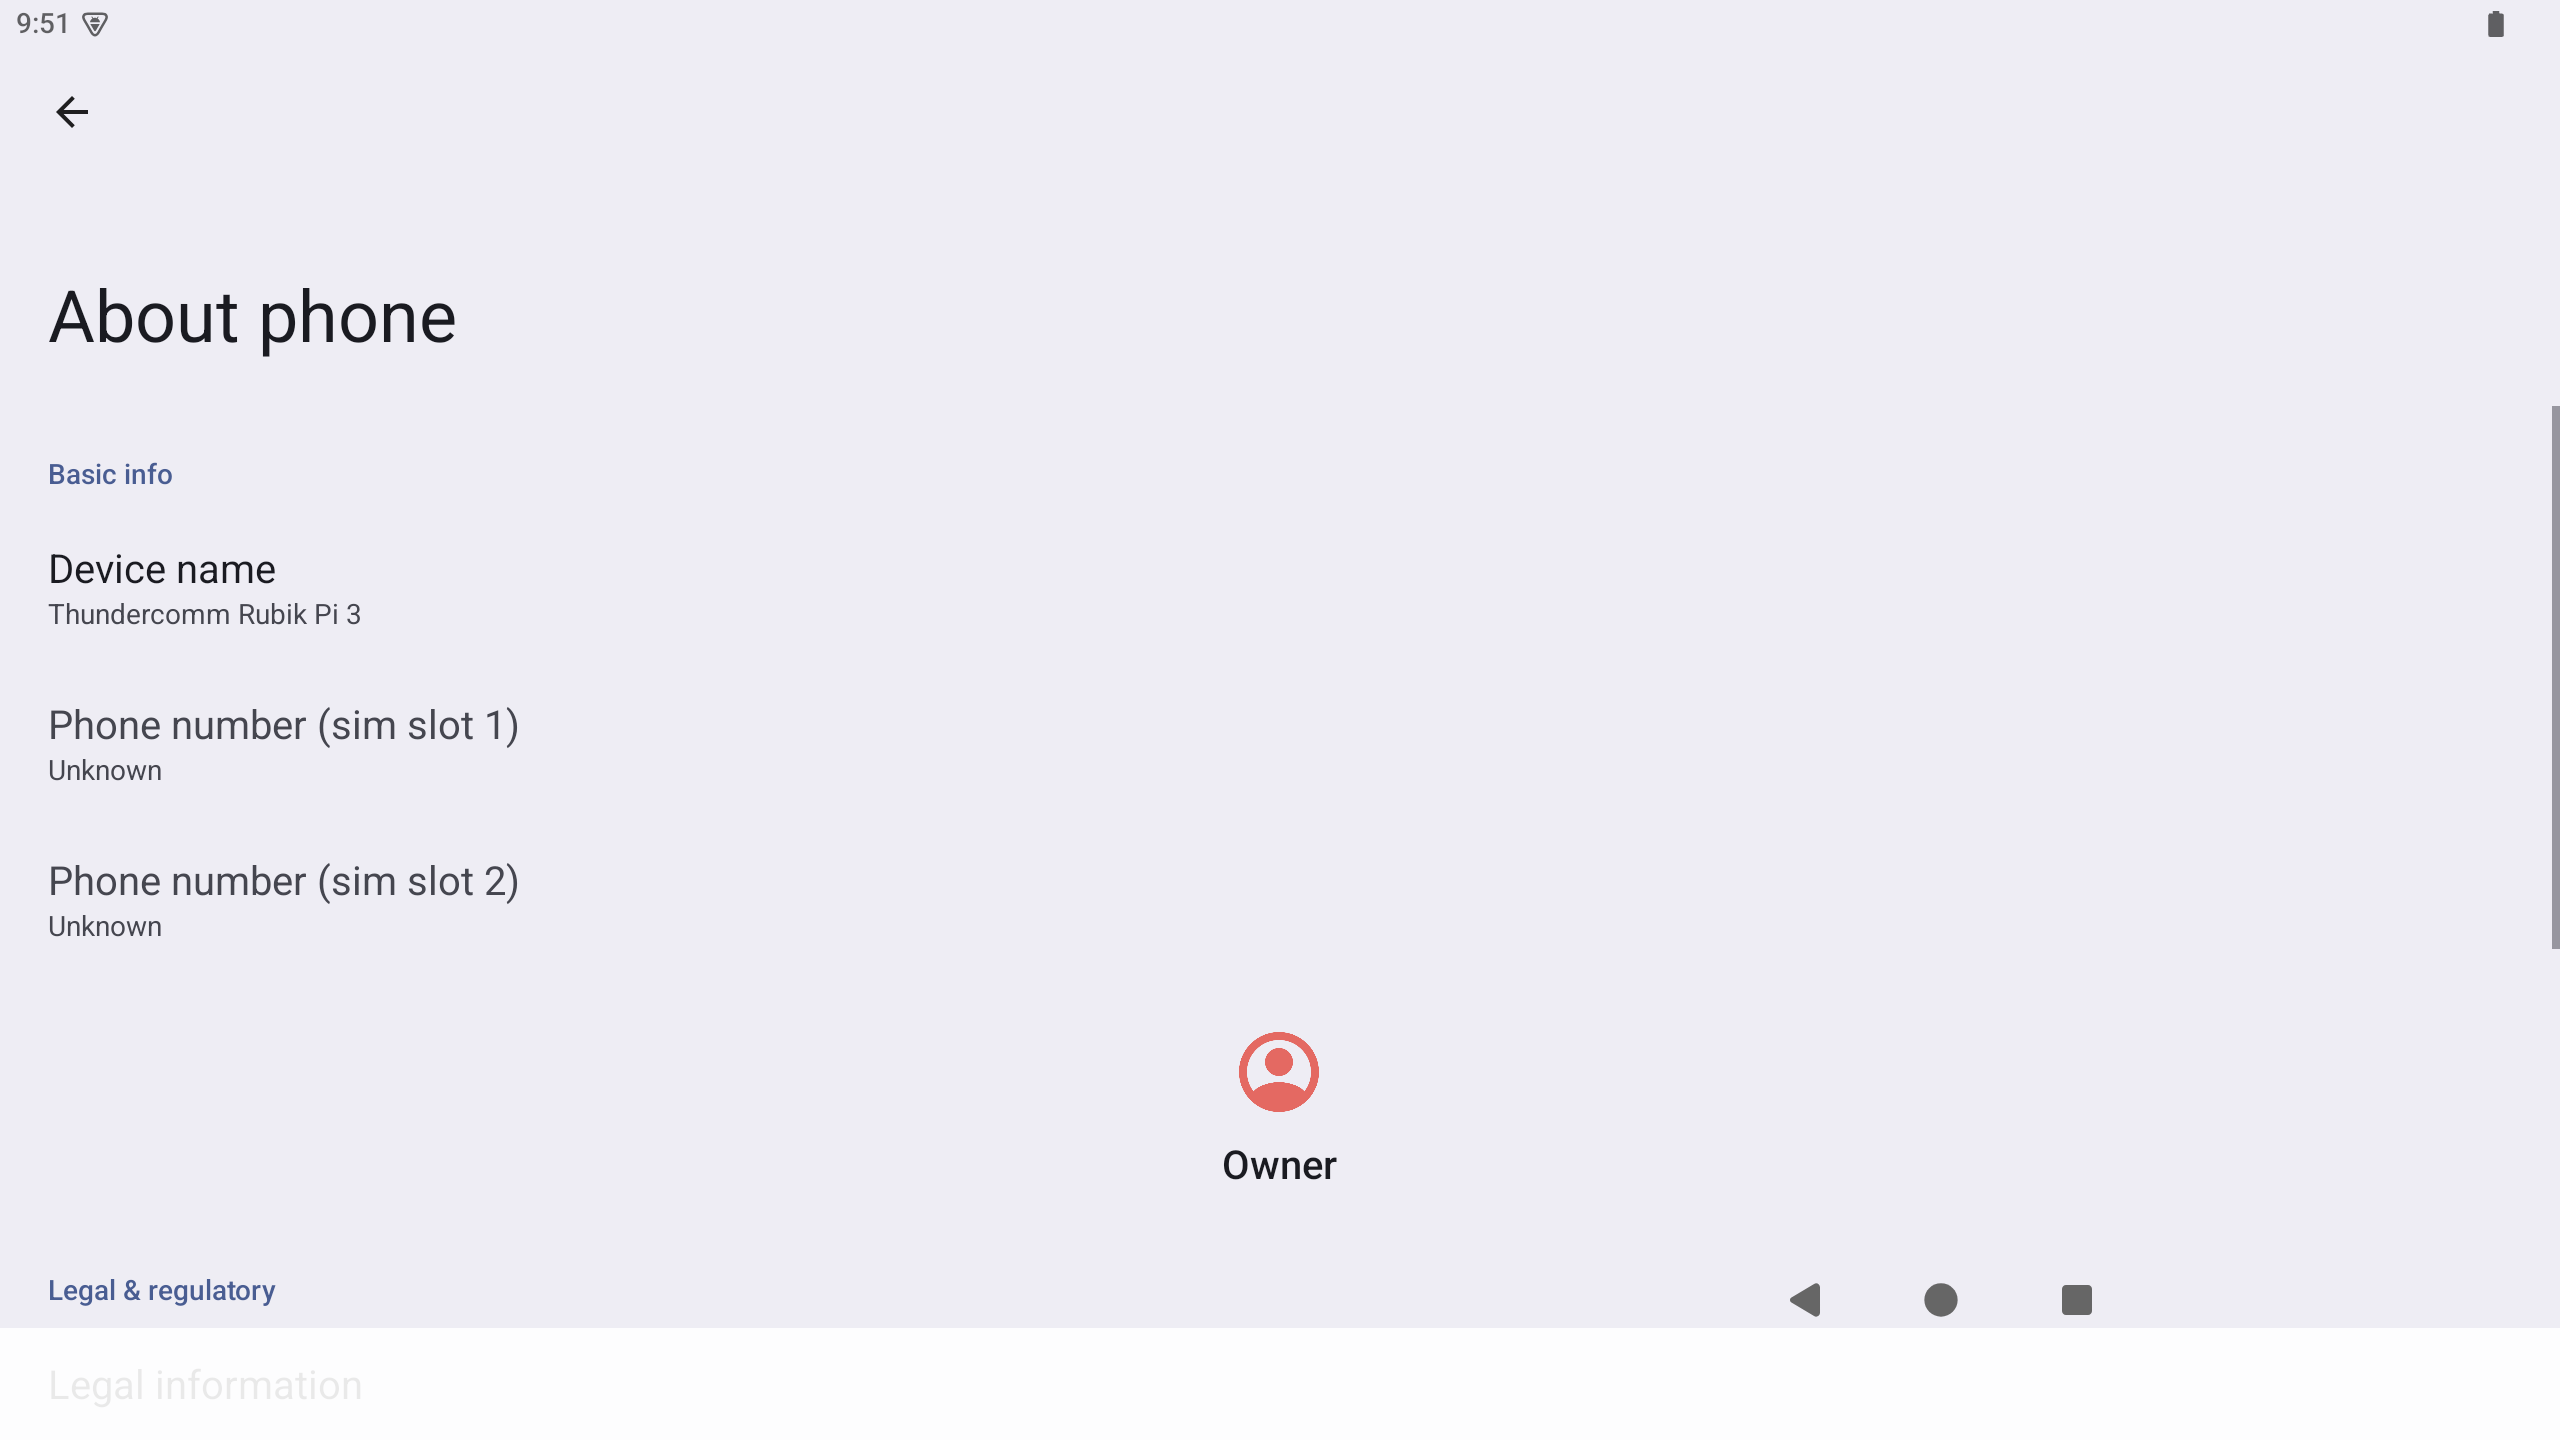
The sample output is from an Android 15 userdebug build. Build number, fingerprint, and build type may differ between release packages.
Connect an HDMI monitor
To view the Android graphical interface, perform the following steps to connect an HDMI monitor:
-
Connect one end of the HDMI cable to the HDMI OUT port on RUBIK Pi 3.
-
Connect the other end to the monitor.
-
Power on the device and wait until Android 15 boots.
-
If there is no display output, confirm that the monitor input source is set to the correct HDMI port and that the power adapter supports 12 V/3 A PD 3.0.
Connect a mouse and keyboard
Connect a USB keyboard and mouse to the Type-A ports.
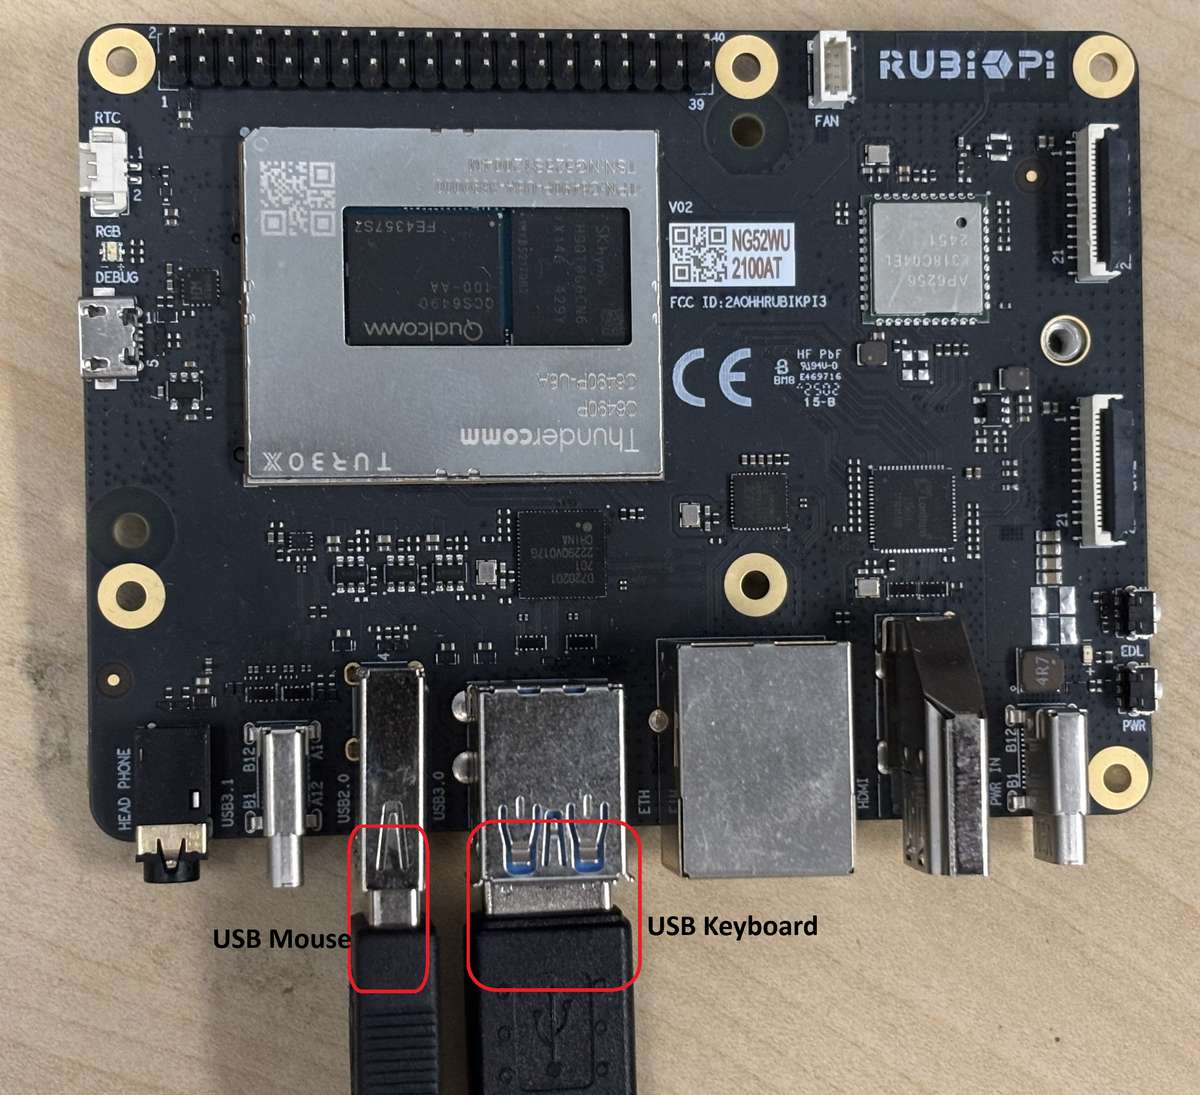
Once connected, you can complete Wi-Fi configuration, check settings, and manage application operations within the Android GUI.
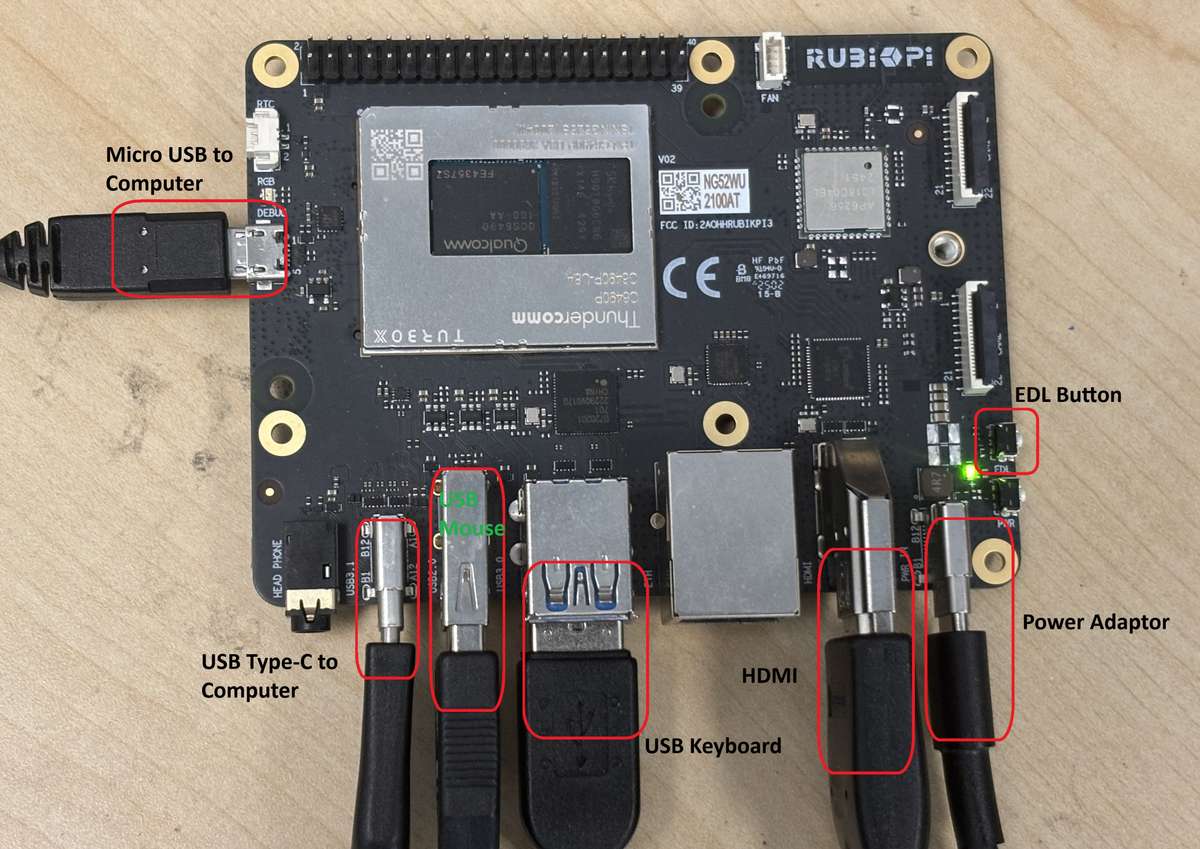
Port connections
Enter EDL mode
Emergency Download (EDL) mode is used by Qualcomm Device Loader (QDL) to flash firmware and system images to RUBIK Pi 3. If the device has already been flashed and can boot normally, skip this section during initial setup.
- Method 1: EDL button
- Method 2: ADB command
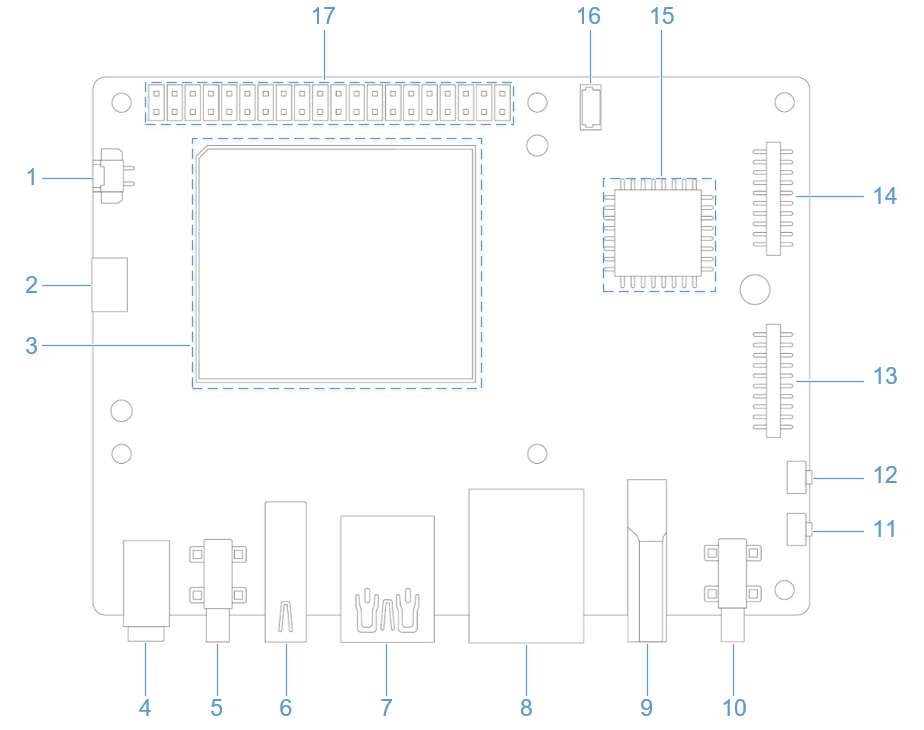
- Disconnect the power from port 10 and unplug the Type-C cable from port 5.
- Press and hold the EDL button (No.12 in the figure above).
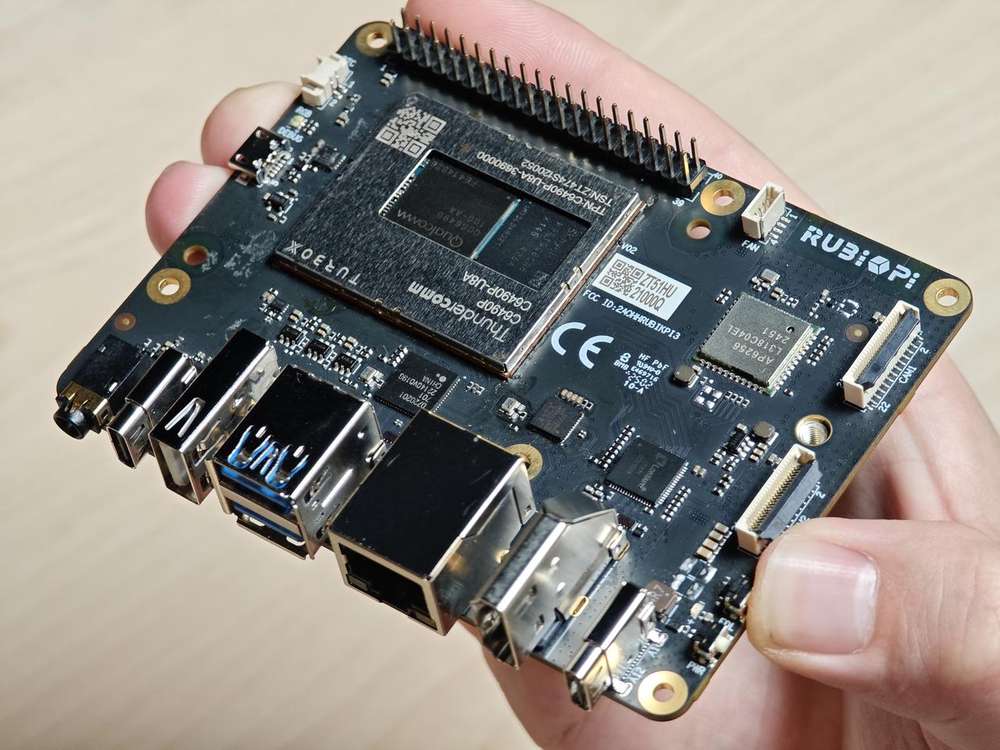
- While holding down the EDL button, connect the power cable to port 10.
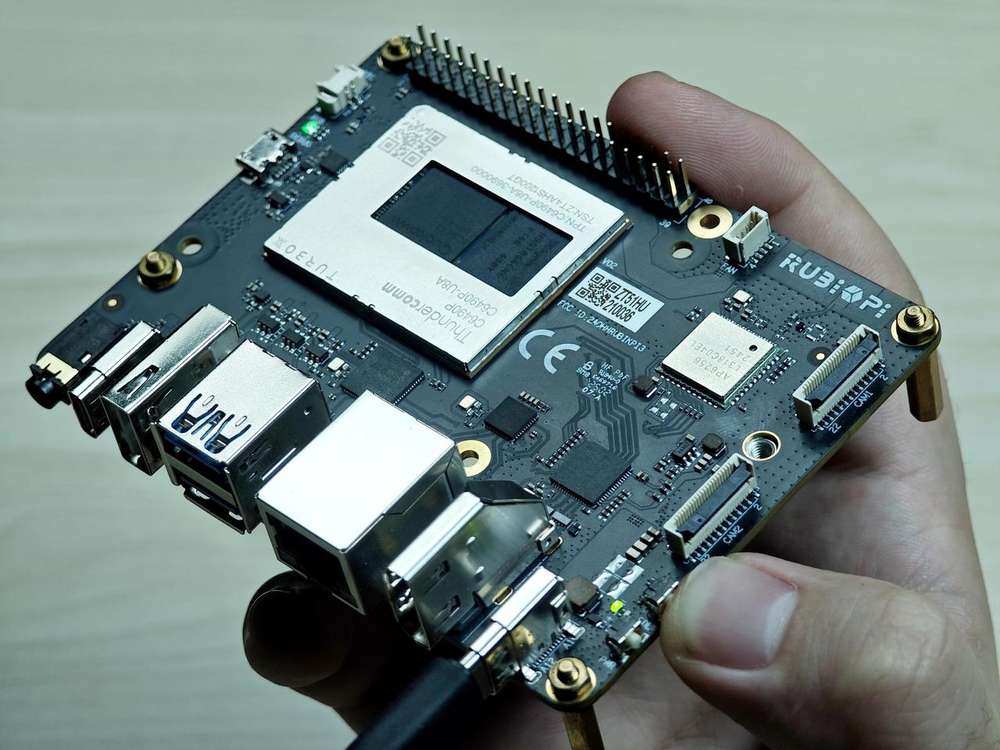
- While holding down the EDL button, connect the Type-C cable to port 5 and wait for 3 seconds to enter 9008 mode.
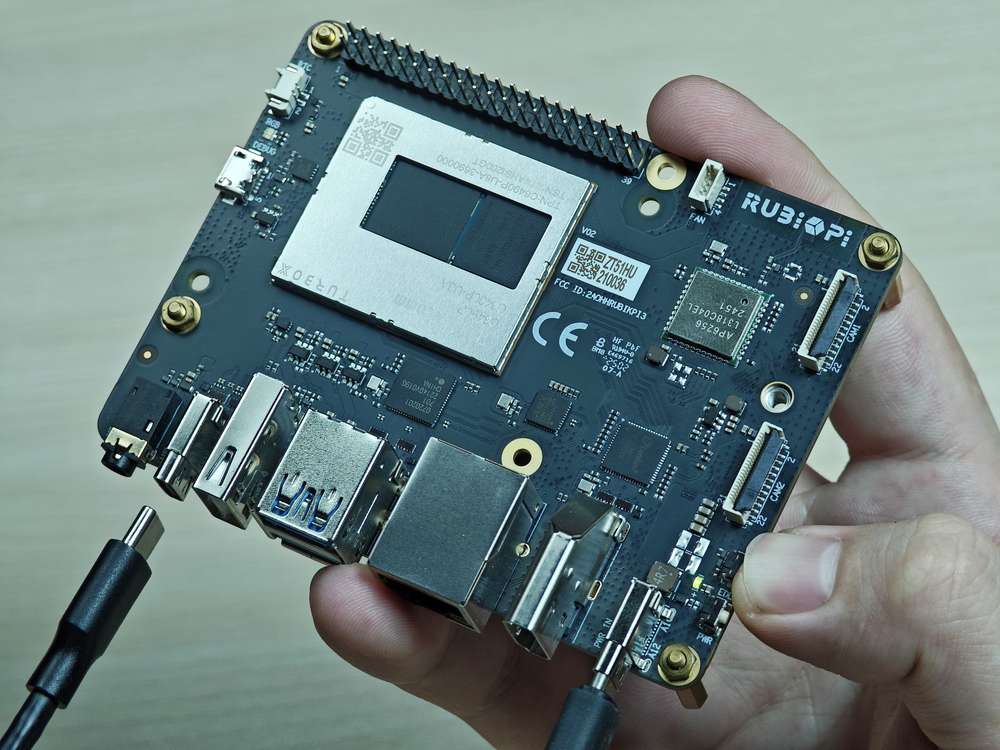
- Release the EDL button.
If Android 15 is running and ADB is available, run:
adb shell reboot edl
Before running this command, ensure that the device is connected to the host computer via a USB Type-C data cable and that the device is visible when executing adb devices.