Get Started
Introduction
RUBIK Pi 3 is developed based on the Qualcomm QCS6490 processor, which features the Qualcomm® Kryo™ 670 CPU and the Qualcomm® Hexagon™ Processor with fused AI-accelerator architecture. The processor provides exceptional AI performance of 12 TOPS and offers the capability for various machine learning and AI application scenarios.
RUBIK Pi 3 is designed with a wide range of interfaces and functions, such as USB, camera, DisplayPort, HDMI, Ethernet, 3.5mm headphone jack, Wi-Fi, Bluetooth, M.2 connector, fan, RTC, and 40-pin LS connector. These features cater to diverse development needs while facilitating rapid development and efficient debugging.
RUBIK Pi 3 is compatible with various systems, such as Qualcomm Linux, Debian 13, Android 13, and Canonical Ubuntu for Qualcomm Platforms*, providing developers with the flexibility to meet their specific application needs.
*Canonical Ubuntu for Qualcomm Platforms is in the planning phase.
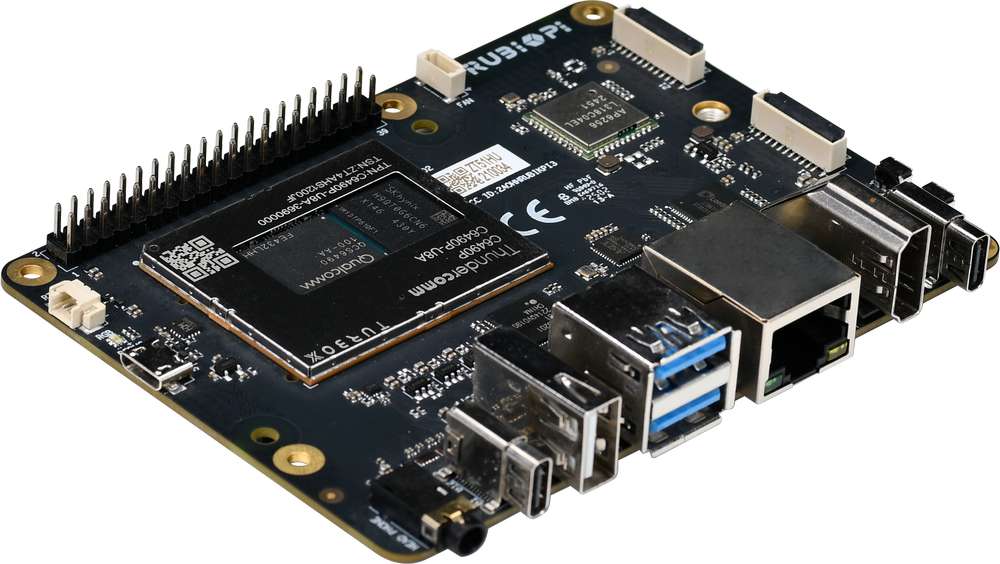
Specifications
| Category | RUBIK Pi 3 Feature |
|---|---|
| SoC | QCS6490 |
| Processor | 1 x Cortex-A78 2.7 GHz 3 x Cortex-A78 2.4 GHz 4 x Cortex-A55 1.9 GHz |
| GPU | Adreno 643 GPU @ up to 812 MHz |
| VPU | Adreno 633 VPU |
| NPU | 12 TOPS |
| ISP | Spectra ISP capable of on-device machine learning and machine processing |
| RAM | 8 GB LPDDR4x |
| ROM | 128 GB UFS 2.2 |
| Wi-Fi & Bluetooth | Wi-Fi 5 and Bluetooth 5.2 |
| Camera | 2 x 4-lane MIPI CSI D-PHY connector |
| USB | 1 x USB Type-C (USB 3.1 Gen1) 2 x USB Type-A (USB 3.0) 1 x USB Type-A (USB 2.0) |
| GPIO | 28 GPIO pins |
| Ethernet | 1000M |
| M.2 connector | M.2 Key M 2280 (2-lane PCIe 3.0) |
| Audio | 3.5mm headphone jack |
Preparations
-
Computer running Windows 10 and later, or Ubuntu 18 – Ubuntu 22
-
RUBIK Pi 3
-
USB Type-A to Type-C cable
-
USB Type-A to Micro USB cable
-
Power supply (12V 3A Type-C)
- Do not use a desktop or laptop computer to power your RUBIK Pi 3. This may cause damage to both the computer and the RUBIK Pi 3.
- Any external power supply used with the RUBIK Pi must comply with all applicable local laws and regulations.
- A 12 V DC power supply rated at ≥ 3 A is required. The power supply should feature overcurrent, overvoltage, and surge protection.
Download images
RUBIK Pi 3 comes with a pre-installed Linux image (not the latest version) for a quick out-of-the-box experience. If you need the latest version of the Linux image or other operating system images, please visit the RUBIK Pi 3 official website to download.
Visit GitHub to download the Linux source code as needed.
-
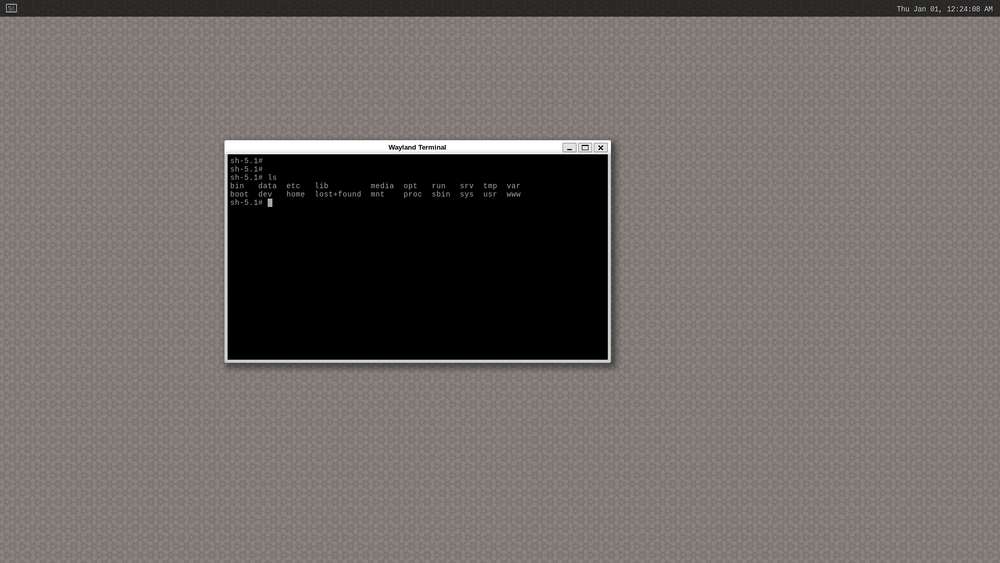
Qualcomm Linux is a simplified desktop system based on Weston. It is suitable for developers who have Linux development experience and seek an in-depth development experience.
-
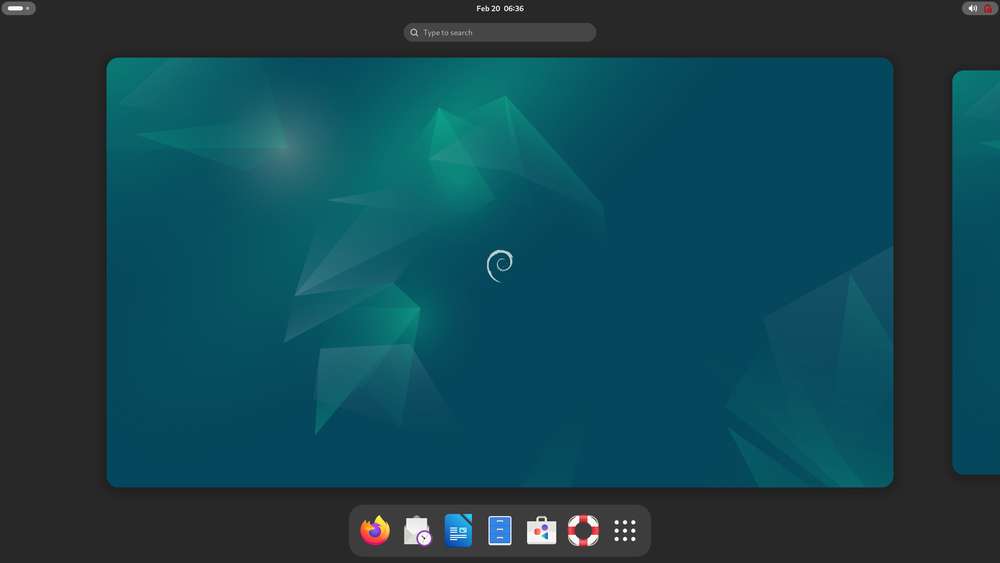
Debian 13: Based on GNOME 48, Debian 13 offers a complete set of system features, a rich software package library, more desktop applications, an enhanced user experience, and abundant development resources, making it ideal for developers who prioritize development convenience.
-
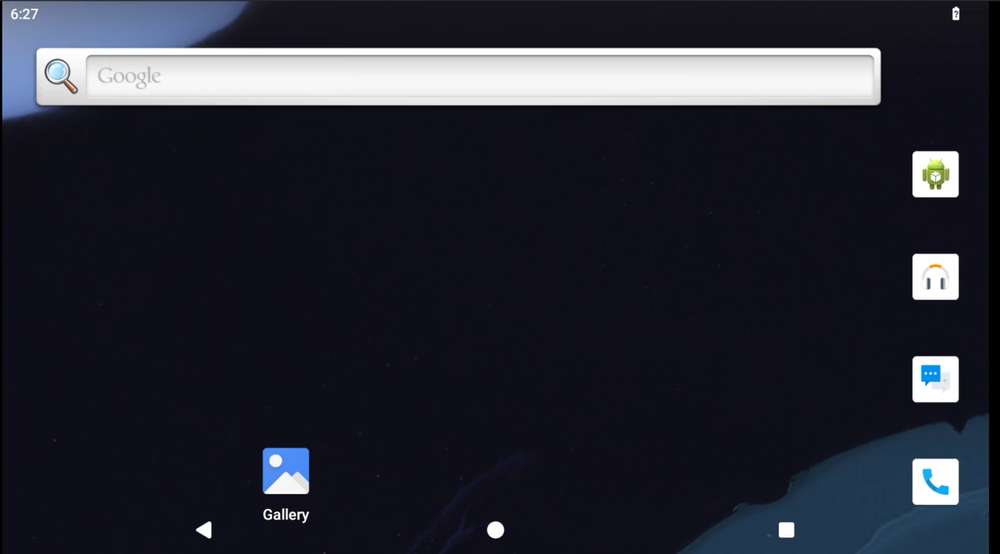
Android 13 is an enhanced system based on Google AOSP, offering an improved experience for developers working on Android applications.
Download QDL
Qualcomm Device Loader (QDL) is a flashing tool that allows you to flash images to RUBIK Pi 3.
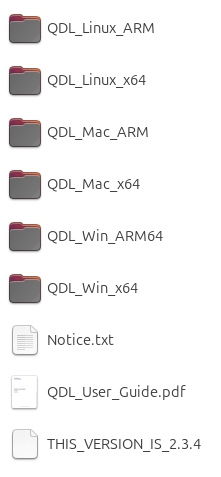
Click here to download QDL and decompress the package you download. The package contains the following files. QDL supports multiple platforms and architectures. For instructions on how to use QDL, refer to QDL_User_Guide.pdf.
Flash images
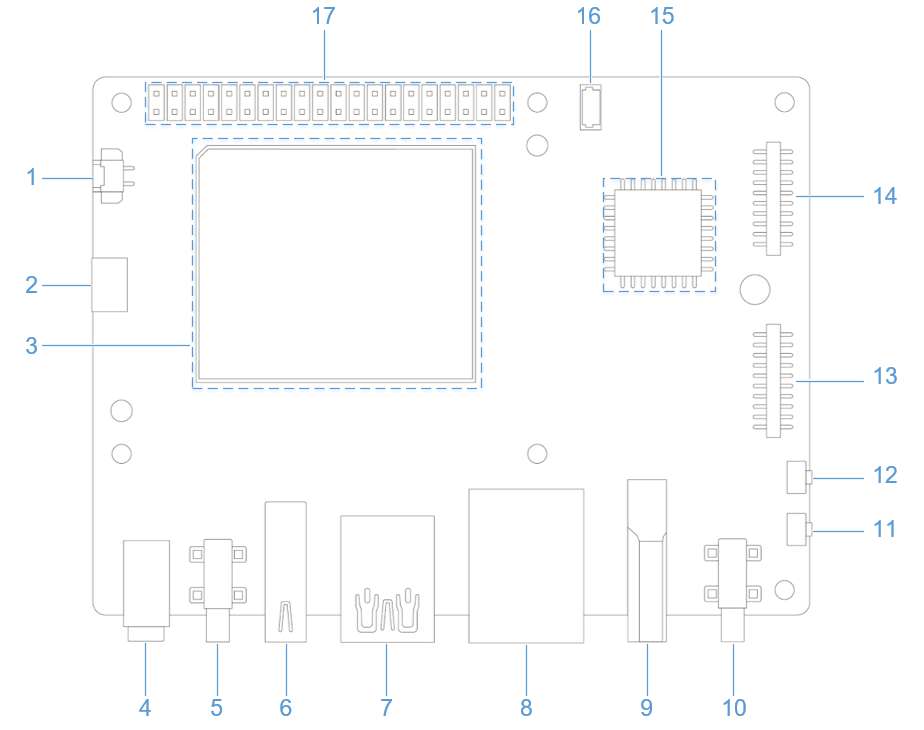
Before flashing images, enter flash mode (9008 mode) using one of the following methods:
Do not touch the PCB components and metal contacts with your bare hands.
Before operation, discharge static electricity using grounding equipment (e.g., anti-static workstation/wrist strap).
Do not place the circuit board directly on conductive surfaces (such as metal tables or ungrounded chassis).
Method 1:
-
Press and hold the [EDL] button (No. 12 in the figure above).
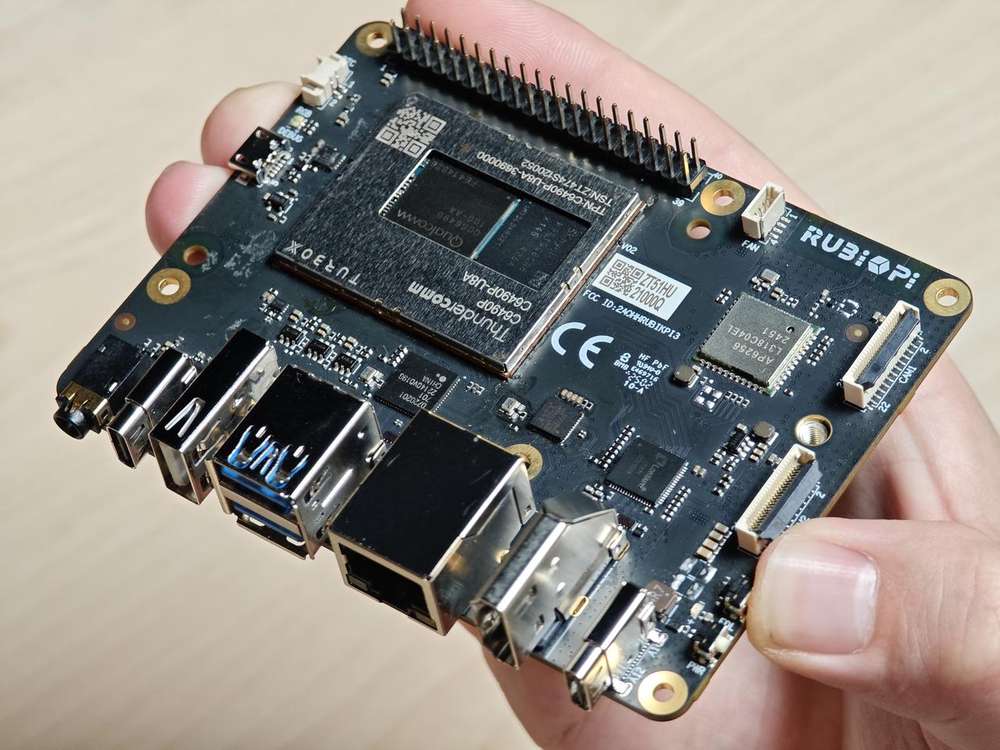
-
Connect the power supply into port 10, as shown in the figure below.
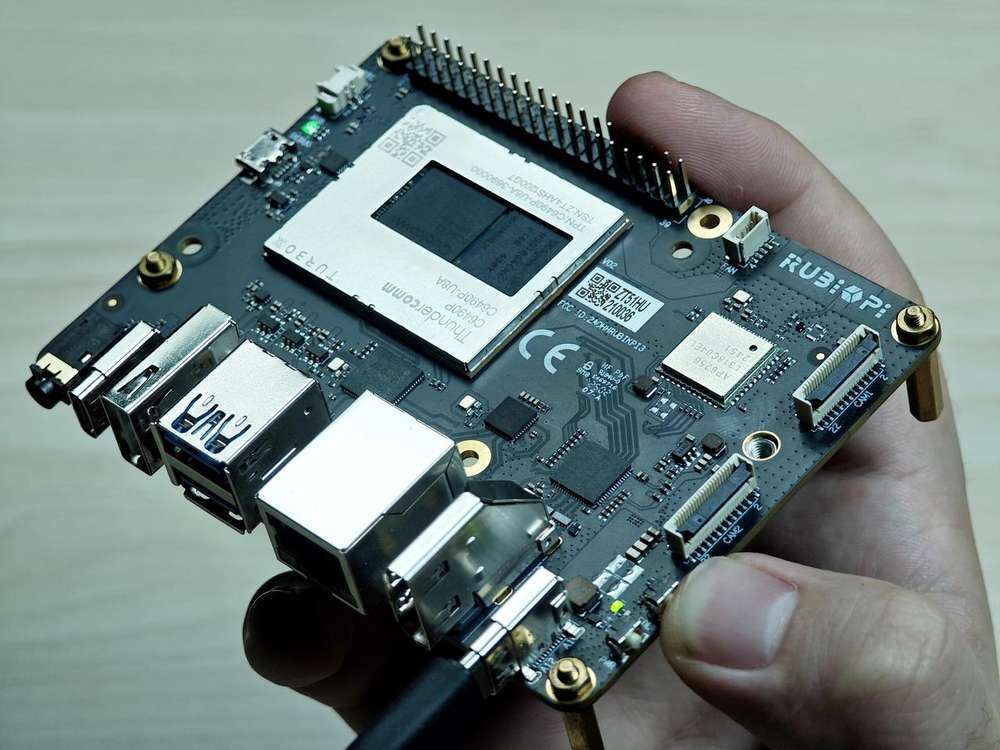
-
Insert the Type-C cable into port 5 and wait three seconds to enter 9008 mode.
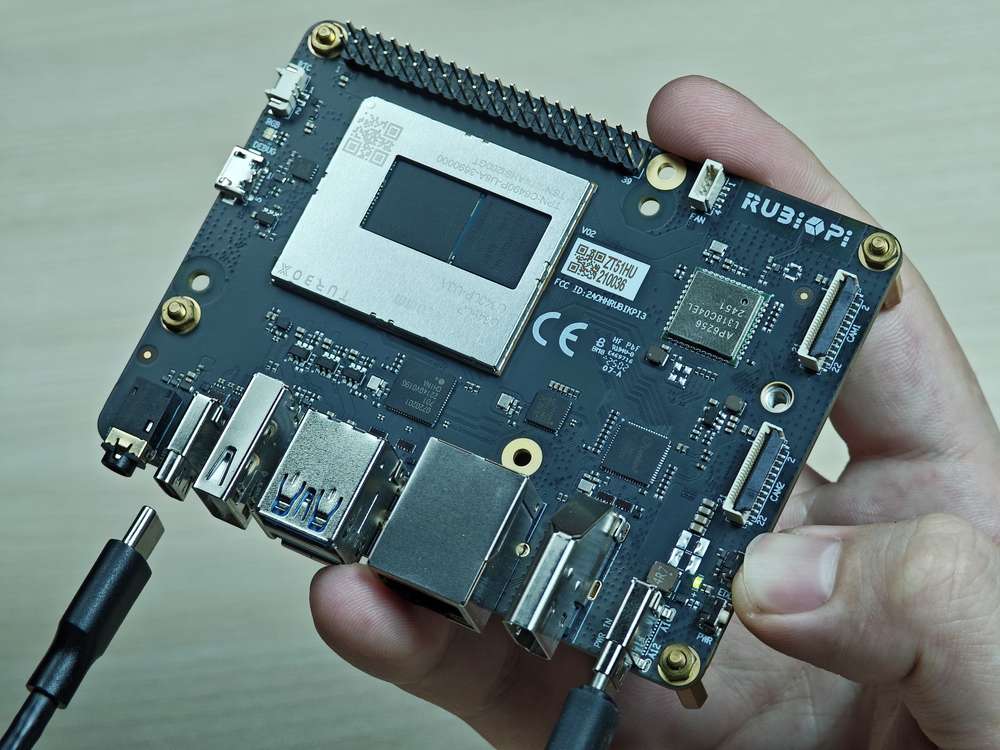
Method 2:
-
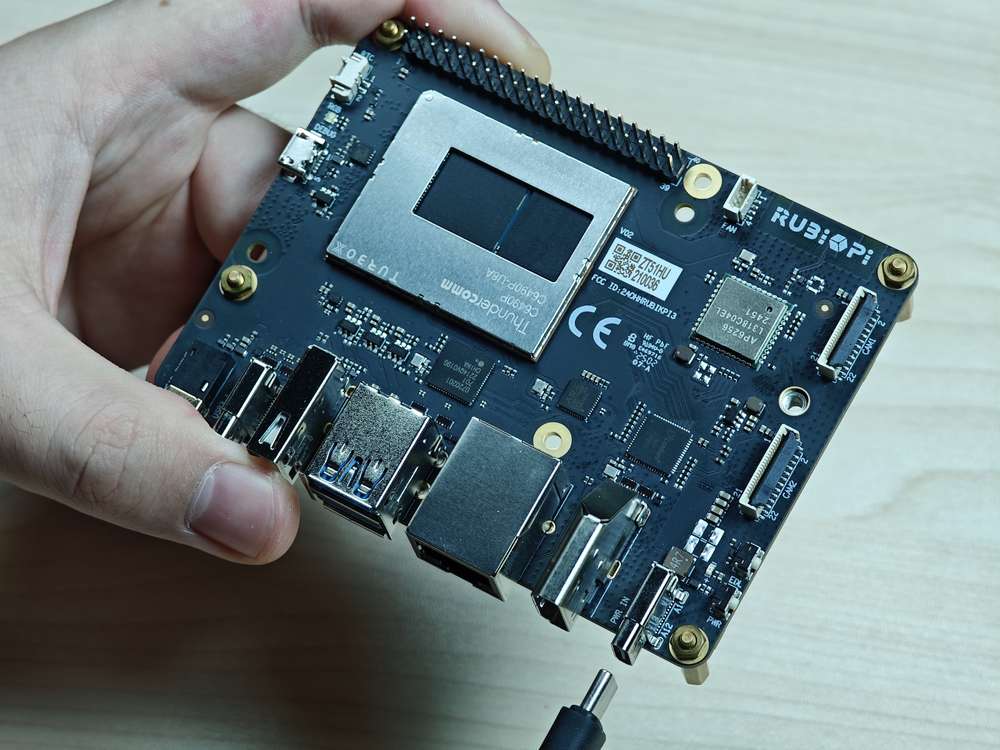
Connect the power supply into port 10.
-
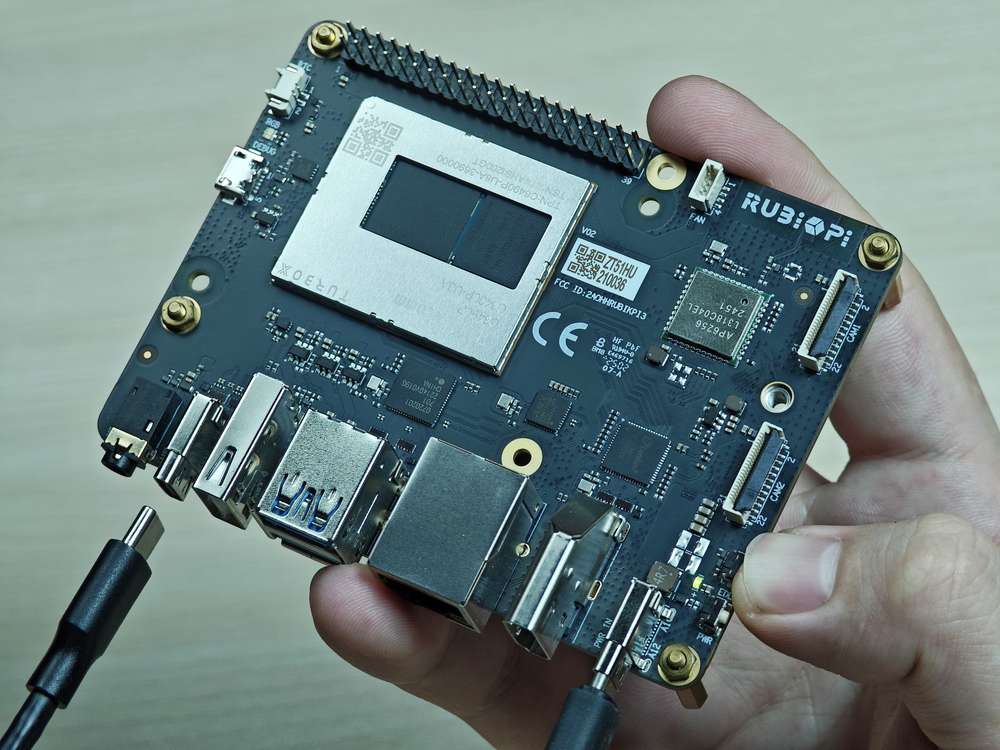
Insert the Type-C cable into port 5.
-
After RUBIK Pi 3 boots up, run the following command to enter 9008 mode.
adb shell reboot edl
Flash images on a Windows system
-
Install the WinUSB driver. (If you have installed it, skip this step.)
-
Uninstall other drivers for this device. Make sure that Qualcomm USB drivers and similar drivers are not installed.
- The device should not appear under the COM ports in Device Manager. If you see the device under the COM ports, follow the instructions to uninstall QUD.
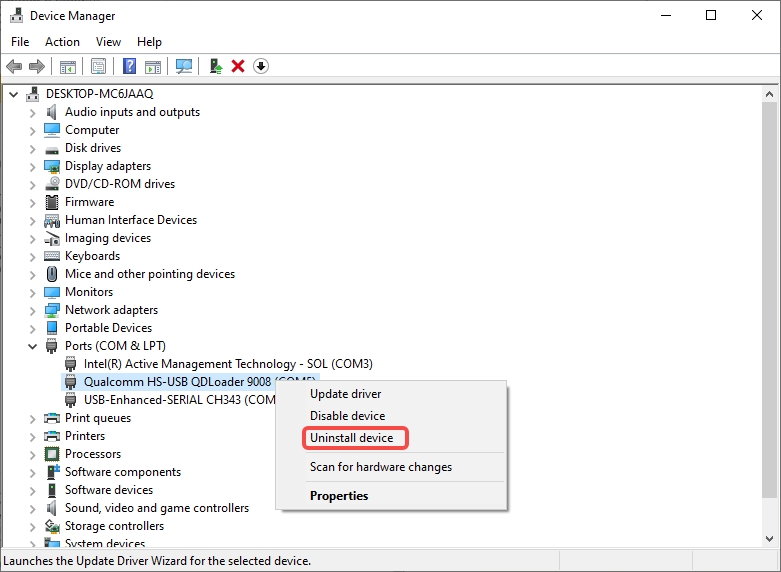
- Ensure that Delete the driver software for this device is checked.
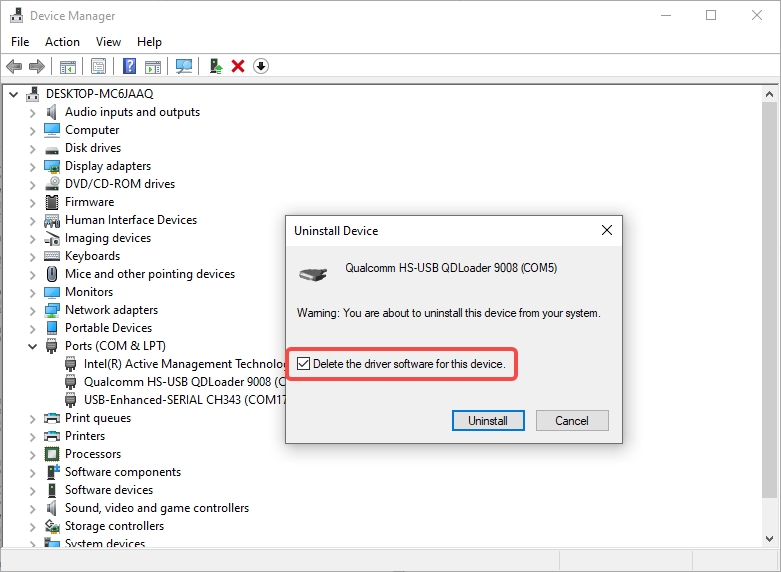
-
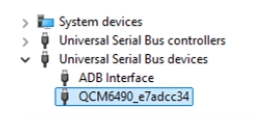
Power off the device and re-enter the flashing mode. Follow the instructions below to install Microsoft WinUSB.
- In Device Manager, right-click the USB port of RUBIK Pi 3 and select Update driver.
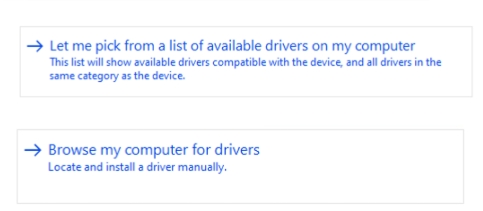
- In the pop-up window, choose the Browse my computer for driver software option.
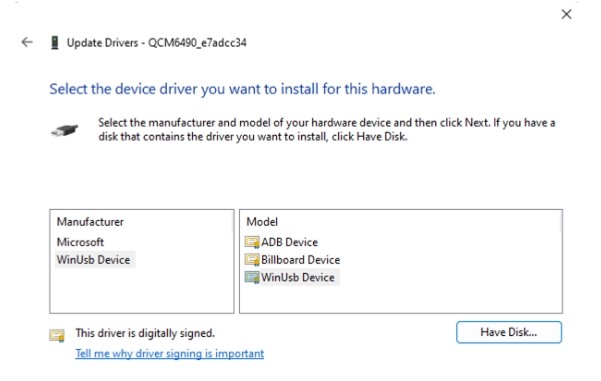
- Under USB devices, select WinUsb Device.
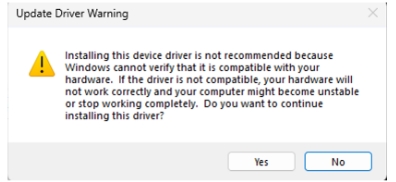
- Click Yes to update the driver.
-
-
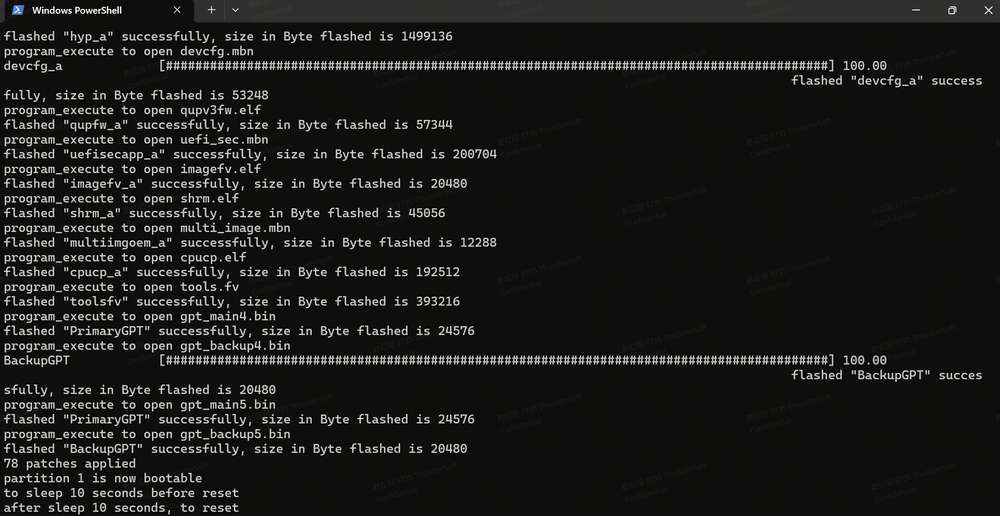
In the terminal, use the following command to run the QDL executable from either the QDL_Win_x64 or QDL_Win_ARM64 directory based on your host architecture to flash the image. Once the flashing process is complete, the device will automatically reboot.
The program file name does not support wildcards. Each image file must be listed in the command explicitly.
Replace
<pathToQDL>with the actual location of the QDL_Win_x64 or QDL_Win_ARM64 directory.
<pathToQDL>\QDL.exe prog_firehose_ddr.elf rawprogram0.xml rawprogram1.xml rawprogram2.xml rawprogram3.xml rawprogram4.xml rawprogram5.xml rawprogram6.xml patch0.xml patch1.xml patch2.xml patch3.xml patch4.xml patch5.xml patch6.xml
- If your RUBIK Pi 3 fails to boot up after flashing, enter the provision directory in the FlatBuild package and run the following command to try provisioning UFS.
After provisioning, some information stored in the UFS, such as the SN and Ethernet MAC address, may be lost.
Replace
<pathToQDL>with the actual location of the QDL_Win_ARM64 or QDL_Win_x64 directory.
<pathToQDL>\QDL.exe prog_firehose_ddr.elf provision_ufs_1_3.xml
After provisioning, remove and plug in the power supply and USB cable to restart your RUBIK Pi 3 and proceed with the image flashing again.
Flash images on an Ubuntu system
- Run the following command to install libusb, libxml2 (If you have installed them, skip this step.)
sudo apt-get install libxml2-dev libudev-dev libusb-1.0-0-dev
-
Go to the ufs directory of the FlatBuild package.
-
Copy the qdl file from the QDL_Linux_x64 or QDL_Linux_ARM directory to the ufs directory, depending on your host architecture.
-
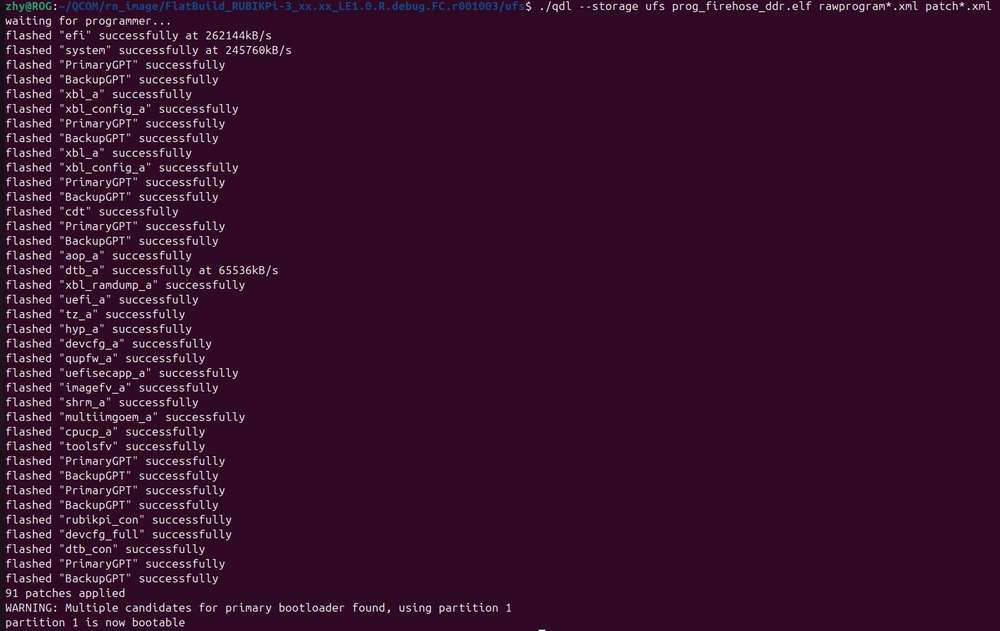
Run the following command to flash the image.
./qdl --storage ufs prog_firehose_ddr.elf rawprogram*.xml patch*.xml
- If your RUBIK Pi 3 fails to boot up after flashing, enter the provision directory in the FlatBuild package and run the following command to try provisioning UFS.
After provisioning, some information stored in the UFS, such as the SN and Ethernet MAC address, may be lost.
Before running the following command, copy the qdl file from the QDL_Linux_x64 or QDL_Linux_ARM directory to the provision directory, depending on your host architecture.
./qdl prog_firehose_ddr.elf provision_ufs_1_3.xml
After provisioning, remove and plug in the power supply and USB cable to restart your RUBIK Pi 3 and proceed with the image flashing again.
Flash images on a Mac system
- Run the following command to install Homebrew (if you have installed it, skip this step).
/bin/bash -c "$(curl -fsSL https://raw.githubusercontent.com/Homebrew/install/HEAD/install.sh)"
- Run the following commands to install libusb and libxml2.
brew install libusb
brew install libxml2
-
Go to the ufs directory of the FlatBuild package.
-
Copy the contents from the QDL_Mac_x64 or QDL_Mac_ARM directory to the ufs directory, depending on your host architecture.
-
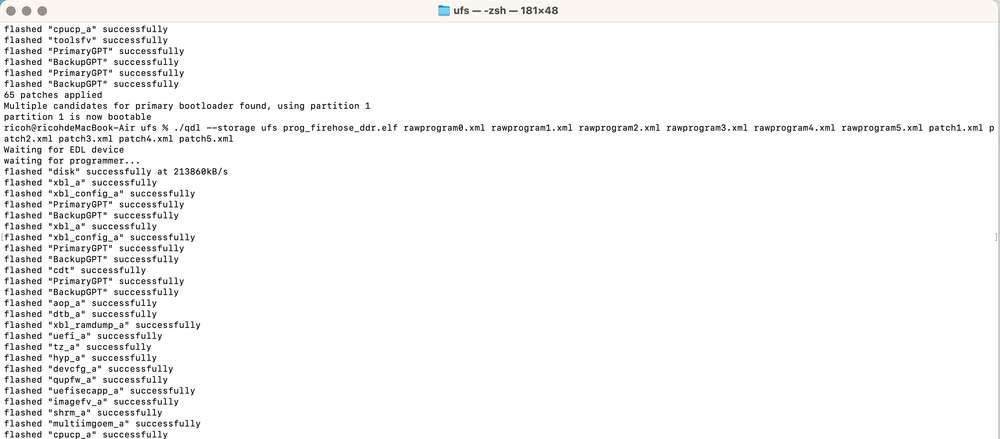
Run the following command to flash the image.
./qdl --storage ufs prog_firehose_ddr.elf rawprogram*.xml patch*.xml
- If your RUBIK Pi 3 fails to boot up after flashing, enter the provision directory in the FlatBuild package and run the following command to try provisioning UFS.
After provisioning, some information stored in the UFS, such as the SN and Ethernet MAC address, may be lost.
Before running the following command, copy the qdl file from the QDL_Linux_x64 or QDL_Linux_ARM directory to the provision directory, depending on your host architecture.
./qdl prog_firehose_ddr.elf provision_ufs_1_3.xml
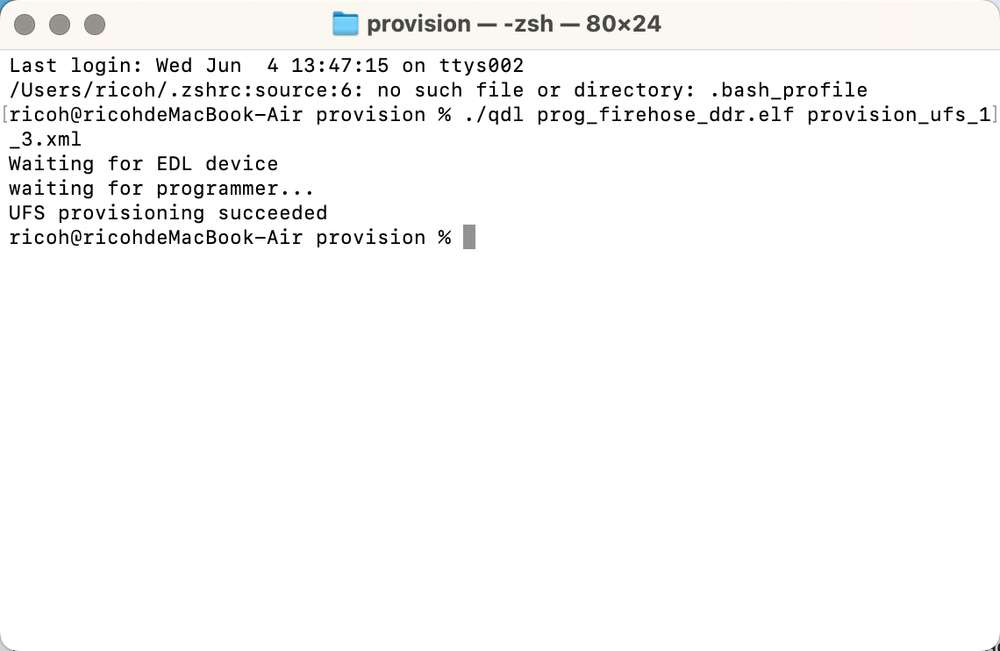
After provisioning, remove and plug in the power supply and USB cable to restart your RUBIK Pi 3 and proceed with the image flashing again.
Power-on
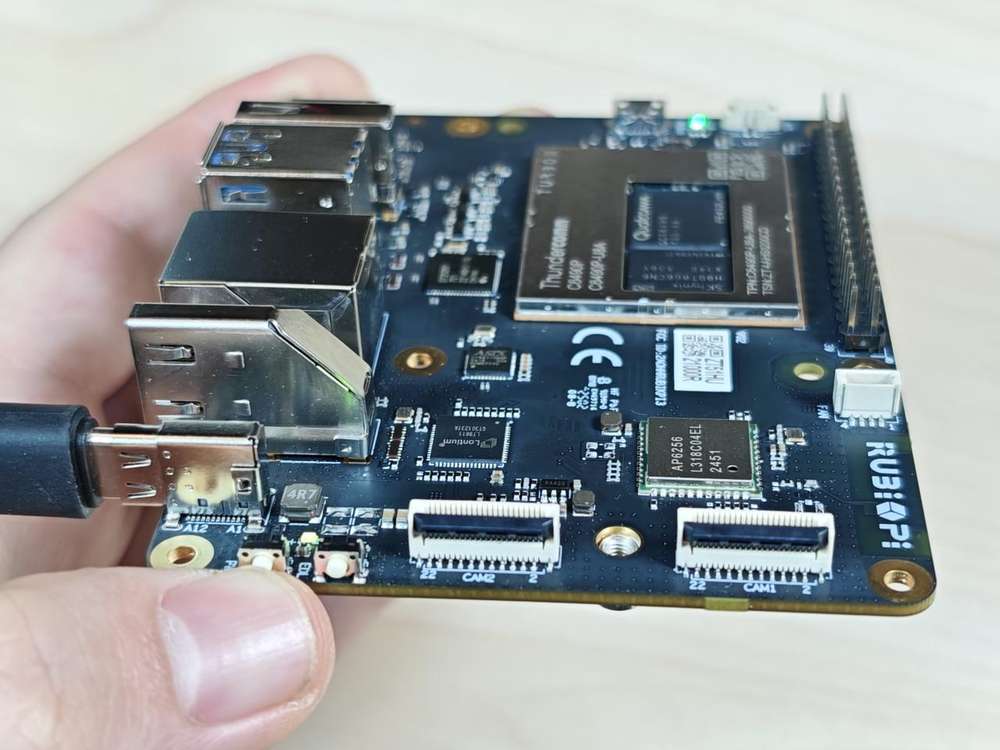
For older board versions, connect the power supply and press the [PWR] button to power on your RUBIK Pi 3. Board versions v02 and later support automatic power-on.
Login
Connect your RUBIK Pi 3 to a monitor via HDMI and power it on. Then, connect a mouse and keyboard. The initialization program will run during the first boot, as shown in the following figure.
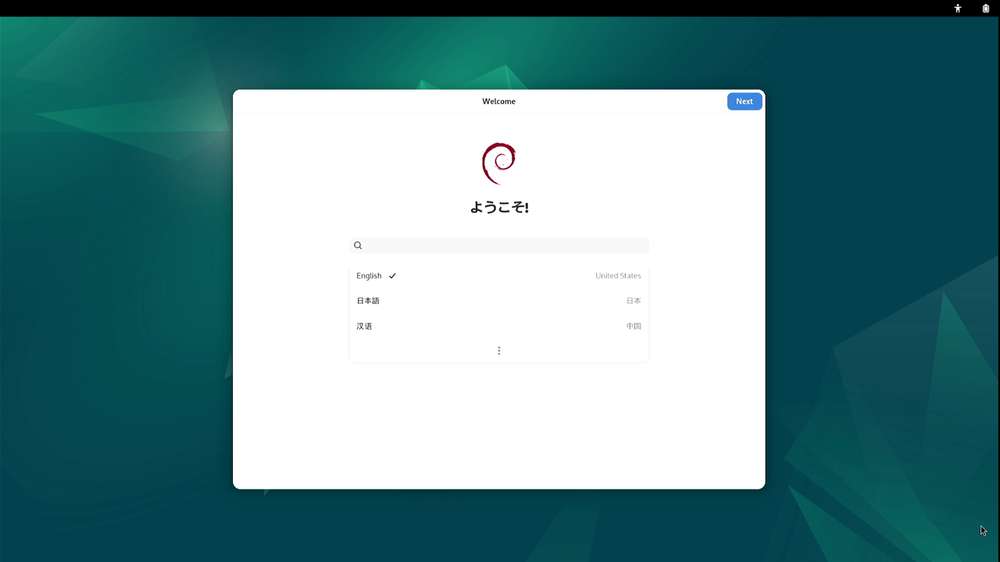
Set the language, time zone, and Wi-Fi, register an account, and log in to the GNOME desktop.
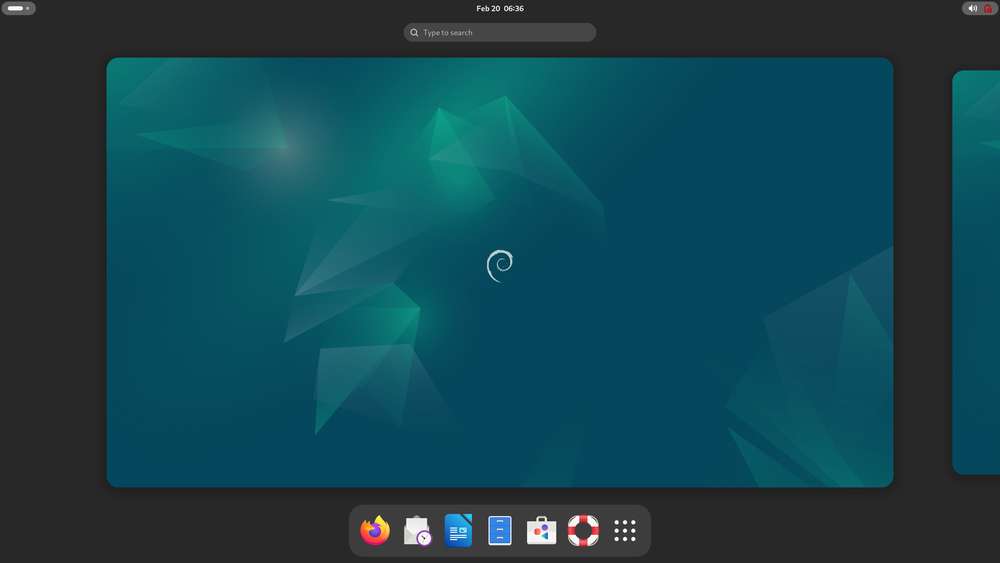
In the Debian 13 image, the root user is registered by default. You can also run the following commands to log in as the root user when not using the graphical user interface.
adb shell
su
Power-off
- Click the Power icon in the top-right corner of the desktop, then click Power Off to power off your RUBIK Pi 3.
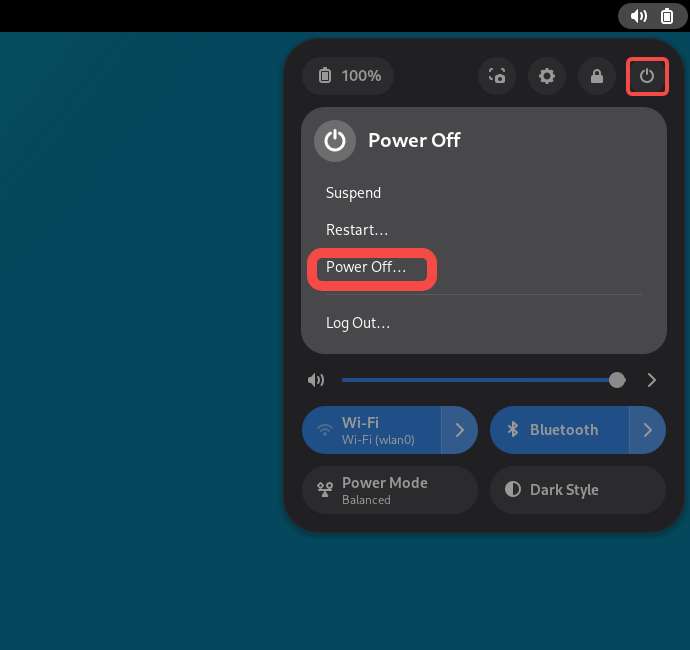
- Alternatively, run the
poweroffcommand in the terminal to power off your RUBIK Pi 3.
Reboot
Select one of the following methods to reboot your RUBIK Pi 3:
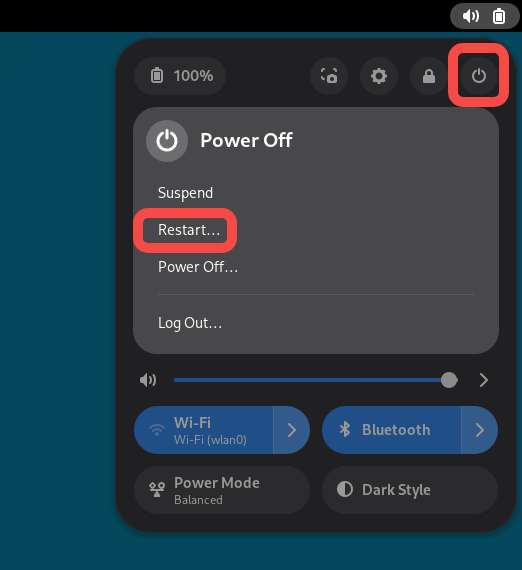
- Click the Power icon in the top-right corner of the desktop, then click Restart to restart your RUBIK Pi 3.
-
Run the
sudo rebootcommand in the terminal to reboot your RUBIK Pi 3. -
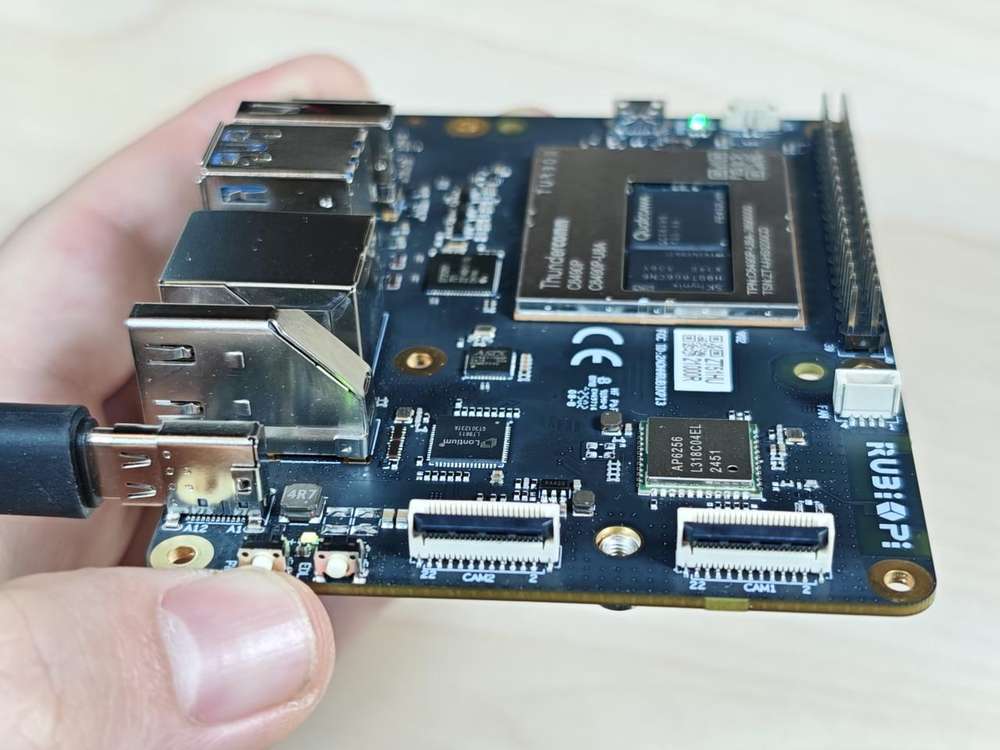
Press and hold the [PWR] button for 12 seconds to reboot your RUBIK Pi 3.
Serial port login
Windows
-
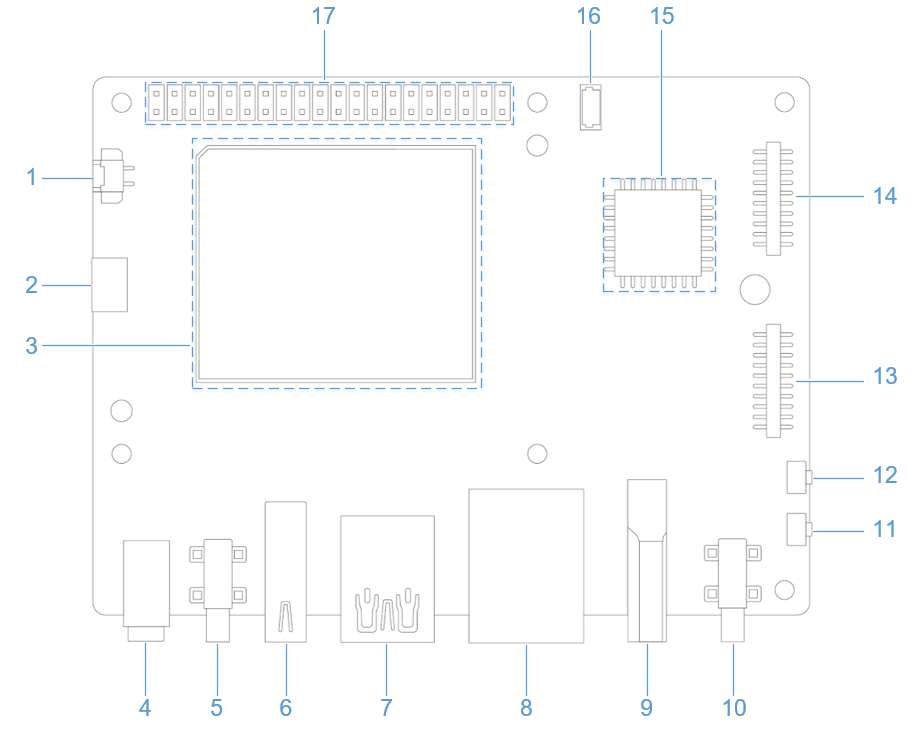
Connect port 2 in the following figure to a computer via a serial cable.
-
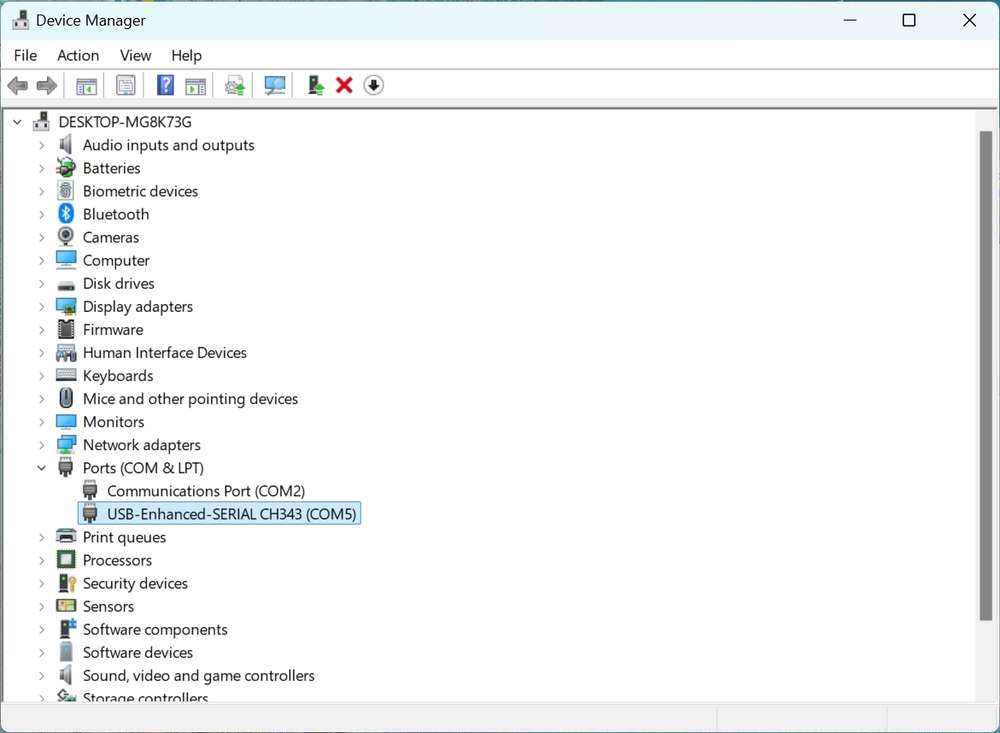
Open the computer settings page, check the corresponding COM port in Device Manager, and record the port.
-
Download MobaXterm at https://mobaxterm.mobatek.net/ and decompress it.

-
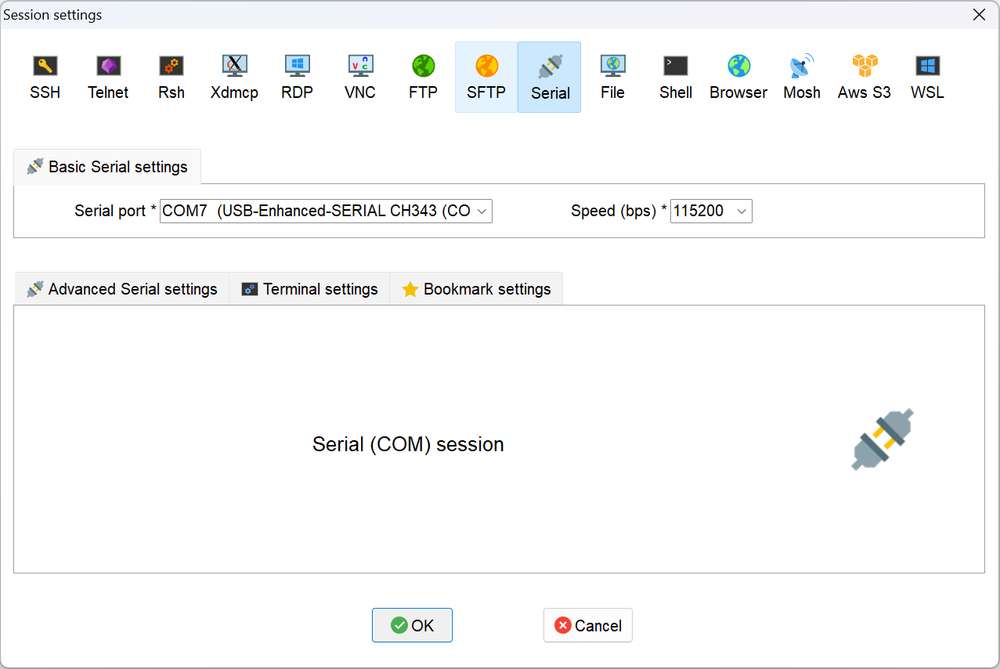
Open MobaXterm, select Session > Serial, and set the baud rate of the serial port to 115200.
-
Click OK and press Enter. Log in using the user name and password registered in login:

Login as the root user:
Account: root
Password: root
Ubuntu
-
Connect port 2 in the following figure to a computer via a serial cable.

-
Run the following commands to install minicom:
sudo apt update
sudo apt install minicom
-
Run the following command to check the USB port:
ls /dev/ttyACM*
-
Run the following command to open minicom. Press Enter. Log in using the user name and password registered in 1.5 Login:
sudo minicom -D /dev/ttyACM0 -b 115200
Login as the root user:
Account: root
Password: root
ADB login
Windows
Preparations
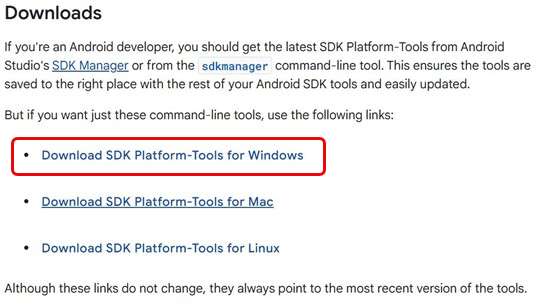
- Download the ADB and Fastboot installation package at https://developer.android.google.cn/tools/releases/platform-tools and decompress the package.
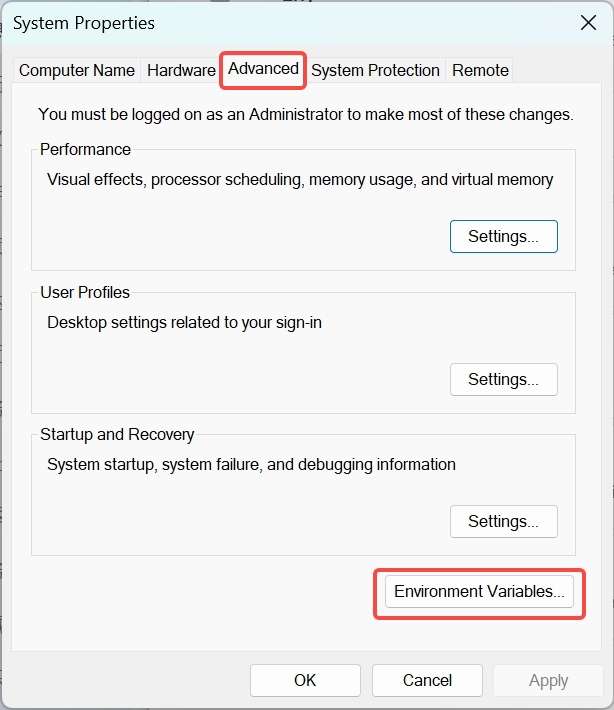
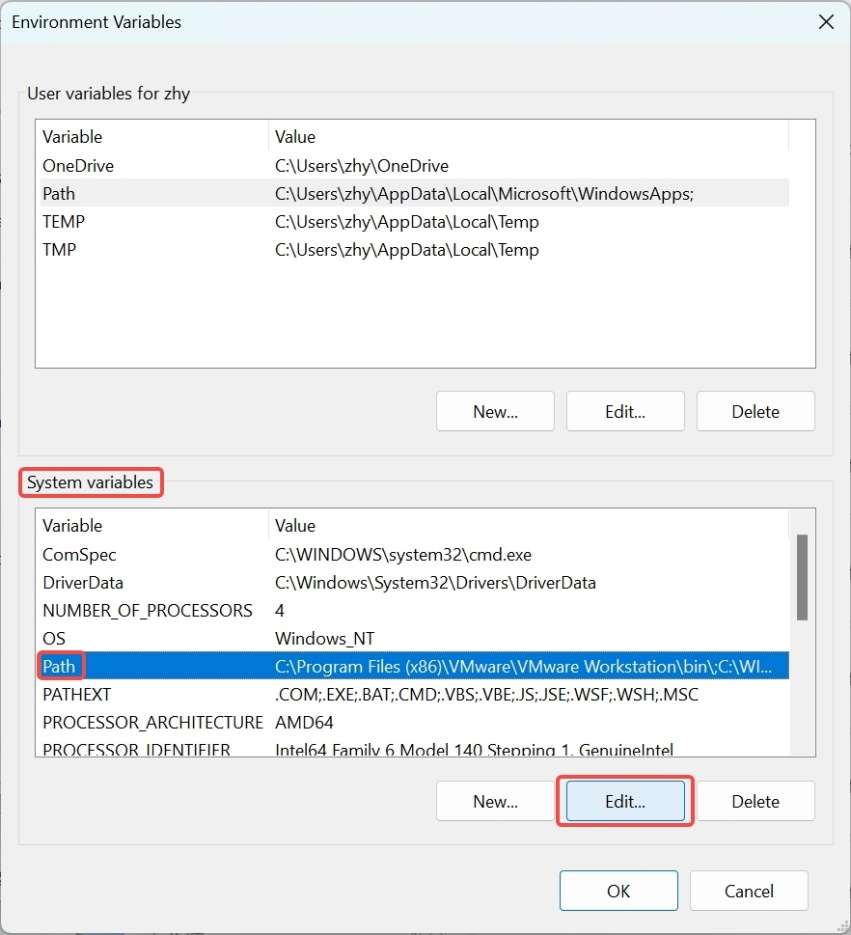
- Right-click This PC and choose Properties. Click Advanced and click Environment Variables. Alternatively, right-click This PC and choose Properties. In the search bar, type Advanced system settings and click Environment Variables.
- Under System variables, select Path and click Edit.
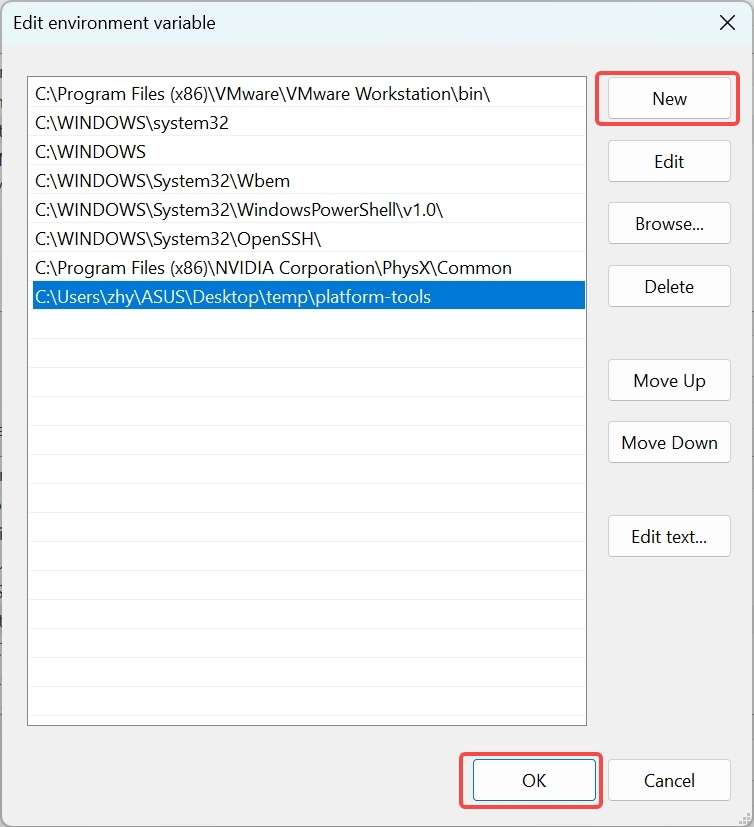
- Click New and type the path of decompressed platform-tools in Step 1. Click OK to save the environment variable.
ADB login��
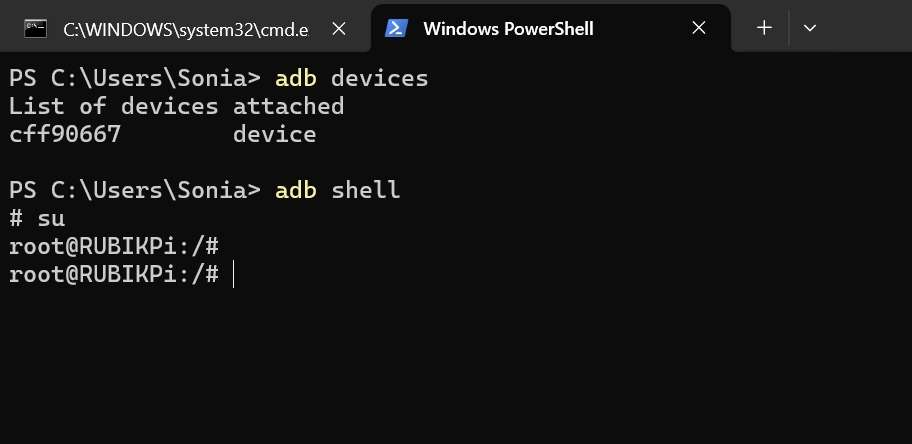
Press Win+R and type "cmd" to open the Windows terminal. Run the following commands to log in to your RUBIK Pi 3:
adb devices # Check if devices are connected
adb root    # Log in as root user
su          # Switch to the root user and enable command completion
Ubuntu
Preparations
-
Run the following command to install the ADB and Fastboot tools:
sudo apt install git android-tools-adb android-tools-fastboot wget -
Update the udev rules file.
-
Run the following command to open and modify the 51-qcom-usb.rules file.
sudo vi /etc/udev/rules.d/51-qcom-usb.rules -
Add the following content to the file. If the following content already exists, skip this step.
SUBSYSTEMS=="usb", ATTRS{idVendor}=="05c6", ATTRS{idProduct}=="9008", MODE="0666", GROUP="plugdev" -
Run the following command to restart
udev.sudo systemctl restart udev
noteIf your RUBIK Pi 3 is already connected to the PC via USB, unplug and replug the USB cable so that the updated rules can take effect.
-
ADB login
Run the following commands in the terminal to log in to your RUBIK Pi 3:
adb devices # Check if devices are connected
adb root    # Log in as root user
su          # Switch to the root user and enable command completion

SSH login
Windows
-
Obtain the IP address.
-
Log in to the backend of the router or use other IP scanning software to obtain the IP address of RUBIK Pi 3.
-
Log in to RUBIK Pi 3 via ADB and run the
ifconfigcommand to obtain the IP address.noteThe IP address may change depending on the network environment, and the device name of RUBIK Pi 3 is "rubikpi".
-
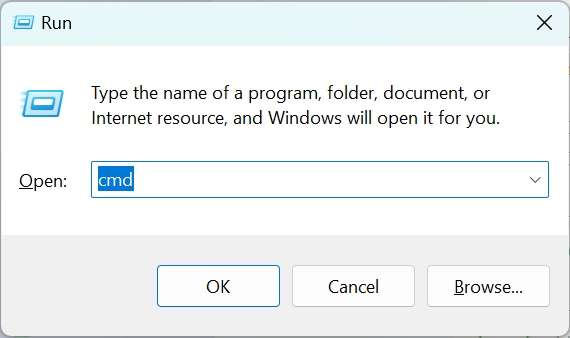
Press Win+R, type "cmd" in the pop-up window, and click OK.
-
Run the
ping <IP>command in the terminal. For example, the IP address of RUBIK Pi 3 is 10.9.5.59, run the following command and view the execution result.
ping 10.9.5.59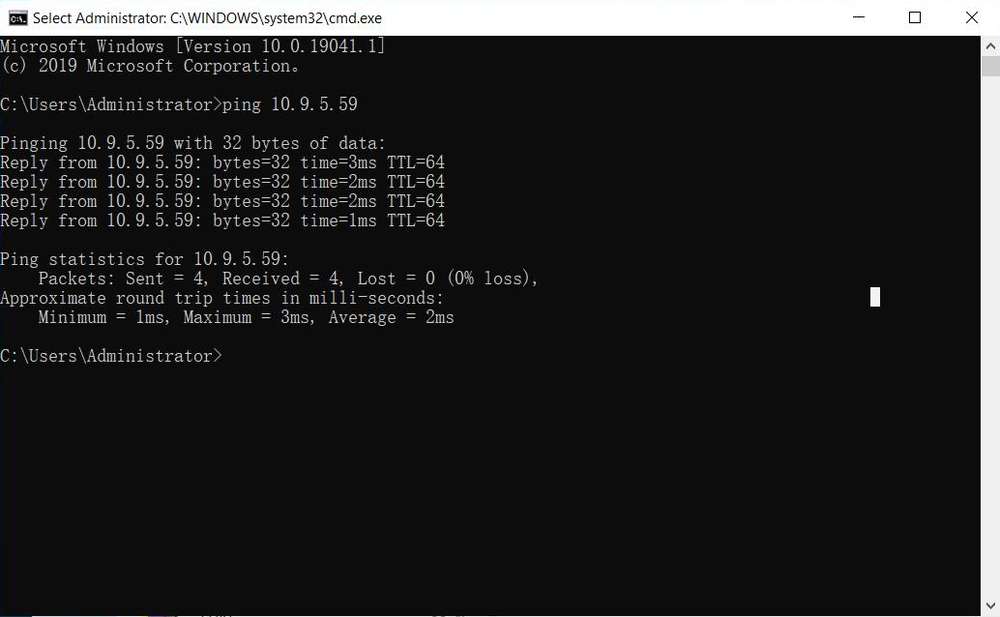
-
-
SSH login.
- Open MobaXterm.
- Click Session and select SSH in the pop-up window.
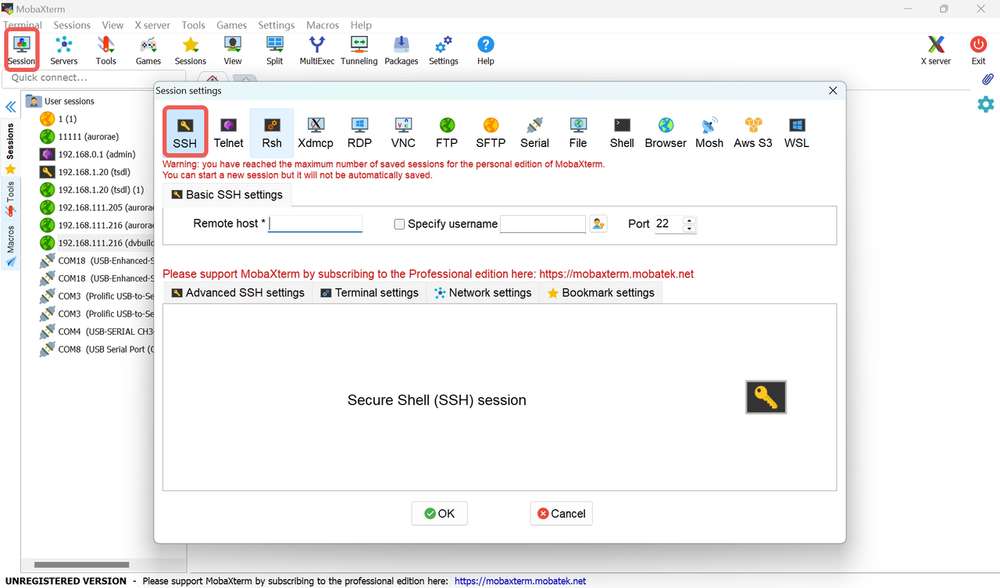
- Type the IP address of the RUBIK Pi 3 you want to log in to and click OK.
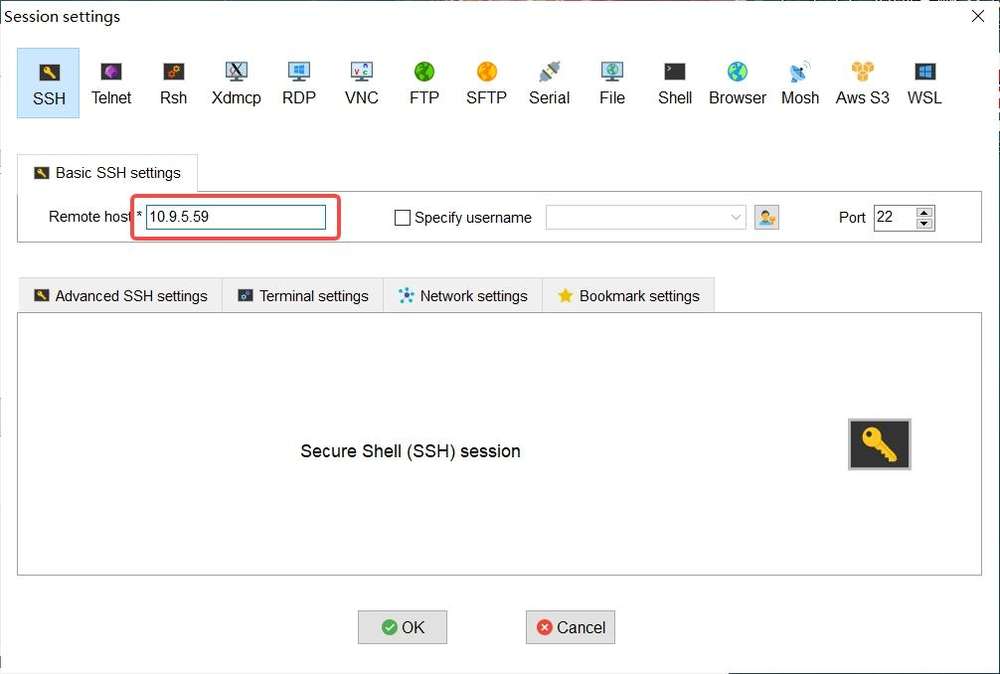
- Type the username, press Enter, type the password, and press Enter to log in to RUBIK Pi 3.
- The following information indicates that the login is successful.
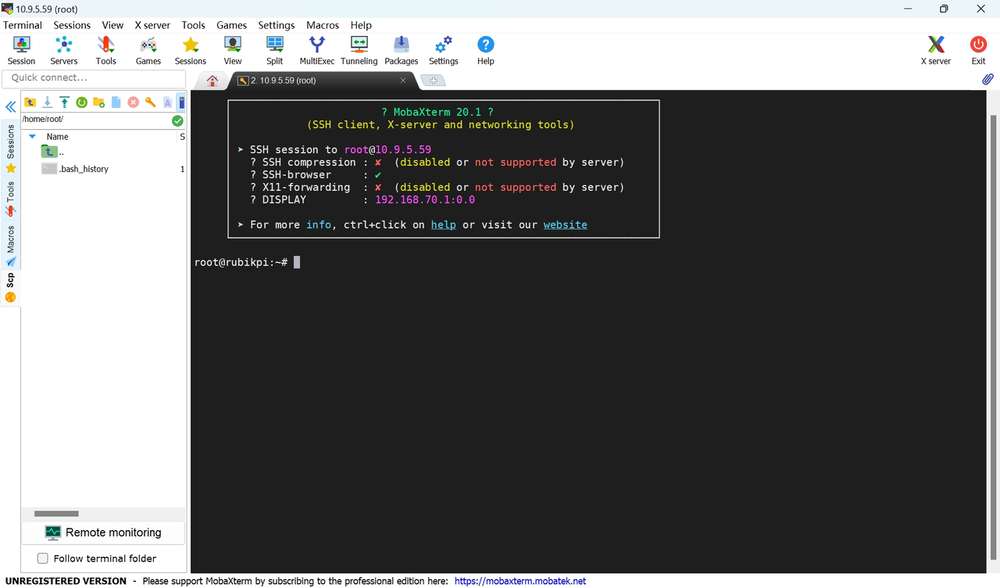
Ubuntu
-
Confirm the network connection.
-
Log in to the backend of the router or use other IP scanning software to obtain the IP address of RUBIK Pi 3.
noteThe IP address may change depending on the network environment, and the device name of RUBIK Pi 3 is "rubikpi".
Alternatively, log in to RUBIK Pi 3 via ADB and run the
ifconfigcommand to obtain the IP address. -
Run the
ping <IP>command in the Ubuntu terminal. For example, the IP address of RUBIK Pi 3 is 10.9.5.59, run the following command and view the execution result.ping 10.9.5.59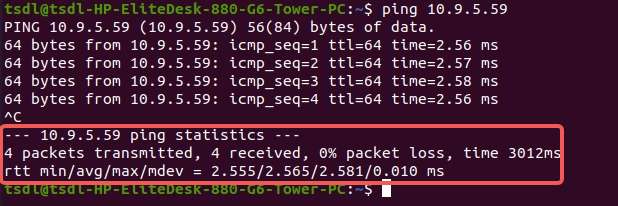
-
-
SSH login.
- Type the
ssh <user>@<IP>command in the Ubuntu terminal and press Enter, as shown in the following figure.rootindicates the role you want to log in as.10.9.5.59indicates the IP address of RUBIK Pi 3.
ssh root@10.9.5.59- Type the password and press Enter. The login succeeds.
- Type the
File transfer
ADB
-
In the PC terminal, run the following command to upload the test.txt file to the /opt directory:
adb push test.txt /opt -
In the PC terminal, run the following command to download the test.txt file to your current directory:
adb pull /opt/test.txt ./
SCP
To use Secure Copy Protocol (SCP) transfer, ensure your RUBIK Pi 3 is connected to the network. For example, if the IP address of RUBIK Pi 3 is 10.9.5.59, run the following commands:
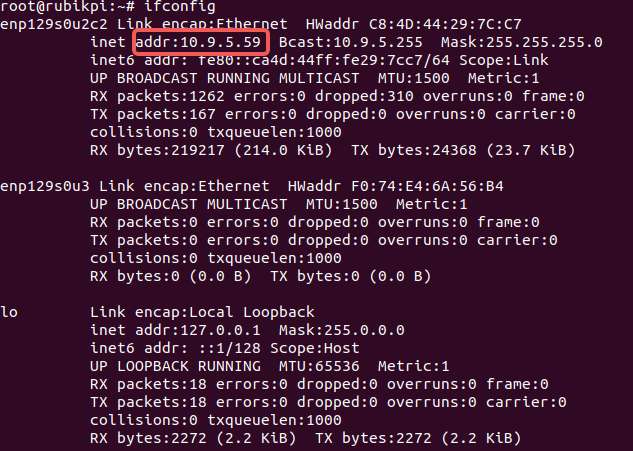
Run the
ifconfigcommand on RUBIK Pi 3 to obtain its IP address.
-
In the PC terminal, run the following command to upload the test.txt file to the /opt directory:
scp test.txt root@10.9.5.59:/opt -
In the PC terminal, run the following command to download the test.txt file to your current directory:
scp root@10.9.5.59:/opt/test.txt ./
Linux kernel
The Debian V1.0.0 image does not include the Linux kernel source code. The source code will be provided in a future stable release.